You might be interested in this post if you are trying to get your laptop or desktop on a WPA-PSK security enabled wireless network. This should be a lot easier in Linux than it is, but we've come up with the what we hope is the easiest possible solution for you here. If you've been searching for the answer in the forums and found nothing but a headache, you've come to the right place. We're shooting to have the wireless setup in EONS be pain free, so stay tuned for our first release.
This procedure was developed using Xubuntu 7.04 (Feisty Fawn), but should work equally well with any Ubuntu derivative (6.10 Edgy or later). Also, always be careful when editing your system configuration files, or following any procedures from any site, as you can do harm to your system if a mistake is made. Always make backups of the configuration files that you change, or you might just find yourself with a broken system that's a pain to fix. Also, please be aware that in this post, you will be entering the pre-shared key for your wireless network in an unencrypted file. This could potentially reveal your password to someone who gains access to your computer.
Finding the Active Wireless Network InterfaceFirst off, we're going to find the name of the wireless network interface. If you already know this, just skip to the next paragraph. Launch an x terminal
(Applications > Accessories > Terminal). If the terminal crashes, please see our post "
XFCE Terminal Crash Fix". Once you are in the terminal type
sudo cat /etc/network/interfaces and hit
Enter. Type your password (of course) and hit
Enter again. In the output that comes up in the terminal, you will see several entries that say something like
auto eth0, where
eth0 is the name of the interface. The trick is that you have to check each one of these in turn until you find your wireless card (I haven't found a good way to scan the active interfaces yet without writing a program or a script). Typically, wired Ethernet connections usually have interface names starting with
eth, with the first wired connection being
eth0, but this doesn't have to be the case. The computer that I'm writing this post on has its wireless card showing up as
eth1. WiFi connections can be listed as
wifi, and I've noticed Atheros wireless chipsets show up starting at
ath0. Write down all of the interface names so that you can step thorough them with the next command. Once you have the interface names, type
iwconfig eth0 and hit
Enter (be sure to replace
eth0 with the name of the interface that you're currently checking). Do this for each of the interfaces until you get one that responds. For the interfaces that aren't active wireless connections, you will get a line of text that is something like
eth0 no wireless extensions. That's a good thing though because it tells you to move on to the next interface name. Once you have found the active wireless interface, move on to the next section.
Check for wpa supplicantWe want to check to make sure that
wpa supplicant is installed. This is the program that does the WPA negotiation with your wireless network. If you haven't already, open an X terminal and type
sudo apt-get install wpasupplicant and hit
Enter. If you get output saying that
wpasupplicant is already the newest version, you're good to go. Otherwise, follow the prompts to get it installed.
Create the Configuration FileIn the terminal window type
sudo mousepad /etc/wpa_supplicant.conf and hit
Enter. Please note here that you could replace
mousepad with any editor (like vim) that you would rather use. There's a really good chance that the editor window will come up empty since this file doesn't seem to exist by default on Xubuntu 6.10 and higher. When the file opens type the following in the window:
network={
ssid="YOUR NETWORK SSID HERE"
psk="YOUR KEY HERE"
key_mgmt=WPA-PSK
proto=WPA
}You will insert your own network ssid and psk instead of the text I have put in.
One gotcha here is that if you have specified the key to be ascii in your wireless router/access point, you have to enclose the key in quotation marks, and if you specified the key in hexadecimal, you will leave the quotation marks off. There are other settings that you can add to this file too, but I like to keep things simple, and this configuration seems to work great. Now, save the file and exit.
Make the Change PersistentNext, type
sudo mousepad /etc/network/interfaces and hit
Enter. Once that window opens, find the heading for your wireless interface, and type
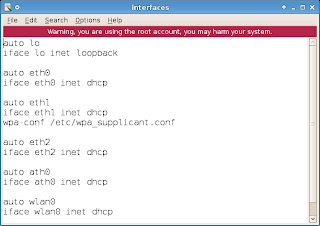
wpa-conf /etc/wpa_supplicant.conf below it. If there is anything about WEP security below there and you're not using WEP on your wireless network, just replace it with the line above. See
Figure 1 to see what my file looks like once I've made the change. Note that eth1 is the interface that my wireless card is on.
 Figure 1
Once you have typed the line, save and close the file.
Restart the Network
The last thing to do is to put your changes into effect by restarting the network on your computer. In the terminal window type sudo ifdown eth1 and hit Enter, and then type sudo ifup eth1 and hit Enter, making sure to replace eth1 with the name of your interface. Your wireless network card should now be on the secured network and if you're network equipment is set up right, you should be able to surf the Web. This change will also make it so that the wireless network will automatically connect when you restart the computer too.
Enjoy!
If you have any questions or comments about this procedure, please attach them to this post. Even if its only to say that you used it and it worked fine for you, we appreciate your feedback.


