Search Tillamook Rage
Google Custom Search

3.22.2008

Dialup modems in Linux

There are still a lot of people needing to use dialup Internet connections. In spite of the belief of many industry people, who generally have plenty of money and live in highly populated areas, the majority of people in the world still use dialup. Many modems that have been made are Winmodems, modems made to run in Windows specifically, all software run. Hardware modems are higher quality modems and are run through, you guessed it, the hardware. Where does that leave Linux users? I recently ran into a problem helping connect an EONS PC to dialup.

You'll first need to know what chipset your modem is using. There will be a chip on the modem that gives the name (Lucent, Agere, Intel, Conexant, Rockwell, etc.).

Agere - I recommend staying away from Agere, they're hard to get working and their AMR modems aren't supported.
Conexant - Conexant has an excellent support site for Linux, Linuxant. They have excellent how-tos and downloads and it would waste space to reproduce that here.
Intel - Always good at supporting their hardware, has extensive modem driver support, here.
Rockwell - See Conexant.
US Robotics - See Conexant.
Lucent - Lucent is hard to find drivers for. Some are below in the general repository, here is an alpha release for LT Windmodems though.

Here's a good general repository, but parts aren't in English, so be prepared if you don't have French/Spanish experience.

Linmodems.org has good information, though some links are fairly worthless now. If you need information on how to detect and setup your modem I would look here, no need for me to reproduce their work here.

Hopefully this will get you up and going with a modem in Linux, if you have more information I missed please comment.

Working With Drives And Files In Puppy Linux

You might be interested in this post if you're working with Puppy Linux and you need to access any drives outside of the one that Puppy is running on. These might include CD, USB, and hard drives, among others.

This procedure was developed using Puppy Linux 3.01 Seamonkey which is available at www.puppylinux.org . It will probably work with other versions or Puplets of Puppy, but that's the one I used, so it's the only one I can guarantee. If you have luck using other versions of Puppy please let us know in the comments. As always, I must warn you to be careful when following this procedure, or any procedure form any site as a mistake can be fatal to your system. Please see our disclaimer for the full details.

For this example, I have a single file called FreeNX_Client_1_5.pup that I'll copy from a USB drive to the my-documents directory. The procedure will be the same if you are copying the file from a CD or other type of drive too.

Mount The Drive
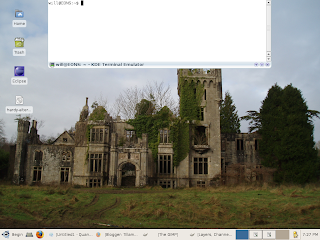
In Figure 1 you see the Puppy Linux desktop. Your desktop may vary slightly, but you get the idea.

Start off by opening the directory that you want to copy the file to (if you are copying the file). You'll see why I have you open it later on. I wanted to copy the file to the my-documents folder, so I clicked on the home icon (Figure 1) on the desktop and then clicked on the my-documents folder icon in the window that came up.

Figure 1

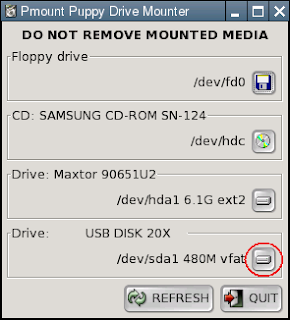
Now click on the drives icon on the desktop to open the Puppy drive mounter tool Pmount. You'll notice in Figure 2 that I have 4 drives listed. There's the floppy drive, the CD-ROM drive, the main hard drive, and my USB flash drive that is labeled as USB DISK 20X. Your listing will vary depending on what drives you have in your computer.

Figure 2

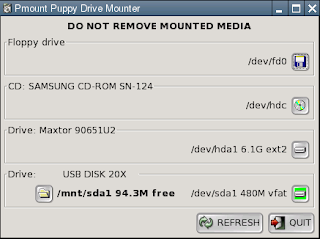
I know that the file that I want is on my USB flash drive, so I click on the mount button (that I've flagged out with the red oval) in Figure 2 to mount the drive. It works the same way for other types of drives too. Once Pmount is done mounting the drive, you will see a new button that has a folder image on it (Figure 3). Clicking on that button will open a window containing the contents of the drive.

Figure 3

Make sure that you don't remove the drive or disk from the computer until you have clicked on the mount button shown in Figure 2 again. Removing a flash drive while it's still mounted can result in data loss.

Work With The Files
Once you have the drive mounted and the folder is open, you can start to work with the files and folders it contains. You can see in Figure 4 that the FreeNX_Client_1_5.pup file that I want to copy is in the root directory of the drive. There's a little bit of a trick here with Puppy. The folder list on a mounted drive is not always updated consistently. Sometimes when you remount a drive that you've had mounted in Puppy before, old files that aren't there anymore will show up. To fix this, click the Rescan directory contents button that I have flagged out with the red oval in Figure 4. After clicking the rescan button I was all set.

Figure 4

I right clicked on the file which gave me the menu in Figure 5.

Figure 5

I wanted to copy the file to my hard drive, so I clicked on the Copy... menu item. You can also click on any of the other options including Rename... and Delete. Clicking Copy... brought up the Copy dialog box in Figure 6. You'll notice that I've drawn a red oval around the file icon (in my file's case it's a bone) in Figure 6.

Figure 6

You can drag this icon (bone) to any folder that you want to copy the file to. This is where the my-documents directory window that I had you open earlier comes in. Drag the icon over to that window and Puppy will copy the file for you.

Now that you have copied the file over, you can do whatever you need to it. In my case, I wanted to install the FreeNX client application, so I just clicked on the file I just copied, which opened the DotPup window in Figure 7.

Figure 7

I clicked the Unzip button which decompressed the installer application and then gave me the dialog in Figure 8.

Figure 8

I clicked the Run button to run the installer, and then clicked No on the next dialog that asked me if I wanted to delete my original DotPup file. You could choose Yes here if you want to get rid of the DotPup file that you installed from. The Puppy installer usually opens up the folder(s) that any files were installed to, so that should help you figure out where things went during the installation.

That's pretty much it. I went the route of showing you how to copy a file since it's the most involved process, but it shows you the basics of how to deal with all of the common file operations. I hope this helps. Please leave comments on this post so that we know if it's helpful or not.

Enjoy!

3.21.2008

Linux FOSS Dreamweaver Alternatives

I've recently started working on doing some initial website template designs for work. Back in the day (6 or 7 years ago) I taught a class on Dreamweaver, and loved it. I have since moved to doing all my work in Linux, and no longer have a copy of Dreamweaver. After some shopping I found two alternatives to review. I was surprised I only managed to find two projects with active development. I required the projects I reviewed to have active development and not be abandonware. NVU and Komposer, an NVU fork, were both apparently good, but there hasn't been much done with them in quite a while. So here they are: Quanta Plus 3.5.6 and Bluefish 1.0.7.

Quanta Plus

Quanta Plus 3.5.6 is licensed under GPL v2. It's very easy to use if you're used to any WYSIWYG editors. It has a nice tabbed layout for various visuals such as font formats, tables, lists, buttons, forms, images, and tags. Along the bottom of the window you can switch between open pages. It's simplistic and easier to use, but also a little less powerful than the Bluefish or Dreamweaver. If you want to make basic pages, Quanta Plus could be a good replacement for you.

Quanta Plus will work in KDE or XFCE distributions. It can be installed through your package manager, package name "quanta," or from their website.

Quanta Plus Website

Bluefish

Bluefish is a little smoother than Quanta Plus and has more powerful features in easier to access locales. For example, you have a tabbed layout like Quanta Plus for formatting features, but in addition there are editing tools for C, Apache, DHTML, DocBook, HTML, PHP, PHP+HTML, and SQL in drop down menus under the formatting tabs. As with Quanta Plus it has tabs along the bottom of the editing window to switch between open pages.

Bluefish is built with GTK+, and therefore will work in Gnome or XFCE distributions. It is licensed under the GPL. Bluefish can be installed through your package manager, package name "bluefish", or from their website.

Bluefish Website

Conclusion

In conclusion, I found the features of Bluefish to be much more extensive. Surprisingly, this didn't make it any more difficult to navigate and use thanks to a well designed menu and tab system. If you're designing very simple pages, just text and graphics, then either would work for you equally well. What window manager you use may be the deciding factor. If you use XFCE either will work, but if you have a KDE distribution (Knoppix, Kubuntu, Mandriva, some Debian) then you're limited, for the most part, to Quanta Plus. If you use Gnome (Ubuntu, some Debian, Red Hat) you're limited to Bluefish. I recommend trying both if you can, you just might find the next best thing to Adobe Dreamweaver.

3.17.2008

Make the Terminal speedy with Yakuake

Call me lazy, but why move the mouse to open a terminal. A purist would say a REAL operating system is entirely console based. I'm no purist, I like an OS to be usable by the majority of people. In Linux the terminal is an essential tool, great for doing any and all work. Well, with Yakuake and a bit of editing you can have a hideable terminal that you can access with a single button - Quake style.

Anyone who has played the original Quake game knows it had access to a terminal within it. That was the basis for Yakuake. Yakuake is a KDE application, so it works in KDE or XFCE systems. Below is a picture of what it looks like when it's up and running.

Simply open a terminal and type

sudo apt-get install yakuake

It will need to install several other packages, depending on your window manager. Once you're finished you can make it autostart by either copying the yakuake.desktop to the autostart directory or going to Settings > Autostarted Applications. To manually copy the file open a terminal window and type

sudo cp /usr/share/applications/kde/yakuake.desktop /etc/xdg/autostart

Now you can tweak the settings of Yakuake to choose where on the screen you want it to be, what size it should be, and what key will trigger the terminal to appear. It's very easy to customize, so play with it a bit to find the best settings for you.

The default button to open Yakuake is F12. Once open the settings are stored in the directory accessed through the arrow in the lower right corner of the Yakuake.

Hope you enjoy, and now your terminal will react as fast as you think, even without a mouse.

3.07.2008

The 3,000 Mark

Well, we broke 3,000 visitors sometime yesterday. We would like to thank you all, and hope you're finding plenty of help. I thought we might have 1,000 hits the first year. Keep on asking good questions, and we'll keep trying to find solutions to your Linux and tech woes!

3.02.2008

High tech "dumpster diving"

The guiding star behind the development of EONS, and many of our projects, is reuse and keeping electronics in use as long as possible. My job, the one that actually pays the bills, is as an eScrap Management Consultant, so managing electronics is my speciality. Electronics are especially toxic, containing 9 deadly elements. So I'll give everyone a crash course in how to increase the longevity of your electronics, and how you can help.

1) Don't throw away your electronics. Landfills are the worst possible location, once allowed to be put in the ground the toxins leach out and into the ground and water. Your local Solid Waste Management District or recycling district will know who to take it to if they don't take it themselves. You can usually find the closest district through your state's Department of Environmental Management.

2) College move-out days are a great time to get good stuff from dumpsters, especially at large colleges. Many students who live a long ways away, and a lot of international students, will throw almost new things out at the end of the year because it's cheaper/easier than hauling it home, and then back to school again. In fact, the computer I do the EONS builds on was from a dumpster, it just needed a new power supply and voila! I had a 2.8 GHz P4, 512mb DDR, 60GB hard drive, and all the bells and whistles I could want in a free computer.

3) Take care of what you have. Don't leave things turned on when they don't need to be, especially if there are moving parts. As an added bonus you will save money on your energy bills.

4) Keep good airflow to your electronics. Don't sit them on carpet, this allows them to pull in more dust and cuts down air flow. Almost all electronics are air cooled, and when they accumulate dust or have less air flow they can't dissipate the heat as well. This wears things out even faster. Keep fans in good shape as well, when you hear extra bearing noise from a fan you should take it out and add some oil to the bearings. Use a source of dry compressed air to blow out computers every few months to keep down dust, compressed air cans are a waste of resources. Make sure the source doesn't have a lot of moisture in the lines or you might turn on you computer only to hear a snap-crackle-pop.

5) Look for ways to reuse items when you upgrade. Find someone who can still use whatever the item is. Local nonprofits may be able to help. If you're in Northern Indiana and need help, you can contact us and we might be able to help you out.

6) Volunteer for local groups doing work with electronics recycling and/or reuse, we always need the help. I even reward my volunteers with points that they can use to redeem for electronics and parts they might need or want.

7) Find reuse parts and do repairs of items you would like. You can look in dumpsters, go to school auctions, or go to recycling centers to find some good parts. They're usually very cheap and you can find some great deals to keep things in use.

8) Buy recertified electronics, recycled content items, and reuse items. They help fund recycling and keep commodities in the production cycle, rather than landfills.

With all that said and done, you can purchase recertified and reuse items from us to help fund our research, education, and recycling programs. Our eBay store is here, or email us (eonsproject at gmail.com) if you are looking for computer parts or specific Mac or PC items, I can get a shipping quote for any item with a zip code.

So do the right thing, recycle and increase your electronics' longevity.