
This procedure was developed using Puppy Linux 3.01 Seamonkey which is available at the Puppy Linux website. It may also work with other versions of Puppy, but 3.01 is the only one that I've tried so far. The one version that we know this won't work with is Puppy 4.0. You can install FreeNX manually and it will function properly, but the .pup installers won't run correctly. We'll update this post as soon as we get a chance to correct the problem.
We are currently looking for hosting for the files in this post (the installers referenced below are stuck on YouSendIt for now), so if you have an interest in hosting these files for us please let us know. We would appreciate the help.
As always, please be careful when following procedures from this site, or any other, as a mistake can leave you with a broken system. See our disclaimer for full details.
Getting Started
Boot off of the Puppy Linux CD, choose your keyboard layout, and hit Enter to select Xorg on the Puppy Video Wizard screen. You can try Xvesa later if Xorg gives you problems. The next screen allows you to choose your video settings. The default will probably work fine, but you should press the Right Arrow key once to select TEST and hit Enter. You will probably see another screen asking you to verify that you have a PS/2 mouse (if you have one), and you can hit Enter to select TEXT_X_NOW. If the video test completes successfully, you're all set. To exit the test screen, press the CTRL, ALT, and BACKSPACE keys at once. Once the test completes, you'll be back at the video settings screen, and so you can just hit Enter to select FINISHED. There will be one final screen asking you if you are done. Hit Enter to select DONE. If you have video problems with Puppy at any time during this process, you can reboot from the CD and try different settings on these screens. Be careful not to get to crazy with the video settings though. If the configuration screen tells you that your monitor does not support certain settings, you might want to avoid them. Some settings can damage your CRT monitor or LCD screen. You should be able to look up the model number of you video card and monitor to find their maximum resolution and refresh rate if in doubt.
Once you get to the desktop, start the Puppy installer (Menu > Setup > Puppy universal installer). Note that following my instructions will wipe all data from the client computer's hard drive, so make sure you either back up the data and/or do a frugal install if there's data you don't want to lose.
Once the installer comes up you just follow the instructions to install Puppy. If you need an example, you can follow along with what I did below.
My Example
Since my client had a regular IDE hard drive in my test computer, I selected IDE (ATA) internal hard drive from the list of media to install to and clicked OK. The next dialog that came up was just telling me what drive Puppy was going to be installed to so I clicked OK again. The next dialog just showed me what Puppy found out about the drive I was installing to, so I clicked the button beside Install Puppy to hda1: since there was only one drive in my client. Once you click that button you will see another dialog asking you if it's ok to go ahead with the installation on the selected drive. I just clicked the OK button here too. The next dialog box asks you whether you want to do a Frugal or Full installation. I chose Full so that the installation would use the entire hard drive. At this point if you've done a Puppy install on the hard drive before, a dialog will come up asking you whether you want to UPGRADE or WIPE the installation. I chose WIPE (since I had another failed installation on the drive).
Once the installation is finished, you will see a dialog box asking how you want Puppy to boot up. I had the choice of booting from a USB stick or installing GRUB on the hard drive. I wanted everything to be enclosed on the client's hard drive so I chose Install GRUB. The next dialog tells you that the 'grubconfig' script is ready to run - click the OK button. The next dialog asks you if you want to do a simple or expert GRUB install. I'm a simple person so that's what I selected, and then hit the OK button. I clicked the OK button on the next 4 dialogs which is what I suggest you do unless you have a reason to do otherwise. One of the things you might want to change is where GRUB will install to. I usually go with either the Root or MBR option since they are the cleanest in my opinion. Eventually, you will see the GRUB INSTALL SUCCESS message, and you can just click OK. After that you will see a dialog asking you if you want to reinstall GRUB. If GRUB didn't fail you can just hit No to exit the installation.
Now you're ready to shut down and restart the computer. To shut down, go to (Menu > Shutdown > Power-off computer). Make sure that you take the Puppy CD out of the drive and select DO NOT SAVE on the screen that comes up as puppy is shutting down. That screen is just asking you if you want to save the settings from your current session. You don't need to do that.
The first thing that you will see when you reboot is the GRUB menu. Just hit the Enter key to boot the default option. When Puppy is starting up for the first time, you will be asked again to select your keyboard layout, "X server", and video settings. Follow the instructions above to see what to do.
Changing the GRUB Boot Delay
Once Puppy is booted up, go to the Puppy desktop and click the home icon which should bring up a window showing the files in your home directory (Figure 1). Hit the up arrow (boxed in red in Figure 1) until you see boot as one of the directories in the window. Click on the boot folder icon, then on grub, and then on menu.lst. The menu.lst file will open in Geany and you will be able to edit it. Be very careful to double and triple check what you do from here on out since we'll be editing configuration files that can cause your installation to malfunction.

Figure 1
Once menu.lst is open, find the line#timeout 30
and remove the # and change the 30 to a smaller value like 5. What this does is set the amount of time that the GRUB boot loader will wait before booting Puppy. With the # (comment symbol) in front of the line it will wait forever for the user to hit the Enter key. That's not acceptable behavior when you're setting up lab computers for people. Double check what you've done against Figure 2. Now click the Save button and close Geany.

You only need to read this section if you have a wireless card in your fat client that you're going to use to connect to the server. For my test setup I was using a CNet CWP-854 wireless card with the RT 2561 chipset. Fortunately for me, Puppy recognizes this card right out of the box, so I didn't have to do anything except configure it. You'll find that Puppy recognizes a wide range of wireless cards, and I noticed that version 3.01 did a better job than previous versions of Puppy Linux.
First, we need to launch the Network Wizard (Menu > Setup > Network Wizard). When the Puppy Network Wizard dialog window comes up, click the button for your wireless card. It will probably say something like wlan0. See Figure 3 to get an idea of what you'll be looking at.
 Figure 3
XAuth Installation
If you are running older versions of Puppy (i.e. 2.x), you will need to install xauth before you can get FreeNX running. If you're running a version of Puppy with xauth already installed (Puppy 3.x or greater), skip to the next section. You can download the DotPup installer that we've made here instead of downloading the version in the next section and it will take care of the xauth installation for you. XAuth will install in the /usr/X11R6/bin directory where the FreeNX client binary will be able to find it. If you're not sure if your version of Puppy has xauth installed, you can manually check the /usr/X11R6/bin directory or you can open a console (terminal) and type

Figure 2
Setting Up Your Wireless Card In PuppyYou only need to read this section if you have a wireless card in your fat client that you're going to use to connect to the server. For my test setup I was using a CNet CWP-854 wireless card with the RT 2561 chipset. Fortunately for me, Puppy recognizes this card right out of the box, so I didn't have to do anything except configure it. You'll find that Puppy recognizes a wide range of wireless cards, and I noticed that version 3.01 did a better job than previous versions of Puppy Linux.
First, we need to launch the Network Wizard (Menu > Setup > Network Wizard). When the Puppy Network Wizard dialog window comes up, click the button for your wireless card. It will probably say something like wlan0. See Figure 3 to get an idea of what you'll be looking at.
 Figure 3
Once you click the wireless card's button, the Configure network interface wlan0 dialog box will come up. Keep in mind that wlan0 will be replaced with the name Puppy gives your wireless interface. Just substitute your card's name for wlan0 from here on out. On the configuration dialog, click the Wireless button (Figure 4).
 Figure 4
Clicking on the Wireless button will open a new dialog window asking you to enter your wireless network information (Figure 5). You will need to get this information from your network administrator. Click the button matching the type of network you have - Open, WEP, WPA/TKIP, or WPA2 and enter the appropriate settings. There are too many variations for me to give any detailed instructions here. If you have troubles, post a comment with your question(s) and we'll do our best to help you out.
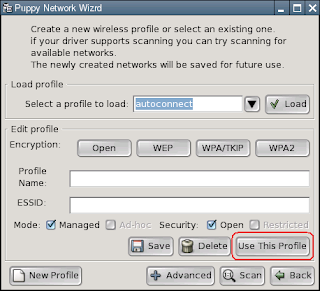 Figure 5
 Figure 4
 Figure 5
Once you have entered your wireless network information, make sure you've entered a profile name of your choosing into the Profile Name: text box and click the Use This Profile button (Figure 5).
After you click the Use This Profile button, you will be returned to the Configure network interface wlan0 dialog box. If your client is on a network with a DHCP server (i.e. you're not using static IP addresses for each of your clients), then you should click the Auto DHCP button to start the wireless card off using the network's DHCP server (Figure 6). If you followed the instructions in Part 1 of this series to the letter, your LTSP/FreeNX server will be the DHCP server.
 Figure 6
I'm assuming here that the rest of your wireless network is up and running properly, otherwise your client won't be able to see anything - including the DHCP server. Once you've clicked the Auto DHCP button, you will have to wait just a little bit and then you should see a dialog box saying NETWORK CONFIGURATION OF wlan0 SUCESSFUL! (Figure 7) which will present you with the option to save the configuration for the next boot. I would suggest clicking Yes here so that your wireless card will start working automagically the next time you boot up.
 Figure 7
 Figure 6
 Figure 7
You can now click the Done button on the network configuration dialog. Now you can move on to start working on the FreeNX integration.
XAuth Installation
If you are running older versions of Puppy (i.e. 2.x), you will need to install xauth before you can get FreeNX running. If you're running a version of Puppy with xauth already installed (Puppy 3.x or greater), skip to the next section. You can download the DotPup installer that we've made here instead of downloading the version in the next section and it will take care of the xauth installation for you. XAuth will install in the /usr/X11R6/bin directory where the FreeNX client binary will be able to find it. If you're not sure if your version of Puppy has xauth installed, you can manually check the /usr/X11R6/bin directory or you can open a console (terminal) and type
find / -iname xauthand hit Enter to have your computer do the searching for you. If you see xauth show up in any X11Rx directory, where x is the version number (probably 6 or 7), then you should be fine.
FreeNX Installation
Now you're ready to download and install the FreeNX DotPup file that we here at Tillamook Rage have created for you. Go here, and click the DOWNLOAD NOW button for the FreeNX_Client_1_5.pup file. If your client is not on the Internet, you will have to burn the FreeNX client installation file to a CD, or put it on a flash drive to move it over. We have created a post called Working With Drives And Files in Puppy Linux which walks you through dealing with copying the installer file to and from external drives and also installing the FreeNX DotPup.
Once you've gone through the post mentioned above, a window should open showing you the /usr/NX directory where the FreeNX client files are stored. If that window doesn't open, you can click on the home icon on your desktop and hit the up arrow that is boxed in red in Figure 1 until you see a usr directory. Click on it, click on the NX directory, click on the bin directory, and then run the FreeNX client by clicking on the nxclient binary file.
Configuring the FreeNX Client
Now we're going to set the FreeNX Client up to connect to the server. If you haven't run the FreeNX Client yet, go ahead and click on the nxclient executable file that's in the /usr/NX/bin directory to launch the application. You will see the Welcome dialog box (Figure 8) - go ahead and click Next.
 Figure 8
Now you will see the Session dialog (Figure 9) that allows you to select a name for your session, along with the session settings. You can pick any name for the session (I used TestName), but I would suggest keeping it relatively short.
 Figure 9
In the text box beside Host, type the IP address of the LTSP server that you set up from Part 1. I used 192.168.0.1 as you can see in Figure 9. The slider towards the bottom sets how much network bandwidth is available to your client. It may take some experimentation to get this setting right for your network conditions. Wireless networks may need special tweaking to get them set just right. If you have several computers on your wireless or dialup connections and you start running out of bandwidth, try moving this slider closer to Modem to see if that fixes the problem.
Click Next and you will end up at the Desktop settings dialog (Figure 10). Pull down the list box that has KDE in it and select Custom.
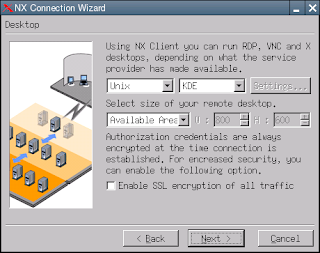 Figure 10
 Figure 12
Configuring Puppy to Work Well With FreeNX
We're now ready to set Puppy up to look and act like a LTSP client. If you just wanted to run FreeNX without using this client as a fat-client, you can skip this section. I'm just going to show you how to tidy things up so that your users only see the LTSP desktop.
The first thing that we want to do is to set the FreeNX client up to start automatically when Puppy starts. To do this click on the console icon on the desktop, and when the console application comes up type
Now you're ready to download and install the FreeNX DotPup file that we here at Tillamook Rage have created for you. Go here, and click the DOWNLOAD NOW button for the FreeNX_Client_1_5.pup file. If your client is not on the Internet, you will have to burn the FreeNX client installation file to a CD, or put it on a flash drive to move it over. We have created a post called Working With Drives And Files in Puppy Linux which walks you through dealing with copying the installer file to and from external drives and also installing the FreeNX DotPup.
Configuring the FreeNX Client
Now we're going to set the FreeNX Client up to connect to the server. If you haven't run the FreeNX Client yet, go ahead and click on the nxclient executable file that's in the /usr/NX/bin directory to launch the application. You will see the Welcome dialog box (Figure 8) - go ahead and click Next.
 Figure 8
 Figure 9
Click Next and you will end up at the Desktop settings dialog (Figure 10). Pull down the list box that has KDE in it and select Custom.
 Figure 10
Now click the Settings... button. Under the Application section click the option button for Run the following command and type
/usr/bin/xfce4-session
Check to make sure that your Custom - Settings dialog box looks like the one in Figure 11 and then click the OK button.
Pull down the list box that says Available Area and select Fullscreen, and then check to make sure that your NX Connection Wizard dialog looks like the one in Figure 11. You can also check the Enable SSL encryption on all traffic, but if your session runs slowly try un-checking it again. Once you've checked it out, you can click the Next > button.
 Figure 11
Click the Finish button on the next screen and you will see the login dialog in Figure 12. If you get an error dialog about not being able to create an icon on the desktop, don't worry about it.
 Figure 11
 Figure 12
Once you are ready, you can type the user name and password of a user that you have set up on the LTSP server and click the Login button. You might get a dialog about not being able to establish the authenticity of the host/server, but you are the one that set it up, so don't worry about it. Just click the Yes button to go ahead and connect.
It takes FreeNX a while to get the remote session up and going, but eventually you should see a desktop session from your LTSP server running on your Puppy Linux "fat-client". I tested the setup for this post using a computer with a Celeron 466 over wireless, and it took about 30 to 45 seconds to connect and display a desktop.
It takes FreeNX a while to get the remote session up and going, but eventually you should see a desktop session from your LTSP server running on your Puppy Linux "fat-client". I tested the setup for this post using a computer with a Celeron 466 over wireless, and it took about 30 to 45 seconds to connect and display a desktop.
We're now ready to set Puppy up to look and act like a LTSP client. If you just wanted to run FreeNX without using this client as a fat-client, you can skip this section. I'm just going to show you how to tidy things up so that your users only see the LTSP desktop.
The first thing that we want to do is to set the FreeNX client up to start automatically when Puppy starts. To do this click on the console icon on the desktop, and when the console application comes up type
geany ~/.jwm/jwmrc-personaland hit the Enter key. This will open the configuration file for your window manager (the app that handles displaying all of your windows for you). When the Geany window comes up, insert the line that's circled in red in Figure 13 in the location shown.
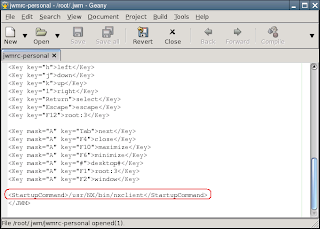 Figure 13
 Figure 13
Save the file and close Geany. Now the next time you (re)start the computer, the FreeNX client will start up automatically.
Next, we'll set the FreeNX client up to be full screen. Go back to the console window, or bring a new one up by clicking on the console icon on the desktop, and then type the following two lines, each followed by the Enter key.
Next, we'll set the FreeNX client up to be full screen. Go back to the console window, or bring a new one up by clicking on the console icon on the desktop, and then type the following two lines, each followed by the Enter key.
cd /rootgeany .jwmrcOnce Geany comes up, scroll down until you see the line that sets the Height attribute of WindowStyle (which is the same as the BorderStyle entry in Puppy 2.x versions) to 22 (Figure 14). This entry should be toward the bottom third of the file . Change 22 2 . If your original Height line doesn't have the value of 22 don't worry, just check to make sure you're between the
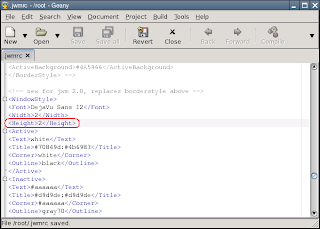 Figure 14
 Figure 14
Now, save the file and exit Geany. After you restart your computer, you won't see any title bars on your windows. Now, the question might occur to you "how do I move the windows now?". I've got you covered. In JWM (Puppy's default window manager), as well as many other window managers, you can hold down on the ALT key and then drag a window around by clicking and dragging anywhere on it. You can also close an application when you can't see the close x button on the title bar by right clicking on the application in the task bar and then selecting the Close menu item. That should keep you moving right along even without title bars.
The next thing we want to do is auto hide the task bar so that it's not taking up screen real estate that's meant for FreeNX. To do this, open the JWM configuration dialog (Menu > Desktop > JWM configuration or Menu > Control Panel > JWM configuration in Puppy 2.x) and click the OK button on the informational dialog that comes up. Click the button beside Taskbar to launch the Taskbar configuration dialog. Click the button beside Tray Autohide Option, click the option button for ON:Tray Autohide on, and then click the OK button (Figure 15). You might get a dialog box telling you that the tray autohide option is now on. You can just click OK. You should now be back at the Configuration Options dialog box, and you can click OK and and then click the Yes button beside Restart JWM now? on the JWM Configuration Manager dialog so that the changes will take effect.
 Figure 15
You can now hit the Exit button on the JWM Configuration Manager dialog box and restart the computer to make sure that all of your changes take effect. Once the computer has rebooted, you should see the FreeNX client automatically launch, there should not be any title bar showing on it's window, and there should be no taskbar unless you move your mouse cursor over it.
You're now all set to start using the client in your lab. Wash, rinse, and repeat for as many clients as you have.
Troubleshooting
As with any server, having a log file to look at when things go awry is a must. By default, logging is disabled on the FreeNX server so I'll go through how to get it turned on. If you're getting authentication errors, or if you just plain can't get the clients to connect to the server, try this out and then take a spin through the log file(s).
The first thing you will want to do is to open the nxserver node configuration file, turn on logging, and set the logging level. To do this, open a terminal window (Applications > Accessories > Terminal) and type
Uncomment the NX_LOG_LEVEL line by removing the # from in front of it, and change the 0 to the logging level you want. You'll notice that just above the NX_LOG_LEVEL line there are several commented lines explaining what each level does. I usually use level 4 which gives me the information that I need. The line should now read
assuming that you chose to use log level 4 like me. Also, uncomment the line that reads
again by removing the #. This time you don't need to change it, just remember where the log file is (/var/log/nxserver.log). Now, restart your computer - you could just restart the FreeNX server, but I like to be thorough.
When a user tries to connect to the server, the general information about their login attempt is recorded in the nxserver.log file, and some information specific to their own session may be stored under the ~/.nx directory. There are so many things to look for in the log file that I can't cover them all here. If you have trouble, post your log file information to the comments at the end of this post and we'll try to help. One thing that may help you is to open a terminal (Applications > Accessories > Terminal) and type
Don't forget to disable (or reduce) the NX_LOG_LEVEL setting again once you get your server running or you'll just be wasting system resources. If you want, you can turn the logging level down to 1 so that you only see errors in the log files. I wouldn't leave it much higher than that since you don't usually need all the information (like the client-server communication) after you have your server all debugged.
Conclusion
I hope that this series has been and will be helpful to anyone trying to set up a computer lab using low bandwidth network equipment. Let us know how things go while you are trying this setup. We are always grateful for comments and questions on our posts.
Enjoy!
Additional Reading
Puppy Linux Homepage
Addtional Reading Section of Part 1
Created: 06-20-08
Revised: 06-20-08
The next thing we want to do is auto hide the task bar so that it's not taking up screen real estate that's meant for FreeNX. To do this, open the JWM configuration dialog (Menu > Desktop > JWM configuration or Menu > Control Panel > JWM configuration in Puppy 2.x) and click the OK button on the informational dialog that comes up. Click the button beside Taskbar to launch the Taskbar configuration dialog. Click the button beside Tray Autohide Option, click the option button for ON:Tray Autohide on, and then click the OK button (Figure 15). You might get a dialog box telling you that the tray autohide option is now on. You can just click OK. You should now be back at the Configuration Options dialog box, and you can click OK and and then click the Yes button beside Restart JWM now? on the JWM Configuration Manager dialog so that the changes will take effect.
 Figure 15
You're now all set to start using the client in your lab. Wash, rinse, and repeat for as many clients as you have.
Troubleshooting
As with any server, having a log file to look at when things go awry is a must. By default, logging is disabled on the FreeNX server so I'll go through how to get it turned on. If you're getting authentication errors, or if you just plain can't get the clients to connect to the server, try this out and then take a spin through the log file(s).
The first thing you will want to do is to open the nxserver node configuration file, turn on logging, and set the logging level. To do this, open a terminal window (Applications > Accessories > Terminal) and type
sudo mousepad /etc/nxserver/node.confand hit Enter. You might have to type your administrative password of course. Again, you can replace mousepad in the line above with the command for your prefered plain text editor. Scroll down until you find the lines that refer to logging (Figure 16).


Figure 16
Uncomment the NX_LOG_LEVEL line by removing the # from in front of it, and change the 0 to the logging level you want. You'll notice that just above the NX_LOG_LEVEL line there are several commented lines explaining what each level does. I usually use level 4 which gives me the information that I need. The line should now read
NX_LOG_LEVEL=4
assuming that you chose to use log level 4 like me. Also, uncomment the line that reads
#NX_LOGFILE=/var/log/nxserver.log
again by removing the #. This time you don't need to change it, just remember where the log file is (/var/log/nxserver.log). Now, restart your computer - you could just restart the FreeNX server, but I like to be thorough.
When a user tries to connect to the server, the general information about their login attempt is recorded in the nxserver.log file, and some information specific to their own session may be stored under the ~/.nx directory. There are so many things to look for in the log file that I can't cover them all here. If you have trouble, post your log file information to the comments at the end of this post and we'll try to help. One thing that may help you is to open a terminal (Applications > Accessories > Terminal) and type
sudo tail -f /var/log/nxserver.logand hit Enter. The tail command displays the last 10 lines from a file, and using the -f switch causes tail to update in real-time for the changes to the file. So, with the command above you can watch as your clients try to connect to the FreeNX server and monitor what goes wrong and when.
Don't forget to disable (or reduce) the NX_LOG_LEVEL setting again once you get your server running or you'll just be wasting system resources. If you want, you can turn the logging level down to 1 so that you only see errors in the log files. I wouldn't leave it much higher than that since you don't usually need all the information (like the client-server communication) after you have your server all debugged.
Conclusion
I hope that this series has been and will be helpful to anyone trying to set up a computer lab using low bandwidth network equipment. Let us know how things go while you are trying this setup. We are always grateful for comments and questions on our posts.
Enjoy!
Additional Reading
Puppy Linux Homepage
Addtional Reading Section of Part 1
Created: 06-20-08
Revised: 06-20-08


No comments:
Post a Comment