Linux, much like candy, comes in many flavors. This might be a bit overwhelming, like going to the grocery store and seeing 50 types of bread. Sure, they're all essentially the same thing at the core, but there are a lot of additions. Some are very basic, the white bread distros, and others are hearty and jam packed with nuts and other nuggets, the full service everything you could need and then some distros. There are some that come ready to eat, some need cut, and some even need baked and are just the ingredients (I'm looking at you Gentoo). What follows is the epic tale of my search for a Linux for all seasons. This is by no means an exhaustive list, but a list of what I've found to be the best for a few different categories.
Desktop
As anyone familiar with Linux knows it's similar to a bag of jelly beans, there are a lot of flavors and to find the one you like best you need to do some serious taste testing. Any of our regular readers may have guessed that my top pick currently is Xubuntu. It is now in version 8.04, and for more information you can read our other review on the current release. If you like Xubuntu you can try the other members of the Ubuntu family: Ubuntu, Kubuntu, Gobuntu, and Edubuntu. They're all fairly similar, and all worth trying, but Xubuntu uses XFCE and is the lightest and most versitale of them.
JeremyW: SUSE (openSUSE) was my first true Linux love before I met Xubuntu. Don't get me wrong, SUSE is still great, but now-a-days I'm a big fan of lean and mean, yet still powerful distros. Just before I started writing this, I got an email that openSUSE 11.0 is out now, but 10.3 is still the download that you are pointed to on the openSUSE page. I think this is done to give early access to people who support the openSUSE project by paying for their CDs. openSUSE comes in two main flavors now, one that uses Gnome, and the other KDE. If I'm going to run a resource hungry distro, I prefer to run KDE, but either Gnome or KDE will work great for you. openSUSE is really easy to set up and use, and has great hardware support and auto-detection. I would suggest getting a Live CD of one of the two versions to try it first, but I think you'll be pleased. KDE 4 (which is included with 11.0) tilts the meter on the eye candy scale too with the addition of the Oxygen icon set among other things. I'm also a big fan of the way that the applications menu has been done in the later 3.5.x versions and in 4.x. The repositories for openSUSE are very complete, so you'll find most of what you need through YaST2, SUSE's package manager. All this, and the technology of Novell's pay-for offerings trickling down to this open version, who could ask for anything more (other than Novell not having a partnership with Microsoft)? So, if you have a 1.4 GHz Pentium 4 (or equivalent) or higher, 256 MB of RAM (512 recommended), and some time, I would recommend giving openSUSE 10.3 (or 11.0 if you wait a few weeks) a try.
Fedora 9 is a free Red Hat version released May 13, 2008; which should mean excellent tech support and community support. Typically I would say it would be an excellent choice. I'm not sure if it was just my hardware, but I found it to be a nightmare. I set up all these distros on separate partitions on my 3.2GHz dual core P4 with 2GB DDR and an ATI Radeon 9800 Pro, and all ran blazingly fast. Fedora 9 however refused to configure Xorg correctly, and was the only one to have problems. Once I got that sorted out, I found out that when Fedora installed GRUB to my MBR it refused to let me boot any OS but it and I couldn't install over it from any other OS for some reason. I had to erase my MBR and reinstall from a Xubuntu CD. I recommend that if you want to try Fedora 9, don't do so if you plan to have any other OS installed. They claim Fedora 9 is the first non-destructive USB installable distro (Puppy Linux has been USB installable for years, though they may be splitting hairs on definitions here), the first major distro with KDE 4 by default (which isn't true because Kubuntu-KDE4 came out in April), and state "Fedora is the first to deliver, and while we're happy people reuse the open source goodness we provide, we want people to know who's behind it." While Fedora is an OK distro, their attitude and major flaws prevent me from recommending them for general use, and I expect to receive hatemail for that.
Gentoo, barely a step above Linux From Scratch, in terms of both control and difficulty of setup. If you want to learn all the under the hood basics and have full control of your OS I recommend starting with LFS and using Gentoo only if you're a masochist. I realize, I'm going to get hate mail for that one, but for most uses Gentoo is overly complicated. While not easy to setup, these are both extremely powerful distros and can be tweaked to exactly the way you want them, and I guarantee that after using either one you will have a true appreciation for a prebuilt operating system and all it can do.
Live Distribution
Live distributions run the full gamut from bloated behemoths to super simplistic and speedy. For general use I prefer Puppy Linux or one of its derivatives. They just recently released Version 4.0 "Dingo." If you need something even smaller or more specialized you can try one of their community developed Puplets, which are Puppy derivatives. Puppy itself is only 80MB, making it rival another small live distribution I will talk about in a bit, DSL. It can be booted from a CD or USB drive but can also be installed alongside another OS. In spite of its size it comes with productivity software, multimedia software, and a very easy to use interface. I discovered it last summer and fell in love with it, it's extremely easy to customize and remaster and I've used it mainly for recovering broken systems and wiping hard drives. It uses the JWM window manager and has a specialized package manager called PupGet. Most of the programs you will want are right on the desktop, where they're easy to find. You're running in the root environment, so anything you do in the terminal will have full root permissions, no messing with sudo. It installs customized packages saved as .pup files. JeremyW has some experience making these as Puppy was the base for the Wireless Thin Clients post.
The next tiny live distribution I've had some luck with is Dang Small Linux (The PG name anyway), or DSL. DSL I like for its size, but not its appearance. It is 50MB and fits nicely on a miniCD. It is currently in version 4.2.5, which came out in January of 2008. You can choose to use JWM or the very tiny FluxBox window managers. Now FluxBox may not be pretty, but it does run on a 486 better than anything else I've seen. They also provide virtual machine images and an embedded version, meant to run within Windows, which gives it a niche market. Much like Puppy it comes with some very basic text editors, spreadsheet software, browsers, and other useful software.
If you want a live distribution with all the horsepower of an installed system then you should give Knoppix a try. It will remind you a lot of the Desktop versions of Ubuntu and its derivatives, and is also a Debian relative. Unlike the previous 2 distros I've talked about here Knoppix uses KDE as its window manager. It comes with OpenOffice.org, which may cause you to scratch your head. You may ask, "How can an OS small enough to fit on a CD hold such a large software package?" It's simple, Knoppix uses a boot loader that decompresses an image which is loaded into RAM, an image that can be up to 2GB for a CD and 8GB for a DVD.
Classroom
The only distro I've come across that is specifically designed for education is Edubuntu. You Maxwell Smarts out there may have figured out that Edubuntu is a member of the Ubuntu family, and with 8.04 that's become even more obvious. Edubuntu now has to be coinstalled with Ubuntu to function. After installing Ubuntu you can install Edubuntu which adds the educational packages and makes some GUI tweaks. I did some testing with my parents, both teachers, and got their reactions. My mom, a first grade teacher, said the software was great for them and would work great. My dad, a high school chemistry teacher, didn't like most of the science software provided in the repository, but there is a lot of software out there to try. I would say Edubuntu is mainly usable in an Elementary School setting, but I still hesitate to recommend it because it uses Gnome and has higher hardware requirements. The software available with Edubuntu is all in the Canonical repository, so it can be installed in Xubuntu which will run much quicker and on older hardware.
Server
The first Linux server distro I want to cover is CentOS. Many of you may not have heard of this, but I really like it, especially for hardware support and setup. The fileserver at the facility I contract for recently succumbed to the capacitor flaw, and so I had to make a quick change. JeremyW had originally set the server up with CentOS and it worked very nicely. I took the RAID controller and hard drives and put them in another computer, and upon startup a configuration utility ran that removed the old hardware profiles and reconfigured the new ones, so with no trouble for me beyond a few keystrokes the server was up and running again. It is based on Red Hat Enterprise Linux, and is currently in version 5.1. RHEL is a commercial product and on the cutting edge, but for most small businesses and home setups CentOS is a great free (as in beer and speech) alternative.
For a somewhat more secure server, because it lacks a graphical X server, you can try Ubuntu Server. It comes with the same great support and community as the rest of the Ubuntu family. If you're familiar with a normal Ubuntu text-based installer there's really nothing new to explain here, and if you're familiar with using the terminal you will have no trouble with Ubuntu Server. I haven't had a lot of time to do much with this, but I will have a separate post on Ubuntu Server in the future.
Clustering
I've been working on cluster computing for a few years now, and just in the past year found what I consider the easiest HPC OS distro to set up and use. PelicanHPC, previously the Parallel Knoppix project, is designed to run on a single computer acting as a master server that hands out boot images to the nodes, which are required to have PXE enabled network cards. For more information on that see our upcoming Cluster Computing Post (I'll add the link when it's officially up, watch for the update). The nodes for the cluster need at least 128MB RAM, which may require updating some older computers, and really need only the motherboard (with processor and RAM of course), a PXE enabled NIC, and a power source. Simply start the server computer with the PelicanHPC CD and follow the directions in their cluster setup wizard.
Hopefully you have found at least one new distro to try, and if you have another one or more to add please comment and give us all some more information.
Posted: 6-30-08
Revised: 6-30-08
Further Reading
Ubuntu
Kubuntu
Xubuntu
Edubuntu
Gobuntu
Ubuntu Server
XFCE
Gnome
KDE
OpenSuSe
Fedora 9
Gentoo
Linux From Scratch
Puppy
DSL
Knoppix
CentOS
Red Hat Enterprise Linux
PelicanHPC
Linux Journal: Almost 9 Distros in Almost 6 Minutes
Search Tillamook Rage


6.30.2008
6.20.2008
Wireless/Dialup Computer Labs - Part 2
This is the second part of a two part series about using the LTSP and FreeNX servers together to accommodate low bandwidth (i.e. wireless and dial-up) clients. This post is all about setting up the clients. Since wireless and dial-up clients don't support network booting from an LTSP server, we need another means of getting them up and going. The clients that you create will technically be "fat-clients" instead of the normal diskless "thin-clients", but that's a necessary evil.
This procedure was developed using Puppy Linux 3.01 Seamonkey which is available at the Puppy Linux website. It may also work with other versions of Puppy, but 3.01 is the only one that I've tried so far. The one version that we know this won't work with is Puppy 4.0. You can install FreeNX manually and it will function properly, but the .pup installers won't run correctly. We'll update this post as soon as we get a chance to correct the problem.
We are currently looking for hosting for the files in this post (the installers referenced below are stuck on YouSendIt for now), so if you have an interest in hosting these files for us please let us know. We would appreciate the help.
As always, please be careful when following procedures from this site, or any other, as a mistake can leave you with a broken system. See our disclaimer for full details.
Getting Started
Boot off of the Puppy Linux CD, choose your keyboard layout, and hit Enter to select Xorg on the Puppy Video Wizard screen. You can try Xvesa later if Xorg gives you problems. The next screen allows you to choose your video settings. The default will probably work fine, but you should press the Right Arrow key once to select TEST and hit Enter. You will probably see another screen asking you to verify that you have a PS/2 mouse (if you have one), and you can hit Enter to select TEXT_X_NOW. If the video test completes successfully, you're all set. To exit the test screen, press the CTRL, ALT, and BACKSPACE keys at once. Once the test completes, you'll be back at the video settings screen, and so you can just hit Enter to select FINISHED. There will be one final screen asking you if you are done. Hit Enter to select DONE. If you have video problems with Puppy at any time during this process, you can reboot from the CD and try different settings on these screens. Be careful not to get to crazy with the video settings though. If the configuration screen tells you that your monitor does not support certain settings, you might want to avoid them. Some settings can damage your CRT monitor or LCD screen. You should be able to look up the model number of you video card and monitor to find their maximum resolution and refresh rate if in doubt.
Once you get to the desktop, start the Puppy installer (Menu > Setup > Puppy universal installer). Note that following my instructions will wipe all data from the client computer's hard drive, so make sure you either back up the data and/or do a frugal install if there's data you don't want to lose.
Once the installer comes up you just follow the instructions to install Puppy. If you need an example, you can follow along with what I did below.
My Example
Since my client had a regular IDE hard drive in my test computer, I selected IDE (ATA) internal hard drive from the list of media to install to and clicked OK. The next dialog that came up was just telling me what drive Puppy was going to be installed to so I clicked OK again. The next dialog just showed me what Puppy found out about the drive I was installing to, so I clicked the button beside Install Puppy to hda1: since there was only one drive in my client. Once you click that button you will see another dialog asking you if it's ok to go ahead with the installation on the selected drive. I just clicked the OK button here too. The next dialog box asks you whether you want to do a Frugal or Full installation. I chose Full so that the installation would use the entire hard drive. At this point if you've done a Puppy install on the hard drive before, a dialog will come up asking you whether you want to UPGRADE or WIPE the installation. I chose WIPE (since I had another failed installation on the drive).
Once the installation is finished, you will see a dialog box asking how you want Puppy to boot up. I had the choice of booting from a USB stick or installing GRUB on the hard drive. I wanted everything to be enclosed on the client's hard drive so I chose Install GRUB. The next dialog tells you that the 'grubconfig' script is ready to run - click the OK button. The next dialog asks you if you want to do a simple or expert GRUB install. I'm a simple person so that's what I selected, and then hit the OK button. I clicked the OK button on the next 4 dialogs which is what I suggest you do unless you have a reason to do otherwise. One of the things you might want to change is where GRUB will install to. I usually go with either the Root or MBR option since they are the cleanest in my opinion. Eventually, you will see the GRUB INSTALL SUCCESS message, and you can just click OK. After that you will see a dialog asking you if you want to reinstall GRUB. If GRUB didn't fail you can just hit No to exit the installation.
Now you're ready to shut down and restart the computer. To shut down, go to (Menu > Shutdown > Power-off computer). Make sure that you take the Puppy CD out of the drive and select DO NOT SAVE on the screen that comes up as puppy is shutting down. That screen is just asking you if you want to save the settings from your current session. You don't need to do that.
The first thing that you will see when you reboot is the GRUB menu. Just hit the Enter key to boot the default option. When Puppy is starting up for the first time, you will be asked again to select your keyboard layout, "X server", and video settings. Follow the instructions above to see what to do.
Changing the GRUB Boot Delay
Once Puppy is booted up, go to the Puppy desktop and click the home icon which should bring up a window showing the files in your home directory (Figure 1). Hit the up arrow (boxed in red in Figure 1) until you see boot as one of the directories in the window. Click on the boot folder icon, then on grub, and then on menu.lst. The menu.lst file will open in Geany and you will be able to edit it. Be very careful to double and triple check what you do from here on out since we'll be editing configuration files that can cause your installation to malfunction.

Figure 1
Once menu.lst is open, find the line#timeout 30
and remove the # and change the 30 to a smaller value like 5. What this does is set the amount of time that the GRUB boot loader will wait before booting Puppy. With the # (comment symbol) in front of the line it will wait forever for the user to hit the Enter key. That's not acceptable behavior when you're setting up lab computers for people. Double check what you've done against Figure 2. Now click the Save button and close Geany.

You only need to read this section if you have a wireless card in your fat client that you're going to use to connect to the server. For my test setup I was using a CNet CWP-854 wireless card with the RT 2561 chipset. Fortunately for me, Puppy recognizes this card right out of the box, so I didn't have to do anything except configure it. You'll find that Puppy recognizes a wide range of wireless cards, and I noticed that version 3.01 did a better job than previous versions of Puppy Linux.
First, we need to launch the Network Wizard (Menu > Setup > Network Wizard). When the Puppy Network Wizard dialog window comes up, click the button for your wireless card. It will probably say something like wlan0. See Figure 3 to get an idea of what you'll be looking at.
 Figure 3
XAuth Installation
If you are running older versions of Puppy (i.e. 2.x), you will need to install xauth before you can get FreeNX running. If you're running a version of Puppy with xauth already installed (Puppy 3.x or greater), skip to the next section. You can download the DotPup installer that we've made here instead of downloading the version in the next section and it will take care of the xauth installation for you. XAuth will install in the /usr/X11R6/bin directory where the FreeNX client binary will be able to find it. If you're not sure if your version of Puppy has xauth installed, you can manually check the /usr/X11R6/bin directory or you can open a console (terminal) and type

Figure 2
Setting Up Your Wireless Card In PuppyYou only need to read this section if you have a wireless card in your fat client that you're going to use to connect to the server. For my test setup I was using a CNet CWP-854 wireless card with the RT 2561 chipset. Fortunately for me, Puppy recognizes this card right out of the box, so I didn't have to do anything except configure it. You'll find that Puppy recognizes a wide range of wireless cards, and I noticed that version 3.01 did a better job than previous versions of Puppy Linux.
First, we need to launch the Network Wizard (Menu > Setup > Network Wizard). When the Puppy Network Wizard dialog window comes up, click the button for your wireless card. It will probably say something like wlan0. See Figure 3 to get an idea of what you'll be looking at.
 Figure 3
Once you click the wireless card's button, the Configure network interface wlan0 dialog box will come up. Keep in mind that wlan0 will be replaced with the name Puppy gives your wireless interface. Just substitute your card's name for wlan0 from here on out. On the configuration dialog, click the Wireless button (Figure 4).
 Figure 4
Clicking on the Wireless button will open a new dialog window asking you to enter your wireless network information (Figure 5). You will need to get this information from your network administrator. Click the button matching the type of network you have - Open, WEP, WPA/TKIP, or WPA2 and enter the appropriate settings. There are too many variations for me to give any detailed instructions here. If you have troubles, post a comment with your question(s) and we'll do our best to help you out.
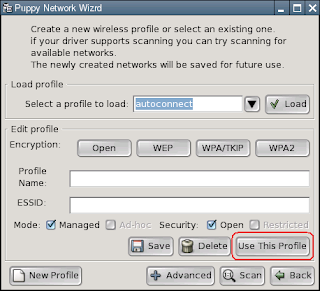 Figure 5
 Figure 4
 Figure 5
Once you have entered your wireless network information, make sure you've entered a profile name of your choosing into the Profile Name: text box and click the Use This Profile button (Figure 5).
After you click the Use This Profile button, you will be returned to the Configure network interface wlan0 dialog box. If your client is on a network with a DHCP server (i.e. you're not using static IP addresses for each of your clients), then you should click the Auto DHCP button to start the wireless card off using the network's DHCP server (Figure 6). If you followed the instructions in Part 1 of this series to the letter, your LTSP/FreeNX server will be the DHCP server.
 Figure 6
I'm assuming here that the rest of your wireless network is up and running properly, otherwise your client won't be able to see anything - including the DHCP server. Once you've clicked the Auto DHCP button, you will have to wait just a little bit and then you should see a dialog box saying NETWORK CONFIGURATION OF wlan0 SUCESSFUL! (Figure 7) which will present you with the option to save the configuration for the next boot. I would suggest clicking Yes here so that your wireless card will start working automagically the next time you boot up.
 Figure 7
 Figure 6
 Figure 7
You can now click the Done button on the network configuration dialog. Now you can move on to start working on the FreeNX integration.
XAuth Installation
If you are running older versions of Puppy (i.e. 2.x), you will need to install xauth before you can get FreeNX running. If you're running a version of Puppy with xauth already installed (Puppy 3.x or greater), skip to the next section. You can download the DotPup installer that we've made here instead of downloading the version in the next section and it will take care of the xauth installation for you. XAuth will install in the /usr/X11R6/bin directory where the FreeNX client binary will be able to find it. If you're not sure if your version of Puppy has xauth installed, you can manually check the /usr/X11R6/bin directory or you can open a console (terminal) and type
find / -iname xauthand hit Enter to have your computer do the searching for you. If you see xauth show up in any X11Rx directory, where x is the version number (probably 6 or 7), then you should be fine.
FreeNX Installation
Now you're ready to download and install the FreeNX DotPup file that we here at Tillamook Rage have created for you. Go here, and click the DOWNLOAD NOW button for the FreeNX_Client_1_5.pup file. If your client is not on the Internet, you will have to burn the FreeNX client installation file to a CD, or put it on a flash drive to move it over. We have created a post called Working With Drives And Files in Puppy Linux which walks you through dealing with copying the installer file to and from external drives and also installing the FreeNX DotPup.
Once you've gone through the post mentioned above, a window should open showing you the /usr/NX directory where the FreeNX client files are stored. If that window doesn't open, you can click on the home icon on your desktop and hit the up arrow that is boxed in red in Figure 1 until you see a usr directory. Click on it, click on the NX directory, click on the bin directory, and then run the FreeNX client by clicking on the nxclient binary file.
Configuring the FreeNX Client
Now we're going to set the FreeNX Client up to connect to the server. If you haven't run the FreeNX Client yet, go ahead and click on the nxclient executable file that's in the /usr/NX/bin directory to launch the application. You will see the Welcome dialog box (Figure 8) - go ahead and click Next.
 Figure 8
Now you will see the Session dialog (Figure 9) that allows you to select a name for your session, along with the session settings. You can pick any name for the session (I used TestName), but I would suggest keeping it relatively short.
 Figure 9
In the text box beside Host, type the IP address of the LTSP server that you set up from Part 1. I used 192.168.0.1 as you can see in Figure 9. The slider towards the bottom sets how much network bandwidth is available to your client. It may take some experimentation to get this setting right for your network conditions. Wireless networks may need special tweaking to get them set just right. If you have several computers on your wireless or dialup connections and you start running out of bandwidth, try moving this slider closer to Modem to see if that fixes the problem.
Click Next and you will end up at the Desktop settings dialog (Figure 10). Pull down the list box that has KDE in it and select Custom.
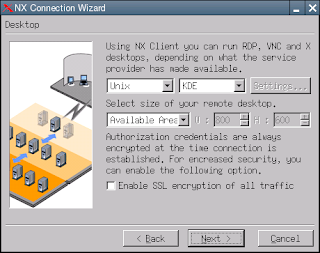 Figure 10
 Figure 12
Configuring Puppy to Work Well With FreeNX
We're now ready to set Puppy up to look and act like a LTSP client. If you just wanted to run FreeNX without using this client as a fat-client, you can skip this section. I'm just going to show you how to tidy things up so that your users only see the LTSP desktop.
The first thing that we want to do is to set the FreeNX client up to start automatically when Puppy starts. To do this click on the console icon on the desktop, and when the console application comes up type
Now you're ready to download and install the FreeNX DotPup file that we here at Tillamook Rage have created for you. Go here, and click the DOWNLOAD NOW button for the FreeNX_Client_1_5.pup file. If your client is not on the Internet, you will have to burn the FreeNX client installation file to a CD, or put it on a flash drive to move it over. We have created a post called Working With Drives And Files in Puppy Linux which walks you through dealing with copying the installer file to and from external drives and also installing the FreeNX DotPup.
Configuring the FreeNX Client
Now we're going to set the FreeNX Client up to connect to the server. If you haven't run the FreeNX Client yet, go ahead and click on the nxclient executable file that's in the /usr/NX/bin directory to launch the application. You will see the Welcome dialog box (Figure 8) - go ahead and click Next.
 Figure 8
 Figure 9
Click Next and you will end up at the Desktop settings dialog (Figure 10). Pull down the list box that has KDE in it and select Custom.
 Figure 10
Now click the Settings... button. Under the Application section click the option button for Run the following command and type
/usr/bin/xfce4-session
Check to make sure that your Custom - Settings dialog box looks like the one in Figure 11 and then click the OK button.
Pull down the list box that says Available Area and select Fullscreen, and then check to make sure that your NX Connection Wizard dialog looks like the one in Figure 11. You can also check the Enable SSL encryption on all traffic, but if your session runs slowly try un-checking it again. Once you've checked it out, you can click the Next > button.
 Figure 11
Click the Finish button on the next screen and you will see the login dialog in Figure 12. If you get an error dialog about not being able to create an icon on the desktop, don't worry about it.
 Figure 11
 Figure 12
Once you are ready, you can type the user name and password of a user that you have set up on the LTSP server and click the Login button. You might get a dialog about not being able to establish the authenticity of the host/server, but you are the one that set it up, so don't worry about it. Just click the Yes button to go ahead and connect.
It takes FreeNX a while to get the remote session up and going, but eventually you should see a desktop session from your LTSP server running on your Puppy Linux "fat-client". I tested the setup for this post using a computer with a Celeron 466 over wireless, and it took about 30 to 45 seconds to connect and display a desktop.
It takes FreeNX a while to get the remote session up and going, but eventually you should see a desktop session from your LTSP server running on your Puppy Linux "fat-client". I tested the setup for this post using a computer with a Celeron 466 over wireless, and it took about 30 to 45 seconds to connect and display a desktop.
We're now ready to set Puppy up to look and act like a LTSP client. If you just wanted to run FreeNX without using this client as a fat-client, you can skip this section. I'm just going to show you how to tidy things up so that your users only see the LTSP desktop.
The first thing that we want to do is to set the FreeNX client up to start automatically when Puppy starts. To do this click on the console icon on the desktop, and when the console application comes up type
geany ~/.jwm/jwmrc-personaland hit the Enter key. This will open the configuration file for your window manager (the app that handles displaying all of your windows for you). When the Geany window comes up, insert the line that's circled in red in Figure 13 in the location shown.
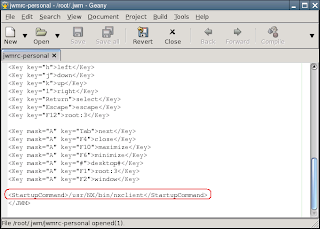 Figure 13
 Figure 13
Save the file and close Geany. Now the next time you (re)start the computer, the FreeNX client will start up automatically.
Next, we'll set the FreeNX client up to be full screen. Go back to the console window, or bring a new one up by clicking on the console icon on the desktop, and then type the following two lines, each followed by the Enter key.
Next, we'll set the FreeNX client up to be full screen. Go back to the console window, or bring a new one up by clicking on the console icon on the desktop, and then type the following two lines, each followed by the Enter key.
cd /rootgeany .jwmrcOnce Geany comes up, scroll down until you see the line that sets the Height attribute of WindowStyle (which is the same as the BorderStyle entry in Puppy 2.x versions) to 22 (Figure 14). This entry should be toward the bottom third of the file . Change 22 2 . If your original Height line doesn't have the value of 22 don't worry, just check to make sure you're between the
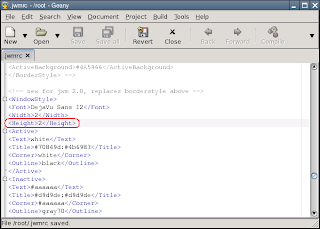 Figure 14
 Figure 14
Now, save the file and exit Geany. After you restart your computer, you won't see any title bars on your windows. Now, the question might occur to you "how do I move the windows now?". I've got you covered. In JWM (Puppy's default window manager), as well as many other window managers, you can hold down on the ALT key and then drag a window around by clicking and dragging anywhere on it. You can also close an application when you can't see the close x button on the title bar by right clicking on the application in the task bar and then selecting the Close menu item. That should keep you moving right along even without title bars.
The next thing we want to do is auto hide the task bar so that it's not taking up screen real estate that's meant for FreeNX. To do this, open the JWM configuration dialog (Menu > Desktop > JWM configuration or Menu > Control Panel > JWM configuration in Puppy 2.x) and click the OK button on the informational dialog that comes up. Click the button beside Taskbar to launch the Taskbar configuration dialog. Click the button beside Tray Autohide Option, click the option button for ON:Tray Autohide on, and then click the OK button (Figure 15). You might get a dialog box telling you that the tray autohide option is now on. You can just click OK. You should now be back at the Configuration Options dialog box, and you can click OK and and then click the Yes button beside Restart JWM now? on the JWM Configuration Manager dialog so that the changes will take effect.
 Figure 15
You can now hit the Exit button on the JWM Configuration Manager dialog box and restart the computer to make sure that all of your changes take effect. Once the computer has rebooted, you should see the FreeNX client automatically launch, there should not be any title bar showing on it's window, and there should be no taskbar unless you move your mouse cursor over it.
You're now all set to start using the client in your lab. Wash, rinse, and repeat for as many clients as you have.
Troubleshooting
As with any server, having a log file to look at when things go awry is a must. By default, logging is disabled on the FreeNX server so I'll go through how to get it turned on. If you're getting authentication errors, or if you just plain can't get the clients to connect to the server, try this out and then take a spin through the log file(s).
The first thing you will want to do is to open the nxserver node configuration file, turn on logging, and set the logging level. To do this, open a terminal window (Applications > Accessories > Terminal) and type
Uncomment the NX_LOG_LEVEL line by removing the # from in front of it, and change the 0 to the logging level you want. You'll notice that just above the NX_LOG_LEVEL line there are several commented lines explaining what each level does. I usually use level 4 which gives me the information that I need. The line should now read
assuming that you chose to use log level 4 like me. Also, uncomment the line that reads
again by removing the #. This time you don't need to change it, just remember where the log file is (/var/log/nxserver.log). Now, restart your computer - you could just restart the FreeNX server, but I like to be thorough.
When a user tries to connect to the server, the general information about their login attempt is recorded in the nxserver.log file, and some information specific to their own session may be stored under the ~/.nx directory. There are so many things to look for in the log file that I can't cover them all here. If you have trouble, post your log file information to the comments at the end of this post and we'll try to help. One thing that may help you is to open a terminal (Applications > Accessories > Terminal) and type
Don't forget to disable (or reduce) the NX_LOG_LEVEL setting again once you get your server running or you'll just be wasting system resources. If you want, you can turn the logging level down to 1 so that you only see errors in the log files. I wouldn't leave it much higher than that since you don't usually need all the information (like the client-server communication) after you have your server all debugged.
Conclusion
I hope that this series has been and will be helpful to anyone trying to set up a computer lab using low bandwidth network equipment. Let us know how things go while you are trying this setup. We are always grateful for comments and questions on our posts.
Enjoy!
Additional Reading
Puppy Linux Homepage
Addtional Reading Section of Part 1
Created: 06-20-08
Revised: 06-20-08
The next thing we want to do is auto hide the task bar so that it's not taking up screen real estate that's meant for FreeNX. To do this, open the JWM configuration dialog (Menu > Desktop > JWM configuration or Menu > Control Panel > JWM configuration in Puppy 2.x) and click the OK button on the informational dialog that comes up. Click the button beside Taskbar to launch the Taskbar configuration dialog. Click the button beside Tray Autohide Option, click the option button for ON:Tray Autohide on, and then click the OK button (Figure 15). You might get a dialog box telling you that the tray autohide option is now on. You can just click OK. You should now be back at the Configuration Options dialog box, and you can click OK and and then click the Yes button beside Restart JWM now? on the JWM Configuration Manager dialog so that the changes will take effect.
 Figure 15
You're now all set to start using the client in your lab. Wash, rinse, and repeat for as many clients as you have.
Troubleshooting
As with any server, having a log file to look at when things go awry is a must. By default, logging is disabled on the FreeNX server so I'll go through how to get it turned on. If you're getting authentication errors, or if you just plain can't get the clients to connect to the server, try this out and then take a spin through the log file(s).
The first thing you will want to do is to open the nxserver node configuration file, turn on logging, and set the logging level. To do this, open a terminal window (Applications > Accessories > Terminal) and type
sudo mousepad /etc/nxserver/node.confand hit Enter. You might have to type your administrative password of course. Again, you can replace mousepad in the line above with the command for your prefered plain text editor. Scroll down until you find the lines that refer to logging (Figure 16).


Figure 16
Uncomment the NX_LOG_LEVEL line by removing the # from in front of it, and change the 0 to the logging level you want. You'll notice that just above the NX_LOG_LEVEL line there are several commented lines explaining what each level does. I usually use level 4 which gives me the information that I need. The line should now read
NX_LOG_LEVEL=4
assuming that you chose to use log level 4 like me. Also, uncomment the line that reads
#NX_LOGFILE=/var/log/nxserver.log
again by removing the #. This time you don't need to change it, just remember where the log file is (/var/log/nxserver.log). Now, restart your computer - you could just restart the FreeNX server, but I like to be thorough.
When a user tries to connect to the server, the general information about their login attempt is recorded in the nxserver.log file, and some information specific to their own session may be stored under the ~/.nx directory. There are so many things to look for in the log file that I can't cover them all here. If you have trouble, post your log file information to the comments at the end of this post and we'll try to help. One thing that may help you is to open a terminal (Applications > Accessories > Terminal) and type
sudo tail -f /var/log/nxserver.logand hit Enter. The tail command displays the last 10 lines from a file, and using the -f switch causes tail to update in real-time for the changes to the file. So, with the command above you can watch as your clients try to connect to the FreeNX server and monitor what goes wrong and when.
Don't forget to disable (or reduce) the NX_LOG_LEVEL setting again once you get your server running or you'll just be wasting system resources. If you want, you can turn the logging level down to 1 so that you only see errors in the log files. I wouldn't leave it much higher than that since you don't usually need all the information (like the client-server communication) after you have your server all debugged.
Conclusion
I hope that this series has been and will be helpful to anyone trying to set up a computer lab using low bandwidth network equipment. Let us know how things go while you are trying this setup. We are always grateful for comments and questions on our posts.
Enjoy!
Additional Reading
Puppy Linux Homepage
Addtional Reading Section of Part 1
Created: 06-20-08
Revised: 06-20-08
6.16.2008
Wireless/Dialup Computer Labs - Part 1
You might be interested in this post if you want to use an LTSP server with clients that are connecting over low bandwidth connections such as wireless or dial-up. Also, this post has the side-effect of enabling the use of LTSP with clients that can't do network boots (i.e. with PXE) which is really useful since almost no wireless cards support any type of network boot functionality. If you get a chance to work through these instructions, please let us know what you find and what you have problems with so that we can improve this post in future revisions.
In Part 1 we'll take a look at how to set up the server, and in Part 2 we'll do the client computer(s).
This procedure was originally developed using the Xubuntu 7.04 Alternate Install CD, and updated using the Xubuntu 9.10 Alternate Install CD. You should be able to use other versions of Ubuntu and Xubuntu to do this procedure, but your mileage may vary. If you are able to get this procedure to work with another version, please post your findings in the comments section for the rest of us.
As always, be careful when following advice and procedures from this site or any other, as you can do serious damage to your Linux system if a mistake is made. See our disclaimer for details.
Introduction
The standard LTSP server-client model works well over wired Ethernet connections, but there are some situations where it just can't cope. Wireless clients usually don't have the ability to boot from the network, and if you want people to connect to your LTSP server over dial-up, standard LTSP is too slow.
One thing to note before we get too far is that setting up your LTSP lab this way will greatly increase the load on your server. The X sessions (the graphical session that displays the desktop) for each of the clients will be run on the server itself, instead of locally on each client. That means that the server has to have enough horsepower to handle as many graphical X sessions as you have clients. Also, keep in mind that running anything computationally intensive (like programs that do a lot of calculations) will add to the stress on the server. I can't really give you a hard and fast rule on how much horsepower you need, but if you've got over 20 to 30 clients, you're probably going to need a high end single core processor or a dual core processor computer with plenty of RAM (at least 1 gigabyte). If you have a lower end server already though, I would suggest you try this procedure out before you go and get another one. You might be able to get away with it and it's not too hard to replace that server later if you need to.
The Procedure
The first thing that you want to do is to follow the procedure outlined in our post LTSP Server Setup The (Relatively) Easy Way. Once you have finished that procedure, you should have a functioning LTSP server that is ready to have the FreeNX server software (more on that later) installed on it. Be sure to check out the troubleshooting section in that post and also the various other updates that we've written in the Additional Reading section below.
The next thing I would suggest is updating your new server installation. To do this, make sure you have a connection to the Internet, Open the Update Manager (Applications > System > Update Manager), and click the Install Updates button. It will probably ask you to enter your administrative password. It will take awhile for all the updates to be downloaded and installed, but once the computer is done updating, you can move to the next step.
Once you have your LTSP server humming along the way you want it, make sure it has a connection to the Internet and install FreeNX. Lucky for us there's now a set of packages available from the Ubuntu community Ubuntu FreeNX Team PPA (Personal Package Archive). The instructions for installing FreeNX from the PPA are different depending on whether you're running Xubuntu 9.10, or an older version. The next section outlines the instructions for 9.10, you can skip over them to the next section if you're running an older version.
Install FreeNX In Xubuntu 9.10
You need to first open a terminal window if you don't have one open already (Applications > Accessories > Terminal). Once the terminal window is open, type the following and hit Enter after typing (or copying) each line.
These lines make sure that you have the command to install the PPA repository installed (add-apt-repository), and then adds the repository.
Once that has finished, we need to update the local cache so that our system knows what packages have been added from the PPA repository.
And finally we'll install the FreeNX package and run a setup script.
You may be asked to hit Y multiple times to finish the installation.
Install FreeNX In A Previous Xubuntu Version
If you're running a version of Xubuntu earlier than 9.10, you will need to follow the instructions on the FreeNX team's Ubuntu documentation page. Look for the Installing the FreeNX server on older Ubuntu Versions section.
Beginning The FreeNX/LTSP Integration
After the FreeNX server is finished installing, you can download the Symbiont Workstation Manager files for LTSP/FreeNX integration. You should be able to download them directly at http://downloads.sourceforge.net/symbiont/NX1.5.0-141_LTSP_0.8.tgz?modtime=1149606780&big_mirror=0 , but since broken or incorrect links are always a danger, I'll give you a less direct and more sure-fire way to get to it. Go to www.sourceforge.net and search symbiont workstation manager under the Software category. The main hit should be the one that you want, so click on it. Click on their Downloads tab and look at the Miscellaneous downloads category. To get the LTSP/FreeNX downloads to show up you'll probably have to click the link View older releases from the Miscellaneous package. Once the full list pops up, click on the NX_LTSP link, and then click the NX1.5.0-141_LTSP_0.8.tgz link. That should get you what you need.
Once you have the file downloaded, you need to extract it. You can do this by double clicking on the file in Thunar (the file manager in XFCE) and clicking the Extract button on the window that comes up. If you extract the the file you downloaded this way, you can now skip down to "Installing The FreeNX Files."
If you want to extract the file from the command line, you can go back to the terminal and type
and hit Enter. You should replace the ~/Desktop portion above with the directory where you downloaded the NX_LTSP file to. If you're using Firefox (which I would guess you probably are), the default is almost always to the Desktop directory. The ~ above is the same thing as your home directory. So, instead of typing /home/user/Desktop I would type ~/Desktop .
Anyway, now that you're in the directory where the NX_LTSP file is, type
and hit the Enter key.
Installing The FreeNX Files
Once the file is done extracting you need to copy the files to the LTSP server directory, being careful to preserve all the files and their properties (including symbolic links). You can do this graphically through Thunar, but I prefer using the terminal for this. So, follow me back to your trusty X term (that is already cd'd to the desktop with cd ~/Desktop) and type
and hit Enter to go into the NX_LTSP directory, then type
and hit Enter to copy the files to where they need to go. You may be asked to enter your adminstrative (root) password after hitting Enter, but that's normal.
Now that all of the new files are copied over, we need to copy the authentication key for the FreeNX server over so that it will be used by the LTSP clients. Once you get more familiar with FreeNX, you'll want to regenerate this key, since using the default key is a security concern, but that's for after you have the server running. To copy the key, switch back to the terminal window and type (copying this line would be easier)
In Part 1 we'll take a look at how to set up the server, and in Part 2 we'll do the client computer(s).
This procedure was originally developed using the Xubuntu 7.04 Alternate Install CD, and updated using the Xubuntu 9.10 Alternate Install CD. You should be able to use other versions of Ubuntu and Xubuntu to do this procedure, but your mileage may vary. If you are able to get this procedure to work with another version, please post your findings in the comments section for the rest of us.
As always, be careful when following advice and procedures from this site or any other, as you can do serious damage to your Linux system if a mistake is made. See our disclaimer for details.
Introduction
The standard LTSP server-client model works well over wired Ethernet connections, but there are some situations where it just can't cope. Wireless clients usually don't have the ability to boot from the network, and if you want people to connect to your LTSP server over dial-up, standard LTSP is too slow.
One thing to note before we get too far is that setting up your LTSP lab this way will greatly increase the load on your server. The X sessions (the graphical session that displays the desktop) for each of the clients will be run on the server itself, instead of locally on each client. That means that the server has to have enough horsepower to handle as many graphical X sessions as you have clients. Also, keep in mind that running anything computationally intensive (like programs that do a lot of calculations) will add to the stress on the server. I can't really give you a hard and fast rule on how much horsepower you need, but if you've got over 20 to 30 clients, you're probably going to need a high end single core processor or a dual core processor computer with plenty of RAM (at least 1 gigabyte). If you have a lower end server already though, I would suggest you try this procedure out before you go and get another one. You might be able to get away with it and it's not too hard to replace that server later if you need to.
The Procedure
The first thing that you want to do is to follow the procedure outlined in our post LTSP Server Setup The (Relatively) Easy Way. Once you have finished that procedure, you should have a functioning LTSP server that is ready to have the FreeNX server software (more on that later) installed on it. Be sure to check out the troubleshooting section in that post and also the various other updates that we've written in the Additional Reading section below.
The next thing I would suggest is updating your new server installation. To do this, make sure you have a connection to the Internet, Open the Update Manager (Applications > System > Update Manager), and click the Install Updates button. It will probably ask you to enter your administrative password. It will take awhile for all the updates to be downloaded and installed, but once the computer is done updating, you can move to the next step.
Once you have your LTSP server humming along the way you want it, make sure it has a connection to the Internet and install FreeNX. Lucky for us there's now a set of packages available from the Ubuntu community Ubuntu FreeNX Team PPA (Personal Package Archive). The instructions for installing FreeNX from the PPA are different depending on whether you're running Xubuntu 9.10, or an older version. The next section outlines the instructions for 9.10, you can skip over them to the next section if you're running an older version.
Install FreeNX In Xubuntu 9.10
You need to first open a terminal window if you don't have one open already (Applications > Accessories > Terminal). Once the terminal window is open, type the following and hit Enter after typing (or copying) each line.
sudo apt-get install python-software-propertiessudo add-apt-repository ppa:freenx-teamThese lines make sure that you have the command to install the PPA repository installed (add-apt-repository), and then adds the repository.
Once that has finished, we need to update the local cache so that our system knows what packages have been added from the PPA repository.
sudo apt-get updateAnd finally we'll install the FreeNX package and run a setup script.
sudo aptitude install freenxsudo /usr/lib/nx/nxsetup --installYou may be asked to hit Y multiple times to finish the installation.
Install FreeNX In A Previous Xubuntu Version
If you're running a version of Xubuntu earlier than 9.10, you will need to follow the instructions on the FreeNX team's Ubuntu documentation page. Look for the Installing the FreeNX server on older Ubuntu Versions section.
Beginning The FreeNX/LTSP Integration
After the FreeNX server is finished installing, you can download the Symbiont Workstation Manager files for LTSP/FreeNX integration. You should be able to download them directly at http://downloads.sourceforge.net/symbiont/NX1.5.0-141_LTSP_0.8.tgz?modtime=1149606780&big_mirror=0 , but since broken or incorrect links are always a danger, I'll give you a less direct and more sure-fire way to get to it. Go to www.sourceforge.net and search symbiont workstation manager under the Software category. The main hit should be the one that you want, so click on it. Click on their Downloads tab and look at the Miscellaneous downloads category. To get the LTSP/FreeNX downloads to show up you'll probably have to click the link View older releases from the Miscellaneous package. Once the full list pops up, click on the NX_LTSP link, and then click the NX1.5.0-141_LTSP_0.8.tgz link. That should get you what you need.
Once you have the file downloaded, you need to extract it. You can do this by double clicking on the file in Thunar (the file manager in XFCE) and clicking the Extract button on the window that comes up. If you extract the the file you downloaded this way, you can now skip down to "Installing The FreeNX Files."
If you want to extract the file from the command line, you can go back to the terminal and type
cd ~/Desktopand hit Enter. You should replace the ~/Desktop portion above with the directory where you downloaded the NX_LTSP file to. If you're using Firefox (which I would guess you probably are), the default is almost always to the Desktop directory. The ~ above is the same thing as your home directory. So, instead of typing /home/user/Desktop I would type ~/Desktop .
Anyway, now that you're in the directory where the NX_LTSP file is, type
tar -zxvf NX1.5.0-141_LTSP_0.8.tgzand hit the Enter key.
Installing The FreeNX Files
Once the file is done extracting you need to copy the files to the LTSP server directory, being careful to preserve all the files and their properties (including symbolic links). You can do this graphically through Thunar, but I prefer using the terminal for this. So, follow me back to your trusty X term (that is already cd'd to the desktop with cd ~/Desktop) and type
cd NX1.5.0-141_LTSPsudo cp -a i386/ /opt/ltsp/Now that all of the new files are copied over, we need to copy the authentication key for the FreeNX server over so that it will be used by the LTSP clients. Once you get more familiar with FreeNX, you'll want to regenerate this key, since using the default key is a security concern, but that's for after you have the server running. To copy the key, switch back to the terminal window and type (copying this line would be easier)
sudo cp /var/lib/nxserver/home/.ssh/client.id_dsa.key /opt/ltsp/i386/usr/NX/share/client.id_dsa.key.session(all on one line) and hit Enter.
Now we need to make the LTSP server software aware of the FreeNX server, so type the following line and hit Enter.
You can replace mousepad in the line above with the command for your favorite plain text editor. Once the file is open, add the line

Troubleshooting
See the troubleshooting section at the end of Part 2.
Conclusion
Well, there it is in all its geeky glory. I hope that gets you started off in the right direction. Please keep us up to date, since as I said in the introduction, this procedure is a work in progress and is still being tested out in the wild. Please don't try these instructions on a server that you can't afford to kill. Start out with an isolated test setup to see if this is going to work for your situation, and remember to keep us up to date on what you find.
Enjoy!
Additional Reading
Linux Terminal Server Project Homepage
FreeNX Homepage
Finding The LTSP Option With Xubuntu 8.04
Build chroot Fails During LTSP Server Install
An LTSP Update
LTSP Client Shuts Down Server - The Fix
LTSP Server Setup - The (Relatively) Easy Way
Ubuntu Community FreeNX Installation
Created Date:06-16-08
Revision Date:01-13-10
Now we need to make the LTSP server software aware of the FreeNX server, so type the following line and hit Enter.
sudo mousepad /opt/ltsp/i386/etc/lts.confYou can replace mousepad in the line above with the command for your favorite plain text editor. Once the file is open, add the line
SCREEN_02 = startnx
(preserving the case and spacing) at the end of the indented section that starts with the line [default] (add the [default] entry if you have to). The file should now look like Figure 3. Save the file and exit the text editor.
Figure 3
Now the last thing you have to do is type the following line and hit Enter.
That's it, you should be able to restart your new FreeNX-LTSP hybrid server and then log in with the client(s) that you will set up in the second and final post in this mini-series. Normal LTSP server maintenance and administration procedures should apply directly to this setup. One quick tip I will give you is to make sure that your FreeNX users don't have the permissions to shut the computer down. When people are logged in using FreeNX in full screen mode, the natural thing to do is to try to log out or shut down when they're done. Shutting down via their account will shut your server down though - a bad thing for the other users.Now the last thing you have to do is type the following line and hit Enter.
sudo ltsp-update-imageTroubleshooting
See the troubleshooting section at the end of Part 2.
Conclusion
Well, there it is in all its geeky glory. I hope that gets you started off in the right direction. Please keep us up to date, since as I said in the introduction, this procedure is a work in progress and is still being tested out in the wild. Please don't try these instructions on a server that you can't afford to kill. Start out with an isolated test setup to see if this is going to work for your situation, and remember to keep us up to date on what you find.
Enjoy!
Additional Reading
Linux Terminal Server Project Homepage
FreeNX Homepage
Finding The LTSP Option With Xubuntu 8.04
Build chroot Fails During LTSP Server Install
An LTSP Update
LTSP Client Shuts Down Server - The Fix
LTSP Server Setup - The (Relatively) Easy Way
Ubuntu Community FreeNX Installation
Created Date:06-16-08
Revision Date:01-13-10
6.03.2008
Desktop Publishing In Xubuntu/Ubuntu
You might be interested in this post if you want to create word processor documents, brouchures, flyers, spreadsheets, presentations, and the like with your Linux machine. I developed this post while running Xubuntu 7.10, but you should be able to adapt it to your Debian or Ubuntu version/derivative. If you have questions about the differences, be sure to ask in the comments section of this post. Please note that I'm using the term "publishing" in a generalized way in this post and not just to mean print shop applications.
As always, be careful when following advice and/or procedures from this, or any other site, as your system or installation (or both) could be damaged if a mistake is made. See our disclaimer for details.
Introduction
There's just no getting away from desktop publishing. Many of us have to deal with some form of document creation during a normal day. Those of us in the Linux world also have to deal with the added challenge of working with proprietary formats from programs like Microsoft Word and Excel. Fear not though, as I'm going to walk you through some of the common applications to use for desktop publishing in Linux, and a few tips that you can use to make life a little easier. Keep in mind as you read this though that I'm not a publishing guru. I use OpenOffice.org quite a bit, but some of the other programs that I'm going to talk about are apps that I haven't used very much, if at all (Inkscape is new to me). As is my habit, my hope here is not to give you an exhaustive treatise on desktop publishing, but a good starting point for your own exploration.
Fonts
Unfortunately, Linux typically doesn't come with a great pack of fonts (at least not for publishing), and the fonts that it does have are not overly compatible if you're transferring files to and from Windows. I'm going to tell you how to install the Microsoft Core Fonts package on your Ubuntu/Xubuntu system, but keep in mind that they have a copyright on them, so you'll have to decide whether or not you really want/need them.
You can install the Microsoft Core Fonts package through the Add/Remove Applications dialog (Applications > System > Add/Remove...) by entering the term msttcorefonts in the Search: field. Once the entry comes up for Microsoft Core Fonts, just checkmark it and click the Apply Changes button, and then click the Apply button in the confirmation dialog that comes up. You'll then be presented with a configuration window telling you that you're about to set up DEbian FOnt MAnager (defoma). Just click the Forward button and the dialog will close. When the installation is complete, you can click the Close button on the Software has been installed successfully dialog. The Microsoft core fonts will now be available when you are using OpenOffice or any other publishing application.
An alternative to the GUI route I just outlined is to open a terminal (Applications > Accessories > Terminal) and type
There is another font package I really like that you might find interesting too. It's a set of fonts that were created by Brian Kent and packaged for Ubuntu by CrunchBang.org. These fonts are not truly open, but they are free and very very nice. Thank you Brian and CrunchBang for making these fonts available to the rest of us Ubuntu/Xubuntu users.
To install the Brian Kent/CruchBang font package, you'll need to add the repository holding the fonts through the Applications > System > Software Sources dialog. Once that dialog has opened, click the Third-Party Software tab, click the Add... button, and then enter the following line in the text box beside APT line:
and click the Add Source button. Unfortunately, this fonts package hasn't been carried into the newer repositories, so you'll have to leave the gutsy part of the line intact, even if you have a newer Ubuntu/Xubuntu version. After you've clicked the Add Source button, click the Close button on the Software Sources dialog and then click the Reload button on the dialog that pops up saying that your software information is out of date. Once the reload is complete, the Software Sources dialog should close.
Now, open the Synaptic Package Manager (Applications > System > Synaptic Package Manager) and search (Edit > Search...) for ttf-aefonts. Once the entry for ttf-aefonts comes up in the right pane, left click on its checkbox and select the Mark for Installation option. You'll get a warning that the download can't be authenticated, but you should be fine. I haven't had any problems with this package at all. Just click the Mark button. Next, click the Apply button which will bring up another dialog letting you confirm your changes. Click the Apply button here too. Lastly, you'll get the Changes applied dialog and you can just click the Close button and then close the Synaptic Package Manager.
You can also install the font package (once you've added the launchpad repository above) by opening a terminal (Applications > Accessories > Terminal) and typing
and then hitting Enter.
You should now have the fonts available when you use OpenOffice or any other programs that allow you to select the font style.
Clipart
If you want some extra open source clipart to use in your documents, you might want to install the Open ClipArt package that's in the standard Ubuntu repository. All you have to do is open the Add/Remove Applications dialog (Applications > System > Add/Remove...) and type openclipart in the Search: text box. You should see the Open ClipArt entry at the top of the list. Just select the checkbox and then click the Apply Changes button. You'll see a couple of other dialogs asking you to confirm your change (click the Apply button) and to close the dialog (click the Close button).
You can also install the Open ClipArt package from the terminal (Applications > Accessories > Terminal) by typing
and then hitting Enter.
Once the Add/Remove Applications dialog is closed (or the Open ClipArt package is done installing in the terminal), you can open a program like OpenOffice, Inkscape, or Scribus and insert the new clipart. For example, to insert an Open ClipArt file in OpenOffice Writer, you click the insert picture menu item (Insert > Picture > From File...) and browse to the /usr/share/openclipart directory. There you'll be able to choose either png or svg file types (you'll probably want to make sure that you use svg for Inkscape and Scribus) and which category you want. There's a bunch, so be ready to take quite a bit of time browsing through them.
OpenOffice
Almost all of us have need of a word processor or spreadsheet program at times, so I always install OpenOffice.org on my computers (don't ask how many computers I have). OpenOffice is a Microsoft Office replacement that creates and edits word processing documents, spreadsheets, presentations, simple drawings, databases, and much more. It can even open and save Microsoft Office formats.
There are basically two alternatives when installing OpenOffice on Xubuntu. The first alternative is the more involved of the two, but gives you the latest version. If you want to go this route, you can download the latest version here. Once you download it, extract it and then run the installer by double clicking on the setup script in the OpenOffice setup folder. When the installer window comes up, just follow the instructions. Make sure that you have Java 5 (1.5) or newer installed though, or OpenOffice won't run.
The easier alternative is to install OpenOffice from the Add/Remove Applications dialog. This will install what usually ends up being a slightly older version of OpenOffice, but if you don't need the latest and greatest, it's quicker and easier to do it this way. To launch the Add/Remove Applications dialog, go to Applications > System > Add/Remove... and left click. Once the dialog opens, type openoffice in the Search: field and your options for the OpenOffice installation will be displayed (Figure 1). Note that it doesn't matter whether you have All available applications selected in the Show: box or not.
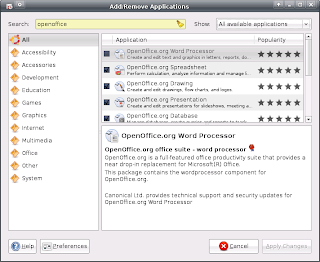 Figure 1
One of the most common tasks that I have to use OpenOffice for (besides creating documents from scratch) is opening and editing Microsoft Office files. To open a Microsoft Office file from within OpenOffice, do the normal File > Open routine and then pull the File type: menu down and select the Microsoft Program's 97/2000/XP option. Figure 2 shows me selecting the Microsoft Word format in Openoffice.org Writer (word processor).

Once you have selected the file type, you can browse to a location where you have a Microsoft file and open it by selecting it and hitting the Open button. Saving to a Microsoft format goes the same way. You take the File > Save As... route and select the Microsoft format that you need.
Another handy input/output feature is the ability to export your documents to PDF files. To do this, you select File > Export as PDF... which will give you the PDF export dialog. I leave the settings alone unless I need something special done, like only exporting a range of pages instead of all of them. You can just click the Export button once you've got all the settings the way you want them.
If you find that you're always working with a certain type of file that's not the default OpenOffice format, you might want to check out the Options dialog (Tools > Options) and look at the Load/Save category. If you use the Always save as pull-down menu and select the Microsoft format you need, OpenOffice will always try to save your documents in the Microsoft Office format. I usually don't do this though because I try to use OpenOffice's open formats for all my documents. It's up to you though. Take a look around in the Options dialog a little on your own, there are a lot of things that you might find useful. There are default formatting options, settings for applications like email clients to use with OpenOffice, Accessibility and Security options, and much more.
OpenOffice has a tremendous amount of features and options, but if you're a convert from Microsoft Office, it should be a pretty easy transition. If you're just starting out with an office suite like OpenOffice, you should probably check out the Help menu. The Help > Get Help Online... option might be a real benefit to you because you can ask the OpenOffice community questions and get answers directly.
Scribus
Scribus (Figure 3) is basically a replacement for Microsoft Publisher. The "drawback" is that it doesn't support opening or saving the Publisher file format, and the development team apparently has no plans to add that support in the future. If you're desperate to transfer files into Scribus from Publisher, you can copy the pages from Publisher into a new Microsoft Word document, save that file, then open it in OpenOffice.org Writer and export that to the OpenOffice Draw format which Scribus can open. Obviously it's not a pretty solution, so I wouldn't expect your document to come through correctly. If you're switching over to Scribus from Publisher, the lack of importing for your old Publisher files is something to keep in mind. You might need to keep Publisher around for legacy support purposes - at least for awhile. Check out the Additional Reading section of this post for a short tutorial that I found through the Scribus site that has a few tips for those switching from Publisher to Scribus.

and then hit Enter.
Once that's finished installing, you can find a Scribus entry under the Applications > Graphics menu. Unfortunately, you'll have to search for help online with the current version of Scribus since there is no integrated manual in the help system. Have a look at the Scribus documentation page to get an idea of what to do. While this does make sure that people get the latest version of the documentation, it could pose a problem for somebody who doesn't have ready access to an Internet connection (think computer labs in developing nations). In the version that comes with Xubuntu 7.10 (1.3.3.9), there is a placeholder for an integrated manual though, so I'm guessing that this omission is only temporary.
There are many great features in Scribus, but a few of the most interesting to me were PDF output (File > Export > Save As PDF...), scripting support (in the Script menu), and good anti-aliasing support. I'm no publishing expert though, so I may be missing some really big issues. If you create publications like flyers, brochures, newsletters and such, I suggest you try Scribus out to see what you think.
Inkscape
According to their website, Inkscape (Figure 4) is an "Open Source vector graphics editor, with capabilities similar to Illustrator, CorelDraw, or Xara X". This is not a program that I use for my own projects, but you can do so much with it and it's used so much in open source publishing, I felt it needed to be included here. To get a good feel for what the program is capable of, you can do what I did and go through a few of the tutorials on their website. While trying these tutorials out, I found Inkscape to be pretty intuitive and powerful, and version 0.46 was very polished and ran well. I didn't have any problems with it during the time that I tried it out. I know that quite a few groups that do publishing use Inkscape and you can get an idea of who uses it, and for what, if you take a look at the gallery on the Inkscape site. In their tutorials section you'll see several of the uses for Inkscape including (but of course not limited to) logos, text effects, comic strips, and even RPG game elements such as buildings.

GIMP
I talked about GIMP (Figure 5) briefly in our digital imaging post, and I want to give it just a little more coverage here.

There's a GIMP add-on that Boot put me wise to that I like to install called gimp-data-extras. According to its description, this package includes an "extra set of brushes, palettes, and gradients for The GIMP". If you find that you need those things and you want to install the data extras package, just open a terminal (Applications > Accessories > Terminal) and type
Viewing/Editing PDF Documents
Just like Adobe (Macromedia) Flash, the Adobe Acrobat PDF format is all over the place, and there will probably be times when you will need to open, edit, or create one of these documents yourself. I've already talked a little bit above about how you can export to PDF from OpenOffice and Scribus, but there are a few other tools for working with Acrobat Reader files in Linux. Just a quick note - I'm going to include the installer package names in parentheses as I go through this section. You can use these names when doing sudo apt-get install, or you can search for them in the Add/Remove Applications dialog.
If you just want a simple PDF viewer when using Xubuntu/Ubuntu, there are several to choose from. Xubuntu comes preinstalled with Document Viewer (Figure 7) whose non-generic name is Evince, and with which I've been very happy. It has all the standard features of a PDF viewer that I usually need and a couple more.


If you don't like Document Viewer or Adobe's Acrobat Reader for some reason though, you have alternatives. KPDF (kpdf), xpdf (xpdf), and ePDFViewer (epdfview) are all very capable viewers that vary by a few features here and there, and are available in the Ubuntu/Xubuntu repository. Some differences also lie in what libraries they rely on (for example Qt versus GTK+) but part of the beauty of running XFCE is that both Qt and GTK+ apps almost always run without any problem. KPDF is nice looking with a feature set that is almost identical to Document Viewer, but KPDF has button toolbars that make accessing its commands a little quicker. xpdf is the least visually appealing, has the fewest features, and doesn't include the typical menu at the top of the window. If you want to see a menu, right click in an open area of the window. xpdf is fine if you just need a very simple viewer, but I prefer others. ePDFViewer is (in my opinion) an average viewer, a lot better than xpdf, but not as good or as feature rich as KPDF or Document Viewer.
If you want to edit PDFs, try PDF Editor (pdfeditor). As long as as the PDF is not locked, PDF Editor should open and change it. Be careful though as I have had it open copywritten material (that wasn't locked) so that I could edit it before. Always check to make sure you're not breaking any laws when you edit someone else's PDFs. One thing to note here is that if the PDF was scanned from a hard copy document instead of being created in software like OpenOffice or Scribus, you won't be able to edit the text unless the document was scanned using OCR (Optical Character Recognition).
PDF Editor has a lot of features like being able to strike through or highlight text, being able to draw on the page, the ability to edit, move, or delete text, etc. The help menu is a little bit sparse, but most of the buttons have fairly descriptive tool tips, so if you know what you want to do, you'll probably be able to figure it out. Another feature of PDF Editor is that it can keep track of revisions for you. That's always nice when you make a mistake and have to roll back to an earlier version. Make sure you usethe File > Save new revision menu option instead of the normal Save if you want to have this roll back functionality though.
Digital Imaging
Image acquisition and editing is also a big part of creating documents, so I usually go ahead and install the applications outlined in my post on digital imaging. That way you'll be able to get images from your digital camera(s) and scanner(s) so that you can include them in your documents.
Printers
I talked a little bit about printers from the standpoint of scanning in my digital imaging post (also mentioned above), but here I would like to talk a little more about Linux printing support. When it's time to print the beautiful document that you've created, Linux gives you the control over the printing process that you would expect from a user friendly desktop operating system. You can add/remove/change your printer(s) by going to Applications > Settings > Printing, which will open the Printer configuration dialog for the localhost (your computer).
If Xubuntu hasn't automagically recognized your printer, the Printer configuration dialog is where you would go to add it manually. Just click the New Printer button, select the printer from the list that comes up (some of the names can be cryptic), and click Forward. Follow the instructions all the way through to add your printer. If you get stuck with this, post a question to the comments section of this post or email us and we'll try to help you.
If your printer isn't being recognized in Xubuntu, and you've made sure that it's plugged into the computer and turned on, you might want to check the Linux compatibility list for your printer manufacturer. Some people would argue that you should do this first, but many times (in my experience) a printer that has the claim of not being supported works under a generic driver. I've had very good luck with Xubuntu recognizing printers, especially Hewlett Packard models.
Once you add your printer (or it is automatically added by Xubuntu), it should show up in your Local Printers list. You can click on the entry for your printer to get the options that are available in the right hand pane. Have a look at Figure 9 to see what I'm talking about.

If you go to the Printer Options page, you'll find a setting that I get a lot of good out of. There's a Print Mode: pulldown menu (Figure 10) that allows you to reduce the quality of your printouts.

Under the Job Options tab there is a plethora (a bunch) of other settings that influence how your printer operates. Another one of the most useful for me is the Scale to fit option that allows you to force the document to fit onto one page. There are also options that allow you to set your document to print with more than one page per sheet, or to print on both sides of the paper (your printer might not support this though). This can be a great paper saver if you're printing out draft or archive documents. My printer doesn't support printing on both sides though, so I do it manually. If you pay attention to how your printer pulls the sheets through, you can usually reinsert the sheet so that the next page will be printed on the back side. This method requires some experimentation, and it also requires printing one page at a time and then re-inserting it into the printer (which can be a little tedious), but it cuts the amount of paper you use in half. Please be aware though that some printers don't like having paper run through them more than once. Be careful when you're trying this method out as you could end up with a nasty paper jam.
Don't forget to look around some more in the pages of the Printer configuration dialog box. You never know what useful things you'll find. Also, if you get a chance to upgrade to the Hardy (8.04) version of Ubuntu/Xubuntu I think you'll be pleasantly surprised with the printer support. 8.04 does a really nice job of autodetecting, autoinstalling, and autoconfiguring printers. Not that earlier versions don't do a good job, but 8.04 is even better.
Conclusion
We'll that's a quick rundown on a very broad topic. I hope that I've given you a good place to start your own exploration into the world of desktop publishing in Xubuntu. Let us know in the comments section what you find and what you think. Your feedback is always important to us.
Enjoy!
Further Reading
1. Scribus
2. Inkscape
3. Gimp
4. Linux Journal Magazine - Oct 2007 - Pages 16,17 - "A Ticket out of Poverty"
5. Linux Pro Magazine - September 2007 - Pages 92,93 - "Hai Ti! Comics"
6. Five Minutes To Midnight
7. Open Lab
8. Our Digital Imaging Post
9. Switching From Publisher To Scribus
10. Brian Kent's AEnigma Font Site
11. CrunchBang
12. Open ClipArt
Created:06-03-08
Revised:06-07-08
As always, be careful when following advice and/or procedures from this, or any other site, as your system or installation (or both) could be damaged if a mistake is made. See our disclaimer for details.
Introduction
There's just no getting away from desktop publishing. Many of us have to deal with some form of document creation during a normal day. Those of us in the Linux world also have to deal with the added challenge of working with proprietary formats from programs like Microsoft Word and Excel. Fear not though, as I'm going to walk you through some of the common applications to use for desktop publishing in Linux, and a few tips that you can use to make life a little easier. Keep in mind as you read this though that I'm not a publishing guru. I use OpenOffice.org quite a bit, but some of the other programs that I'm going to talk about are apps that I haven't used very much, if at all (Inkscape is new to me). As is my habit, my hope here is not to give you an exhaustive treatise on desktop publishing, but a good starting point for your own exploration.
Fonts
Unfortunately, Linux typically doesn't come with a great pack of fonts (at least not for publishing), and the fonts that it does have are not overly compatible if you're transferring files to and from Windows. I'm going to tell you how to install the Microsoft Core Fonts package on your Ubuntu/Xubuntu system, but keep in mind that they have a copyright on them, so you'll have to decide whether or not you really want/need them.
You can install the Microsoft Core Fonts package through the Add/Remove Applications dialog (Applications > System > Add/Remove...) by entering the term msttcorefonts in the Search: field. Once the entry comes up for Microsoft Core Fonts, just checkmark it and click the Apply Changes button, and then click the Apply button in the confirmation dialog that comes up. You'll then be presented with a configuration window telling you that you're about to set up DEbian FOnt MAnager (defoma). Just click the Forward button and the dialog will close. When the installation is complete, you can click the Close button on the Software has been installed successfully dialog. The Microsoft core fonts will now be available when you are using OpenOffice or any other publishing application.
An alternative to the GUI route I just outlined is to open a terminal (Applications > Accessories > Terminal) and type
sudo apt-get install msttcorefontsThere is another font package I really like that you might find interesting too. It's a set of fonts that were created by Brian Kent and packaged for Ubuntu by CrunchBang.org. These fonts are not truly open, but they are free and very very nice. Thank you Brian and CrunchBang for making these fonts available to the rest of us Ubuntu/Xubuntu users.
To install the Brian Kent/CruchBang font package, you'll need to add the repository holding the fonts through the Applications > System > Software Sources dialog. Once that dialog has opened, click the Third-Party Software tab, click the Add... button, and then enter the following line in the text box beside APT line:
deb http://ppa.launchpad.net/corenominal/ubuntu gutsy main
and click the Add Source button. Unfortunately, this fonts package hasn't been carried into the newer repositories, so you'll have to leave the gutsy part of the line intact, even if you have a newer Ubuntu/Xubuntu version. After you've clicked the Add Source button, click the Close button on the Software Sources dialog and then click the Reload button on the dialog that pops up saying that your software information is out of date. Once the reload is complete, the Software Sources dialog should close.
Now, open the Synaptic Package Manager (Applications > System > Synaptic Package Manager) and search (Edit > Search...) for ttf-aefonts. Once the entry for ttf-aefonts comes up in the right pane, left click on its checkbox and select the Mark for Installation option. You'll get a warning that the download can't be authenticated, but you should be fine. I haven't had any problems with this package at all. Just click the Mark button. Next, click the Apply button which will bring up another dialog letting you confirm your changes. Click the Apply button here too. Lastly, you'll get the Changes applied dialog and you can just click the Close button and then close the Synaptic Package Manager.
You can also install the font package (once you've added the launchpad repository above) by opening a terminal (Applications > Accessories > Terminal) and typing
sudo apt-get install ttf-aefontsand then hitting Enter.
You should now have the fonts available when you use OpenOffice or any other programs that allow you to select the font style.
Clipart
If you want some extra open source clipart to use in your documents, you might want to install the Open ClipArt package that's in the standard Ubuntu repository. All you have to do is open the Add/Remove Applications dialog (Applications > System > Add/Remove...) and type openclipart in the Search: text box. You should see the Open ClipArt entry at the top of the list. Just select the checkbox and then click the Apply Changes button. You'll see a couple of other dialogs asking you to confirm your change (click the Apply button) and to close the dialog (click the Close button).
You can also install the Open ClipArt package from the terminal (Applications > Accessories > Terminal) by typing
sudo apt-get install openclipartand then hitting Enter.
Once the Add/Remove Applications dialog is closed (or the Open ClipArt package is done installing in the terminal), you can open a program like OpenOffice, Inkscape, or Scribus and insert the new clipart. For example, to insert an Open ClipArt file in OpenOffice Writer, you click the insert picture menu item (Insert > Picture > From File...) and browse to the /usr/share/openclipart directory. There you'll be able to choose either png or svg file types (you'll probably want to make sure that you use svg for Inkscape and Scribus) and which category you want. There's a bunch, so be ready to take quite a bit of time browsing through them.
OpenOffice
Almost all of us have need of a word processor or spreadsheet program at times, so I always install OpenOffice.org on my computers (don't ask how many computers I have). OpenOffice is a Microsoft Office replacement that creates and edits word processing documents, spreadsheets, presentations, simple drawings, databases, and much more. It can even open and save Microsoft Office formats.
There are basically two alternatives when installing OpenOffice on Xubuntu. The first alternative is the more involved of the two, but gives you the latest version. If you want to go this route, you can download the latest version here. Once you download it, extract it and then run the installer by double clicking on the setup script in the OpenOffice setup folder. When the installer window comes up, just follow the instructions. Make sure that you have Java 5 (1.5) or newer installed though, or OpenOffice won't run.
The easier alternative is to install OpenOffice from the Add/Remove Applications dialog. This will install what usually ends up being a slightly older version of OpenOffice, but if you don't need the latest and greatest, it's quicker and easier to do it this way. To launch the Add/Remove Applications dialog, go to Applications > System > Add/Remove... and left click. Once the dialog opens, type openoffice in the Search: field and your options for the OpenOffice installation will be displayed (Figure 1). Note that it doesn't matter whether you have All available applications selected in the Show: box or not.
 Figure 1
As you can see, there are several different programs that make up OpenOffice in the same way that there are several different programs (Word, Excel, etc) that make up Microsoft Office. Just put a checkmark beside the ones that you want (I usually at least do the Word Processor and Spreadsheet), and then click the Apply Changes button. OpenOffice is installed under the Applications > Office menu so you can start whichever app you need easily.
One of the most common tasks that I have to use OpenOffice for (besides creating documents from scratch) is opening and editing Microsoft Office files. To open a Microsoft Office file from within OpenOffice, do the normal File > Open routine and then pull the File type: menu down and select the Microsoft Program's 97/2000/XP option. Figure 2 shows me selecting the Microsoft Word format in Openoffice.org Writer (word processor).

Figure 2
Once you have selected the file type, you can browse to a location where you have a Microsoft file and open it by selecting it and hitting the Open button. Saving to a Microsoft format goes the same way. You take the File > Save As... route and select the Microsoft format that you need.
Another handy input/output feature is the ability to export your documents to PDF files. To do this, you select File > Export as PDF... which will give you the PDF export dialog. I leave the settings alone unless I need something special done, like only exporting a range of pages instead of all of them. You can just click the Export button once you've got all the settings the way you want them.
If you find that you're always working with a certain type of file that's not the default OpenOffice format, you might want to check out the Options dialog (Tools > Options) and look at the Load/Save category. If you use the Always save as pull-down menu and select the Microsoft format you need, OpenOffice will always try to save your documents in the Microsoft Office format. I usually don't do this though because I try to use OpenOffice's open formats for all my documents. It's up to you though. Take a look around in the Options dialog a little on your own, there are a lot of things that you might find useful. There are default formatting options, settings for applications like email clients to use with OpenOffice, Accessibility and Security options, and much more.
OpenOffice has a tremendous amount of features and options, but if you're a convert from Microsoft Office, it should be a pretty easy transition. If you're just starting out with an office suite like OpenOffice, you should probably check out the Help menu. The Help > Get Help Online... option might be a real benefit to you because you can ask the OpenOffice community questions and get answers directly.
Scribus
Scribus (Figure 3) is basically a replacement for Microsoft Publisher. The "drawback" is that it doesn't support opening or saving the Publisher file format, and the development team apparently has no plans to add that support in the future. If you're desperate to transfer files into Scribus from Publisher, you can copy the pages from Publisher into a new Microsoft Word document, save that file, then open it in OpenOffice.org Writer and export that to the OpenOffice Draw format which Scribus can open. Obviously it's not a pretty solution, so I wouldn't expect your document to come through correctly. If you're switching over to Scribus from Publisher, the lack of importing for your old Publisher files is something to keep in mind. You might need to keep Publisher around for legacy support purposes - at least for awhile. Check out the Additional Reading section of this post for a short tutorial that I found through the Scribus site that has a few tips for those switching from Publisher to Scribus.

Figure 3
Scribus can be installed by opening the Add/Remove Software dialog (Applications > System > Add/Remove...) and typing scribus in the search field. Once the search is done scroll down, check the Scribus entry, and then click the Apply Changes button. There may be two entries for Scribus in the list that comes up. If there are, use the first one. An alternative way to install Scribus is to open a terminal window (Applications > Accessories > Terminal) and typesudo apt-get install scribusand then hit Enter.
Once that's finished installing, you can find a Scribus entry under the Applications > Graphics menu. Unfortunately, you'll have to search for help online with the current version of Scribus since there is no integrated manual in the help system. Have a look at the Scribus documentation page to get an idea of what to do. While this does make sure that people get the latest version of the documentation, it could pose a problem for somebody who doesn't have ready access to an Internet connection (think computer labs in developing nations). In the version that comes with Xubuntu 7.10 (1.3.3.9), there is a placeholder for an integrated manual though, so I'm guessing that this omission is only temporary.
There are many great features in Scribus, but a few of the most interesting to me were PDF output (File > Export > Save As PDF...), scripting support (in the Script menu), and good anti-aliasing support. I'm no publishing expert though, so I may be missing some really big issues. If you create publications like flyers, brochures, newsletters and such, I suggest you try Scribus out to see what you think.
Inkscape
According to their website, Inkscape (Figure 4) is an "Open Source vector graphics editor, with capabilities similar to Illustrator, CorelDraw, or Xara X". This is not a program that I use for my own projects, but you can do so much with it and it's used so much in open source publishing, I felt it needed to be included here. To get a good feel for what the program is capable of, you can do what I did and go through a few of the tutorials on their website. While trying these tutorials out, I found Inkscape to be pretty intuitive and powerful, and version 0.46 was very polished and ran well. I didn't have any problems with it during the time that I tried it out. I know that quite a few groups that do publishing use Inkscape and you can get an idea of who uses it, and for what, if you take a look at the gallery on the Inkscape site. In their tutorials section you'll see several of the uses for Inkscape including (but of course not limited to) logos, text effects, comic strips, and even RPG game elements such as buildings.

Figure 4
Inkscape is very easy to install if you're running an Ubuntu derivative like Xubuntu since it's in the repository. In order to install it, just open a terminal (Applications > Accessories > Terminal) and typesudo apt-get install inkscapeand hit Enter. If you prefer to install applications via the GUI route, you can open the Add/Remove Applications dialog (Applications > System > Add/Remove...) and search for inkscape. The entry for Inkscape should be the only one that comes up, so you can check it and click the Apply Changes button.
If I get a chance to work some more with Inkscape I'll update this post with new information, but for now I hope that gets you started.
If I get a chance to work some more with Inkscape I'll update this post with new information, but for now I hope that gets you started.
GIMP
I talked about GIMP (Figure 5) briefly in our digital imaging post, and I want to give it just a little more coverage here.

Figure 5
Most, if not all of you, that have used Linux for any amount of time have probably used GIMP. It allows you to work with and create images for use in a variety of situations. For instance, I use GIMP to acquire and clean up the screenshots for the blog posts here on Tillamook Rage. Taking a screenshot with GIMP is really easy. With the GIMP window open, you just launch the Screenshot dialog (File > Acquire > Screenshot...) and tell GIMP whether you want to take a picture of the whole screen or just one window, whether you want the window decoration (title bar, border, etc) included, and how long it should wait to take the screen shot. After you click the Snap button (Figure 6) the Screenshot dialog will close and the screenshot will be taken. If you asked GIMP to take a screenshot of a single window, you'll be given a chance to click on the window that you want captured.
Figure 6
Once you've acquired the screenshot, you can crop it and mark it up so that people who view it later can see exactly what you're talking about. One thing I would suggest here is to save the image in GIMP's native XCF format until you're ready to distribute it. That way all of your edits will be preserved and you'll be able to change them later if you need to. Just "save as" the file in your preferred format (I mostly use PNG for this blog) when you've finished all your edits. Even though I use GIMP mostly for screenshots and editing digital images, I've seen it used to create some pretty impressive graphics (logos, text effects, etc) too. Search gimp artwork in Google and take a scroll to see what people (who are much more talented than I am) can do with GIMP.There's a GIMP add-on that Boot put me wise to that I like to install called gimp-data-extras. According to its description, this package includes an "extra set of brushes, palettes, and gradients for The GIMP". If you find that you need those things and you want to install the data extras package, just open a terminal (Applications > Accessories > Terminal) and type
sudo apt-get install gimp-data-extrasand hit Enter. The GUI alternative is to open the Synaptic Package Manager (Applications > System > Synaptic Package Manager) and search (Edit > Search...) for gimp-data-extras. Once the search results come up, just mark the entry for installation and click the Apply button. I would also recommend searching the word gimp this way too. Just scroll down after the search is complete until you start seeing the entries that start with gimp. You can find some really interesting packages and plugins for GIMP that you never knew existed. Just look around and experiment. In my experience any time spent learning GIMP pays you back and then some.
Viewing/Editing PDF Documents
Just like Adobe (Macromedia) Flash, the Adobe Acrobat PDF format is all over the place, and there will probably be times when you will need to open, edit, or create one of these documents yourself. I've already talked a little bit above about how you can export to PDF from OpenOffice and Scribus, but there are a few other tools for working with Acrobat Reader files in Linux. Just a quick note - I'm going to include the installer package names in parentheses as I go through this section. You can use these names when doing sudo apt-get install, or you can search for them in the Add/Remove Applications dialog.
If you just want a simple PDF viewer when using Xubuntu/Ubuntu, there are several to choose from. Xubuntu comes preinstalled with Document Viewer (Figure 7) whose non-generic name is Evince, and with which I've been very happy. It has all the standard features of a PDF viewer that I usually need and a couple more.

Figure 7
Although Document Viewer does work pretty well for me, it's pretty hard to beat the overall integration with other applications (like Firefox) that Adobe's Linux version of Acrobat Reader gives (Figure 8). It's nice to click on a PDF hyperlink in Firefox and have it open inside that tab. It's not a big inconvenience to do the Open With or Save As... routine and use Document Viewer, but the integration is nice when I'm zipping around the Internet and want to get a quick idea of whether I need to read a document or not.
Figure 8
If you want to download and install the Adobe Acrobat Reader for Linux, start by going to Adobe's website. When downloading, Adobe's site (as of the time of this writing) seems to want to detect Xubuntu as a Red Hat based distribution. You have to click the Different language or operating system? link if you want to be able to select the option of downloading a tar.gz or a .deb installer. I downloaded the deb file and then double clicked it to start the installation. It installed fine and started right up on my Xubuntu 7.10 system. Adobe Reader really doesn't have that many more features (that I use in a normal day) than the other PDF reading apps, but something that may seal the deal for you is the whole integration issue.If you don't like Document Viewer or Adobe's Acrobat Reader for some reason though, you have alternatives. KPDF (kpdf), xpdf (xpdf), and ePDFViewer (epdfview) are all very capable viewers that vary by a few features here and there, and are available in the Ubuntu/Xubuntu repository. Some differences also lie in what libraries they rely on (for example Qt versus GTK+) but part of the beauty of running XFCE is that both Qt and GTK+ apps almost always run without any problem. KPDF is nice looking with a feature set that is almost identical to Document Viewer, but KPDF has button toolbars that make accessing its commands a little quicker. xpdf is the least visually appealing, has the fewest features, and doesn't include the typical menu at the top of the window. If you want to see a menu, right click in an open area of the window. xpdf is fine if you just need a very simple viewer, but I prefer others. ePDFViewer is (in my opinion) an average viewer, a lot better than xpdf, but not as good or as feature rich as KPDF or Document Viewer.
If you want to edit PDFs, try PDF Editor (pdfeditor). As long as as the PDF is not locked, PDF Editor should open and change it. Be careful though as I have had it open copywritten material (that wasn't locked) so that I could edit it before. Always check to make sure you're not breaking any laws when you edit someone else's PDFs. One thing to note here is that if the PDF was scanned from a hard copy document instead of being created in software like OpenOffice or Scribus, you won't be able to edit the text unless the document was scanned using OCR (Optical Character Recognition).
PDF Editor has a lot of features like being able to strike through or highlight text, being able to draw on the page, the ability to edit, move, or delete text, etc. The help menu is a little bit sparse, but most of the buttons have fairly descriptive tool tips, so if you know what you want to do, you'll probably be able to figure it out. Another feature of PDF Editor is that it can keep track of revisions for you. That's always nice when you make a mistake and have to roll back to an earlier version. Make sure you usethe File > Save new revision menu option instead of the normal Save if you want to have this roll back functionality though.
Digital Imaging
Image acquisition and editing is also a big part of creating documents, so I usually go ahead and install the applications outlined in my post on digital imaging. That way you'll be able to get images from your digital camera(s) and scanner(s) so that you can include them in your documents.
Printers
I talked a little bit about printers from the standpoint of scanning in my digital imaging post (also mentioned above), but here I would like to talk a little more about Linux printing support. When it's time to print the beautiful document that you've created, Linux gives you the control over the printing process that you would expect from a user friendly desktop operating system. You can add/remove/change your printer(s) by going to Applications > Settings > Printing, which will open the Printer configuration dialog for the localhost (your computer).
If Xubuntu hasn't automagically recognized your printer, the Printer configuration dialog is where you would go to add it manually. Just click the New Printer button, select the printer from the list that comes up (some of the names can be cryptic), and click Forward. Follow the instructions all the way through to add your printer. If you get stuck with this, post a question to the comments section of this post or email us and we'll try to help you.
If your printer isn't being recognized in Xubuntu, and you've made sure that it's plugged into the computer and turned on, you might want to check the Linux compatibility list for your printer manufacturer. Some people would argue that you should do this first, but many times (in my experience) a printer that has the claim of not being supported works under a generic driver. I've had very good luck with Xubuntu recognizing printers, especially Hewlett Packard models.
Once you add your printer (or it is automatically added by Xubuntu), it should show up in your Local Printers list. You can click on the entry for your printer to get the options that are available in the right hand pane. Have a look at Figure 9 to see what I'm talking about.

Figure 9
There are some things in the options pages that you normally shouldn't mess with (like the Device URI), but there are some really handy options too. The first thing you might want to do when you install a printer that you're going to be using a lot is make it the default printer. You can do this on the Settings tab by clicking the Make Default button. Now, every time that you click the print button in an application, the document will go to this printer. This is also the location where you print test pages and tell the printer to clean its print heads with the Print Test Page and Clean Print Heads buttons respectively. You may not get the Clean Print Heads option if your printer doesn't support that functionality though.If you go to the Printer Options page, you'll find a setting that I get a lot of good out of. There's a Print Mode: pulldown menu (Figure 10) that allows you to reduce the quality of your printouts.

Figure 10
If I'm not needing to print nice looking documents to give to someone else, I always use this setting (especially if I'm printing drafts to edit them). It cuts down on the amount of ink that your printer uses (take that over-priced ink cartridge companies!) and makes for less wear and tear on your printer. I usually set this to Draft Grayscale (Black cartridge) or Draft (Color cartridge) so that they will be the default selection because I always forget to set it at print time. If you want to print a nice version of a document, you can always go to the printing properties section of the program you're using and change the setting to the higher print quality. For example, in OpenOffice Writer, you would go the normal File > Print route and then click the Properties button. If you look around a little bit, you'll find a Printout Mode option under the Device tab. That will allow you to change the print quality setting back to a higher level. Other programs will be similar, you'll just have to look around a little bit for the setting.Under the Job Options tab there is a plethora (a bunch) of other settings that influence how your printer operates. Another one of the most useful for me is the Scale to fit option that allows you to force the document to fit onto one page. There are also options that allow you to set your document to print with more than one page per sheet, or to print on both sides of the paper (your printer might not support this though). This can be a great paper saver if you're printing out draft or archive documents. My printer doesn't support printing on both sides though, so I do it manually. If you pay attention to how your printer pulls the sheets through, you can usually reinsert the sheet so that the next page will be printed on the back side. This method requires some experimentation, and it also requires printing one page at a time and then re-inserting it into the printer (which can be a little tedious), but it cuts the amount of paper you use in half. Please be aware though that some printers don't like having paper run through them more than once. Be careful when you're trying this method out as you could end up with a nasty paper jam.
Don't forget to look around some more in the pages of the Printer configuration dialog box. You never know what useful things you'll find. Also, if you get a chance to upgrade to the Hardy (8.04) version of Ubuntu/Xubuntu I think you'll be pleasantly surprised with the printer support. 8.04 does a really nice job of autodetecting, autoinstalling, and autoconfiguring printers. Not that earlier versions don't do a good job, but 8.04 is even better.
Conclusion
We'll that's a quick rundown on a very broad topic. I hope that I've given you a good place to start your own exploration into the world of desktop publishing in Xubuntu. Let us know in the comments section what you find and what you think. Your feedback is always important to us.
Enjoy!
Further Reading
1. Scribus
2. Inkscape
3. Gimp
4. Linux Journal Magazine - Oct 2007 - Pages 16,17 - "A Ticket out of Poverty"
5. Linux Pro Magazine - September 2007 - Pages 92,93 - "Hai Ti! Comics"
6. Five Minutes To Midnight
7. Open Lab
8. Our Digital Imaging Post
9. Switching From Publisher To Scribus
10. Brian Kent's AEnigma Font Site
11. CrunchBang
12. Open ClipArt
Created:06-03-08
Revised:06-07-08
Subscribe to:
Posts (Atom)


