If you're like me, then you don't have a ton of money to blow on your hobbies (that darn money tree just won't grow). I'm sure that everyone is like me and would love to build C3PO or a Replicator/Replicant in their garage , but who has the cash to heat their evil lair and still buy equipment? Well, that's where reuse robotics comes in. Now, I'm not talking about modular robotics platforms, or reusable source code, I'm talking about getting outdated and discarded computers and electronic components, and reusing/re-purposing them for your projects. There are examples of these types of projects all over the Internet, just try to Google mousebot and see what happens. Boot has written a great post on some ways that we can lay our grubby little paws on discarded computer/electronic equipment (legally I might add), so that even if you have no money at all, you should still be able to get gear. Check out his post called High tech "dumpster diving" for details.
As time goes on and Boot and I continue to have a blast with Linux, we find all sorts of things that could cross over to robotics. I myself have a penchant for robotics and embedded systems, and I find a lot of reuse ideas through doing my own projects. As Boot and I come across things, we'll use this series to pass them along to you. By the way, for any of the un-initiated among you, when I refer to embedded systems I'm talking about computers that have as much as possible crammed onto a single motherboard (storage too). Your cell phone is a good example of an embedded system.
Below are just a few things that I want to mention as we start this series.
Exhibit A
As I mentioned above, Boot has a post on the basics of scrounging for equipment. I can't recommend this post highly enough. Whether you're a pre-teen or teen with no money, or whether you're Donnie Trump, you can get some good out of the information that Boot is issuing forth in that one. Please check it out.
Exhibit B
A website that I really like from a hobbyist perspective is Anthony Beckwith's robotics page. To me a lot of his projects are the purest form of reuse robotics. You can see parts from computers, VCRs, calculators, and much much more in his robot designs. He also does quite a bit with solar powered robots, which I think is really cool. Mr Beckwith, I salute you.
Exhibit C
Boot and I are working on several posts for this series, and as time goes on and more things come to us, we'll throw them on here. To give you and idea though, coming up we'll have at least one post on building diskless robot controllers out of old motherboards and network cards, and we'll also have a post on using the sound card of a computer for analog sensor inputs.
Well, there you have it. The things that I've mentioned here are just to whet your appetite. Stay tuned for future installments of this series. We've got lots of cool ideas and information to share with you.
Enjoy!
Search Tillamook Rage


4.10.2008


4.03.2008
Digital Imaging In Linux
You might be interested in this post if you want to use digital cameras and/or scanners in Linux.
This procedure was developed using both Xubuntu Feisty (7.04) and Xubuntu Gutsy (7.10), but should work equally well with any version or derivative of Ubuntu or any Debian derivative - with some minor changes.
As always, be careful what you do with the advice and procedures from this site or any other, as you can do serious damage to your system if a mistake is made. Please see our disclaimer for details.
Introduction
Recently, I was thrown into the task of mind-melding Linux (specifically Xubuntu) with a newer digital camera when my dad bought a Kodak EasyShare M883. He also wanted to get an all-in-one printer so that he could print, fax, and scan. He really likes the Xubuntu Feisty system that I set up for him many months ago, and I didn't want to ruin things for him by switching it back to Windows, so I had to make things work well for him in Linux. This post is about my (mis)adventures in trying to do that. My hope is that it will give some of you a head start on using your own digital imaging equipment in Linux, and will help you avoid the same mistakes that I made.
Camera-Shy
There are several digital camera packages for Linux, and the most commonly used one is gphoto. I found that gphoto recognized my dad's M883 right off the bat, and I was able to download photos to the computer. It's interesting to note that gphoto's website didn't have the M883 on their compatibility list. That goes to show you that it doesn't hurt to try something even though you think it might not work. When you get a new camera, I would suggest just trying to plug it in first to see if Linux recognizes it as an external hard drive. If that doesn't work you can install the gphoto library manually and use it, or you can check out the next section on using Picasa. To install gphoto, open an X terminal (Applications > Accessories > Terminal) and type the following line, hitting Enter afterwards. Note that this line is installing two programs at once, gphoto2 and gtkam.
Unfortunately, not every camera will work under Linux. gphoto can't cover all of the available camera models, and many companies don't put out Linux drivers for their cameras. There is still hope though, even if Linux won't recognize your particular camera. There are two basic ways to get your photos off of your camera if it has a removable memory card. The first is with a memory card reader, the kind that fits in a 3.5 or 5.25 inch bay in the front of your computer. If your motherboard supports card readers, most likely Linux will recognize it. Once you have the card reader installed you can just insert the camera's memory card and either open the card as an external drive, or use it in a program like Picasa (see below).
I have to give credit for this second technique to Boot, since I had seen these products around but never put two and two together. What you can do is buy a USB memory card adapter for your memory card type (my dad's was SD). Even when the camera isn't recognized, the adapter with the card in it will be recognized as an external flash drive. That way you can get your photos off the camera while you wait for gphoto or one of the other camera libraries to catch up. You can use it as either an external drive and just copy the files off, or you can open the card and import the photos using a program like Picasa (see below). These adapters come in several flavors, but they usually look like over-sized USB flash drives and accept memory cards (chips) like SD and XD.
Picasa
Once again, the people at Google have done the world a great favor. By teaming up with Codeweavers, Google has ported ("moved" might be a more accurate term) Picasa2 over to the Linux platform. It uses much of the original Windows code and runs it on top of the Windows emulator Wine. Not purely Linux, but an efficient way to make your app cross-platform quickly. Google currently has RPM, DEB, and BIN installers available for the i386 platform. I really like well done BIN installers, so I tried that one out. I was not disappointed. I got a nice graphical installer, and everything installed without a hitch. It's not in the Ubuntu repositories (that I know of) as of the writing of this post, so you'll have to grab one of the installers here. One side-note here is that I found documentation that said Picasa is designed for Gnome and KDE, but I didn't have any problems with it in XFCE.
I had Picasa go ahead and run the new storage detector in the background so that it would automatically detect my dad's camera, and had it put an icon on the desktop.
To import photos from your camera, attach your camera to the computer and do whatever the camera's documentation says to get the camera talking to the computer. Then run Picasa and click on the Import button shown by the red oval in Figure 1.

I found an HP Officejet 6110 All-In-One for my dad at a local solid waste management district (recycling facility). See Boot's post on High Tech Dumpster Diving for ways to find good technology cheap. The printer needed a minor repair, so I got even more of a discount on it. It works great and for less than the price of the cartridges I got a complete, working, all-in-one printer. Not bad eh?
Anyway, Boot and I are pretty big fans of HP printers for Linux since we almost never have one that isn't recognized. You might have problems if you buy a bleeding edge HP printer, but one with any age on it at all should work. A lot of the printers from other manufacturers will work fine too, but they are a little more hit and miss (especially Lexmark and Xerox).
XSane...In The Membrane
XSane is a graphical program that allows you to use scanners. XSane can be integrated with Gimp for 1 step scanning for editing. More about that below. You can install XSane by opening an X terminal (Applications > Accessories > Terminal), typing
Most of us who run Linux (and many who use Windows) use Gimp for our photo editing. If you want to use XSane directly with Gimp, it's pretty easy to do. You can create a symbolic link for XSane in Gimp's plugins directory to make it recognized in Gimp's menu system. Before you can create this link though, you need to gather some information about the version of Gimp and where XSane is installed on your system. Open an X terminal (Applications > Accessories > Terminal) or switch back to one that you haven't closed yet, and type the following command, hitting Enter afterwards.
There is a chance that you may be able to run the Windows software that came with your camera. Wine is a Windows Emulator for Linux, and can be installed by opening an X terminal (Applications > Accessories > Terminal) and typing
This procedure was developed using both Xubuntu Feisty (7.04) and Xubuntu Gutsy (7.10), but should work equally well with any version or derivative of Ubuntu or any Debian derivative - with some minor changes.
As always, be careful what you do with the advice and procedures from this site or any other, as you can do serious damage to your system if a mistake is made. Please see our disclaimer for details.
Introduction
Recently, I was thrown into the task of mind-melding Linux (specifically Xubuntu) with a newer digital camera when my dad bought a Kodak EasyShare M883. He also wanted to get an all-in-one printer so that he could print, fax, and scan. He really likes the Xubuntu Feisty system that I set up for him many months ago, and I didn't want to ruin things for him by switching it back to Windows, so I had to make things work well for him in Linux. This post is about my (mis)adventures in trying to do that. My hope is that it will give some of you a head start on using your own digital imaging equipment in Linux, and will help you avoid the same mistakes that I made.
Camera-Shy
There are several digital camera packages for Linux, and the most commonly used one is gphoto. I found that gphoto recognized my dad's M883 right off the bat, and I was able to download photos to the computer. It's interesting to note that gphoto's website didn't have the M883 on their compatibility list. That goes to show you that it doesn't hurt to try something even though you think it might not work. When you get a new camera, I would suggest just trying to plug it in first to see if Linux recognizes it as an external hard drive. If that doesn't work you can install the gphoto library manually and use it, or you can check out the next section on using Picasa. To install gphoto, open an X terminal (Applications > Accessories > Terminal) and type the following line, hitting Enter afterwards. Note that this line is installing two programs at once, gphoto2 and gtkam.
sudo apt-get install gphoto2 gtkamThe libraries and applications with the gphoto package can be used from the X terminal, but it's easiest to use it with a program like Picasa or GThumb. If you want to use gphoto by itself, you can run the program gtkam that we installed with the command above. gtkam is a graphical front end for the gphoto library which you can use to grab the photos off of your camera. I prefer using Picasa instead of gtkam, so this post will focus on that, but if you want a post on using gphoto without installing any other programs, you can ask in the comments section. We'll be happy to oblige.
Unfortunately, not every camera will work under Linux. gphoto can't cover all of the available camera models, and many companies don't put out Linux drivers for their cameras. There is still hope though, even if Linux won't recognize your particular camera. There are two basic ways to get your photos off of your camera if it has a removable memory card. The first is with a memory card reader, the kind that fits in a 3.5 or 5.25 inch bay in the front of your computer. If your motherboard supports card readers, most likely Linux will recognize it. Once you have the card reader installed you can just insert the camera's memory card and either open the card as an external drive, or use it in a program like Picasa (see below).
I have to give credit for this second technique to Boot, since I had seen these products around but never put two and two together. What you can do is buy a USB memory card adapter for your memory card type (my dad's was SD). Even when the camera isn't recognized, the adapter with the card in it will be recognized as an external flash drive. That way you can get your photos off the camera while you wait for gphoto or one of the other camera libraries to catch up. You can use it as either an external drive and just copy the files off, or you can open the card and import the photos using a program like Picasa (see below). These adapters come in several flavors, but they usually look like over-sized USB flash drives and accept memory cards (chips) like SD and XD.
Picasa
Once again, the people at Google have done the world a great favor. By teaming up with Codeweavers, Google has ported ("moved" might be a more accurate term) Picasa2 over to the Linux platform. It uses much of the original Windows code and runs it on top of the Windows emulator Wine. Not purely Linux, but an efficient way to make your app cross-platform quickly. Google currently has RPM, DEB, and BIN installers available for the i386 platform. I really like well done BIN installers, so I tried that one out. I was not disappointed. I got a nice graphical installer, and everything installed without a hitch. It's not in the Ubuntu repositories (that I know of) as of the writing of this post, so you'll have to grab one of the installers here. One side-note here is that I found documentation that said Picasa is designed for Gnome and KDE, but I didn't have any problems with it in XFCE.
I had Picasa go ahead and run the new storage detector in the background so that it would automatically detect my dad's camera, and had it put an icon on the desktop.
To import photos from your camera, attach your camera to the computer and do whatever the camera's documentation says to get the camera talking to the computer. Then run Picasa and click on the Import button shown by the red oval in Figure 1.

Figure 1
Once you are in the export screen you'll see the Select Device pull down menu shown in the red oval in Figure 2. When you click the pull down menu, you should see your camera in the list of available devices. The names can be kind of cryptic, so if in doubt, I would start at the top one and work your way down. The top entry in the pull down list is usually your camera in my experience. Once you select your camera, Picasa should start the import process. Once you're to that point, you can select photos one by one (while holding the control key) and then click the Import Selected button, or you can import all of the photos by clicking the Import All button.


Figure 2
PrintersI found an HP Officejet 6110 All-In-One for my dad at a local solid waste management district (recycling facility). See Boot's post on High Tech Dumpster Diving for ways to find good technology cheap. The printer needed a minor repair, so I got even more of a discount on it. It works great and for less than the price of the cartridges I got a complete, working, all-in-one printer. Not bad eh?
Anyway, Boot and I are pretty big fans of HP printers for Linux since we almost never have one that isn't recognized. You might have problems if you buy a bleeding edge HP printer, but one with any age on it at all should work. A lot of the printers from other manufacturers will work fine too, but they are a little more hit and miss (especially Lexmark and Xerox).
XSane...In The Membrane
XSane is a graphical program that allows you to use scanners. XSane can be integrated with Gimp for 1 step scanning for editing. More about that below. You can install XSane by opening an X terminal (Applications > Accessories > Terminal), typing
sudo apt-get install xsaneand hitting Enter. To install XSane graphically, open the Add/Remove Software dialog (Applications > System > Add/Remove...) and search for xsane. Once the XSane entry comes up, you can click the checkbox beside it and click the Apply Changes button.
Once XSane is installed, you can launch it by going to Applications > Graphics > XSane Image Scanner. You'll be presented with the set of windows in Figure 3. These windows will allow you to change things like the color balance and brightness of the document. There are many settings, and to write about all of them would take another post. I'll leave you to experiment. Make sure your scanner is turned on and plugged in to your computer, make sure your document is in the scanner, and click on the Scan button highlighted by the red oval in Figure 3.


Once XSane is installed, you can launch it by going to Applications > Graphics > XSane Image Scanner. You'll be presented with the set of windows in Figure 3. These windows will allow you to change things like the color balance and brightness of the document. There are many settings, and to write about all of them would take another post. I'll leave you to experiment. Make sure your scanner is turned on and plugged in to your computer, make sure your document is in the scanner, and click on the Scan button highlighted by the red oval in Figure 3.

Figure 3
XSane will scan the document and then a new window will pop up showing what was scanned. You can then do the typical File > Save As... routine to save the digitized document to the hard drive. If you go the Save As... route, make sure to set the file type using the pull down menu with the red oval around it in Figure 4, or specify the file type by typing the correct extension. So, for a JPEG file, you would type something like myimage.jpg and then click the OK button.
Figure 4
Gimp + XSane = GoodnessMost of us who run Linux (and many who use Windows) use Gimp for our photo editing. If you want to use XSane directly with Gimp, it's pretty easy to do. You can create a symbolic link for XSane in Gimp's plugins directory to make it recognized in Gimp's menu system. Before you can create this link though, you need to gather some information about the version of Gimp and where XSane is installed on your system. Open an X terminal (Applications > Accessories > Terminal) or switch back to one that you haven't closed yet, and type the following command, hitting Enter afterwards.
sudo find / -iname xsaneThis search line will show you the location(s) of the xsane binary. You may see several, but look for one in either the /usr/bin directory or the /usr/local/bin directory and remember the full path. Next you can type the following line, this time hitting the Tab key afterwards.
~/.gimp-Once you hit tab, this line will complete with the version number of Gimp that is installed on your system. Remember this version number.
Now that you have the information from the commands above, you can create the symbolic link in the Gimp plug-ins directory. For all of you who are used to Windows, a symbolic link is kind of like a shortcut. Type the following line, replacing /usr/bin/xsane with the path to xsane on your system, and the 2.4 in ~/.gimp-2.4/plug-ins with the version number of Gimp that you found.
Now that you have the information from the commands above, you can create the symbolic link in the Gimp plug-ins directory. For all of you who are used to Windows, a symbolic link is kind of like a shortcut. Type the following line, replacing /usr/bin/xsane with the path to xsane on your system, and the 2.4 in ~/.gimp-2.4/plug-ins with the version number of Gimp that you found.
ln -s /usr/bin/xsane ~/.gimp-2.4/plug-ins/Make sure to hit the Enter key after you've typed in the command.
Now that is done, launch Gimp (Applications > Graphics > GIMP Image Editor). Once it launches, go to the XSane acquire menu (File > Acquire > XSane) and you should see something similar to Figure 5. Notice that I've put a red box around the XSane menu in the figure. If you've already used XSane with your scanner, you will probably see it in the list below Device dialog... and in my case it's the entry that begins with hpaio. Your scanner name will differ from mine of course. You can either click on the entry for your scanner (if it's there), or you can click on the Device dialog... entry. Each of these entries opens XSane (Figure 3), but clicking the Device dialog... entry searches for a scanner first. If after clicking one of these two entries you get a dialog box telling you that there's no device present, you need to verify that your scanner is hooked up to the computer, that's it's turned on, and that it's supported in Linux.

Now that is done, launch Gimp (Applications > Graphics > GIMP Image Editor). Once it launches, go to the XSane acquire menu (File > Acquire > XSane) and you should see something similar to Figure 5. Notice that I've put a red box around the XSane menu in the figure. If you've already used XSane with your scanner, you will probably see it in the list below Device dialog... and in my case it's the entry that begins with hpaio. Your scanner name will differ from mine of course. You can either click on the entry for your scanner (if it's there), or you can click on the Device dialog... entry. Each of these entries opens XSane (Figure 3), but clicking the Device dialog... entry searches for a scanner first. If after clicking one of these two entries you get a dialog box telling you that there's no device present, you need to verify that your scanner is hooked up to the computer, that's it's turned on, and that it's supported in Linux.

Figure 5
Windows Camera Software With WineOnce the XSane windows pops up (again, Figure 3) you can use it just like before, but the scanned document opens in a Gimp window so that you can start editing it immediately. I like this because it avoids the extra steps of saving the scanned image and then reopening it in Gimp. This way you also have more flexibility on what you do with the document before you save it, and which formats you can save it in.
There is a chance that you may be able to run the Windows software that came with your camera. Wine is a Windows Emulator for Linux, and can be installed by opening an X terminal (Applications > Accessories > Terminal) and typing
sudo apt-get install wineor you can open the software installer (Applications > Settings > Add/Remove...) and search for wine.
If you're following the X terminal route, you may be asked if it's ok to use more space on your hard drive. Just type Y and hit Enter.
Once you have wine installed, you should have a Wine item in your Applications menu. If you have the menu item, expand its menu and click on Configure Wine (Applications > Wine > Configure Wine). As you can see from Figure 6, there are a lot of options that you can experiment with when you're trying to get your Windows programs running. The one that is going to probably be the most critical to you though is the Windows pull down menu with the red box around it in Figure 6.
 Figure 6
With this option set to the default of Windows 2000, my dad's Kodak software installer wouldn't even run. It complained about the version of Windows I was running. When I set it to Windows XP though, it ran fine. Once the program is installed you can open the Wine C drive (Applications > Wine > Browse C:\ Drive) and navigate to where the program was installed (probably the Program Files directory) and double click it. I can't guarantee it will work, but with some tweaking I've been able to get most things to run. Check out the Wine website for extensive information on how to configure Wine to run Windows programs.
I hope that at least gives some of you a headstart on getting your digital imaging equipment working in Linux. If you hit any snags or have any questions, post them to the comments section and we'll try to help.
Enjoy!
If you're following the X terminal route, you may be asked if it's ok to use more space on your hard drive. Just type Y and hit Enter.
Once you have wine installed, you should have a Wine item in your Applications menu. If you have the menu item, expand its menu and click on Configure Wine (Applications > Wine > Configure Wine). As you can see from Figure 6, there are a lot of options that you can experiment with when you're trying to get your Windows programs running. The one that is going to probably be the most critical to you though is the Windows pull down menu with the red box around it in Figure 6.
 Figure 6
I hope that at least gives some of you a headstart on getting your digital imaging equipment working in Linux. If you hit any snags or have any questions, post them to the comments section and we'll try to help.
Enjoy!
3.22.2008
Dialup modems in Linux
There are still a lot of people needing to use dialup Internet connections. In spite of the belief of many industry people, who generally have plenty of money and live in highly populated areas, the majority of people in the world still use dialup. Many modems that have been made are Winmodems, modems made to run in Windows specifically, all software run. Hardware modems are higher quality modems and are run through, you guessed it, the hardware. Where does that leave Linux users? I recently ran into a problem helping connect an EONS PC to dialup.
You'll first need to know what chipset your modem is using. There will be a chip on the modem that gives the name (Lucent, Agere, Intel, Conexant, Rockwell, etc.).
Agere - I recommend staying away from Agere, they're hard to get working and their AMR modems aren't supported.
Conexant - Conexant has an excellent support site for Linux, Linuxant. They have excellent how-tos and downloads and it would waste space to reproduce that here.
Intel - Always good at supporting their hardware, has extensive modem driver support, here.
Rockwell - See Conexant.
US Robotics - See Conexant.
Lucent - Lucent is hard to find drivers for. Some are below in the general repository, here is an alpha release for LT Windmodems though.
Here's a good general repository, but parts aren't in English, so be prepared if you don't have French/Spanish experience.
Linmodems.org has good information, though some links are fairly worthless now. If you need information on how to detect and setup your modem I would look here, no need for me to reproduce their work here.
Hopefully this will get you up and going with a modem in Linux, if you have more information I missed please comment.
You'll first need to know what chipset your modem is using. There will be a chip on the modem that gives the name (Lucent, Agere, Intel, Conexant, Rockwell, etc.).
Agere - I recommend staying away from Agere, they're hard to get working and their AMR modems aren't supported.
Conexant - Conexant has an excellent support site for Linux, Linuxant. They have excellent how-tos and downloads and it would waste space to reproduce that here.
Intel - Always good at supporting their hardware, has extensive modem driver support, here.
Rockwell - See Conexant.
US Robotics - See Conexant.
Lucent - Lucent is hard to find drivers for. Some are below in the general repository, here is an alpha release for LT Windmodems though.
Here's a good general repository, but parts aren't in English, so be prepared if you don't have French/Spanish experience.
Linmodems.org has good information, though some links are fairly worthless now. If you need information on how to detect and setup your modem I would look here, no need for me to reproduce their work here.
Hopefully this will get you up and going with a modem in Linux, if you have more information I missed please comment.
Working With Drives And Files In Puppy Linux
You might be interested in this post if you're working with Puppy Linux and you need to access any drives outside of the one that Puppy is running on. These might include CD, USB, and hard drives, among others.
Mount The Drive
Start off by opening the directory that you want to copy the file to (if you are copying the file). You'll see why I have you open it later on. I wanted to copy the file to the my-documents folder, so I clicked on the home icon (Figure 1) on the desktop and then clicked on the my-documents folder icon in the window that came up.

This procedure was developed using Puppy Linux 3.01 Seamonkey which is available at www.puppylinux.org . It will probably work with other versions or Puplets of Puppy, but that's the one I used, so it's the only one I can guarantee. If you have luck using other versions of Puppy please let us know in the comments. As always, I must warn you to be careful when following this procedure, or any procedure form any site as a mistake can be fatal to your system. Please see our disclaimer for the full details.
For this example, I have a single file called FreeNX_Client_1_5.pup that I'll copy from a USB drive to the my-documents directory. The procedure will be the same if you are copying the file from a CD or other type of drive too.
Mount The Drive
In Figure 1 you see the Puppy Linux desktop. Your desktop may vary slightly, but you get the idea.
Start off by opening the directory that you want to copy the file to (if you are copying the file). You'll see why I have you open it later on. I wanted to copy the file to the my-documents folder, so I clicked on the home icon (Figure 1) on the desktop and then clicked on the my-documents folder icon in the window that came up.

Figure 1
Now click on the drives icon on the desktop to open the Puppy drive mounter tool Pmount. You'll notice in Figure 2 that I have 4 drives listed. There's the floppy drive, the CD-ROM drive, the main hard drive, and my USB flash drive that is labeled as USB DISK 20X. Your listing will vary depending on what drives you have in your computer.
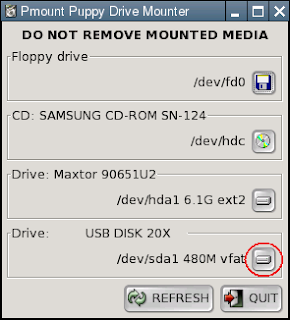 Figure 2
 Figure 2
I know that the file that I want is on my USB flash drive, so I click on the mount button (that I've flagged out with the red oval) in Figure 2 to mount the drive. It works the same way for other types of drives too. Once Pmount is done mounting the drive, you will see a new button that has a folder image on it (Figure 3). Clicking on that button will open a window containing the contents of the drive.
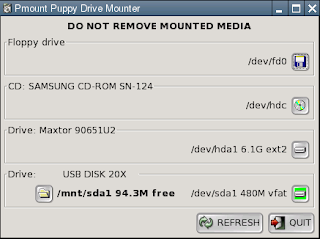 Figure 3
 Figure 3
Make sure that you don't remove the drive or disk from the computer until you have clicked on the mount button shown in Figure 2 again. Removing a flash drive while it's still mounted can result in data loss.
Work With The Files
Once you have the drive mounted and the folder is open, you can start to work with the files and folders it contains. You can see in Figure 4 that the FreeNX_Client_1_5.pup file that I want to copy is in the root directory of the drive. There's a little bit of a trick here with Puppy. The folder list on a mounted drive is not always updated consistently. Sometimes when you remount a drive that you've had mounted in Puppy before, old files that aren't there anymore will show up. To fix this, click the Rescan directory contents button that I have flagged out with the red oval in Figure 4. After clicking the rescan button I was all set.


Now that you have copied the file over, you can do whatever you need to it. In my case, I wanted to install the FreeNX client application, so I just clicked on the file I just copied, which opened the DotPup window in Figure 7.

 Figure 8
I clicked the Run button to run the installer, and then clicked No on the next dialog that asked me if I wanted to delete my original DotPup file. You could choose Yes here if you want to get rid of the DotPup file that you installed from. The Puppy installer usually opens up the folder(s) that any files were installed to, so that should help you figure out where things went during the installation.
That's pretty much it. I went the route of showing you how to copy a file since it's the most involved process, but it shows you the basics of how to deal with all of the common file operations. I hope this helps. Please leave comments on this post so that we know if it's helpful or not.
Enjoy!
Work With The Files
Once you have the drive mounted and the folder is open, you can start to work with the files and folders it contains. You can see in Figure 4 that the FreeNX_Client_1_5.pup file that I want to copy is in the root directory of the drive. There's a little bit of a trick here with Puppy. The folder list on a mounted drive is not always updated consistently. Sometimes when you remount a drive that you've had mounted in Puppy before, old files that aren't there anymore will show up. To fix this, click the Rescan directory contents button that I have flagged out with the red oval in Figure 4. After clicking the rescan button I was all set.

Figure 4
I right clicked on the file which gave me the menu in Figure 5.
Figure 5
I wanted to copy the file to my hard drive, so I clicked on the Copy... menu item. You can also click on any of the other options including Rename... and Delete. Clicking Copy... brought up the Copy dialog box in Figure 6. You'll notice that I've drawn a red oval around the file icon (in my file's case it's a bone) in Figure 6.
Figure 6
You can drag this icon (bone) to any folder that you want to copy the file to. This is where the my-documents directory window that I had you open earlier comes in. Drag the icon over to that window and Puppy will copy the file for you.Now that you have copied the file over, you can do whatever you need to it. In my case, I wanted to install the FreeNX client application, so I just clicked on the file I just copied, which opened the DotPup window in Figure 7.

Figure 7
I clicked the Unzip button which decompressed the installer application and then gave me the dialog in Figure 8. Figure 8
That's pretty much it. I went the route of showing you how to copy a file since it's the most involved process, but it shows you the basics of how to deal with all of the common file operations. I hope this helps. Please leave comments on this post so that we know if it's helpful or not.
Enjoy!
3.21.2008
Linux FOSS Dreamweaver Alternatives
I've recently started working on doing some initial website template designs for work. Back in the day (6 or 7 years ago) I taught a class on Dreamweaver, and loved it. I have since moved to doing all my work in Linux, and no longer have a copy of Dreamweaver. After some shopping I found two alternatives to review. I was surprised I only managed to find two projects with active development. I required the projects I reviewed to have active development and not be abandonware. NVU and Komposer, an NVU fork, were both apparently good, but there hasn't been much done with them in quite a while. So here they are: Quanta Plus 3.5.6 and Bluefish 1.0.7.
Quanta Plus
 Quanta Plus 3.5.6 is licensed under GPL v2. It's very easy to use if you're used to any WYSIWYG editors. It has a nice tabbed layout for various visuals such as font formats, tables, lists, buttons, forms, images, and tags. Along the bottom of the window you can switch between open pages. It's simplistic and easier to use, but also a little less powerful than the Bluefish or Dreamweaver. If you want to make basic pages, Quanta Plus could be a good replacement for you.
Quanta Plus will work in KDE or XFCE distributions. It can be installed through your package manager, package name "quanta," or from their website.
Quanta Plus Website
Bluefish
 Bluefish is a little smoother than Quanta Plus and has more powerful features in easier to access locales. For example, you have a tabbed layout like Quanta Plus for formatting features, but in addition there are editing tools for C, Apache, DHTML, DocBook, HTML, PHP, PHP+HTML, and SQL in drop down menus under the formatting tabs. As with Quanta Plus it has tabs along the bottom of the editing window to switch between open pages.
Bluefish is built with GTK+, and therefore will work in Gnome or XFCE distributions. It is licensed under the GPL. Bluefish can be installed through your package manager, package name "bluefish", or from their website.
Bluefish Website
Conclusion
In conclusion, I found the features of Bluefish to be much more extensive. Surprisingly, this didn't make it any more difficult to navigate and use thanks to a well designed menu and tab system. If you're designing very simple pages, just text and graphics, then either would work for you equally well. What window manager you use may be the deciding factor. If you use XFCE either will work, but if you have a KDE distribution (Knoppix, Kubuntu, Mandriva, some Debian) then you're limited, for the most part, to Quanta Plus. If you use Gnome (Ubuntu, some Debian, Red Hat) you're limited to Bluefish. I recommend trying both if you can, you just might find the next best thing to Adobe Dreamweaver.
Quanta Plus
 Quanta Plus 3.5.6 is licensed under GPL v2. It's very easy to use if you're used to any WYSIWYG editors. It has a nice tabbed layout for various visuals such as font formats, tables, lists, buttons, forms, images, and tags. Along the bottom of the window you can switch between open pages. It's simplistic and easier to use, but also a little less powerful than the Bluefish or Dreamweaver. If you want to make basic pages, Quanta Plus could be a good replacement for you.
Quanta Plus will work in KDE or XFCE distributions. It can be installed through your package manager, package name "quanta," or from their website.
Quanta Plus Website
Bluefish
 Bluefish is a little smoother than Quanta Plus and has more powerful features in easier to access locales. For example, you have a tabbed layout like Quanta Plus for formatting features, but in addition there are editing tools for C, Apache, DHTML, DocBook, HTML, PHP, PHP+HTML, and SQL in drop down menus under the formatting tabs. As with Quanta Plus it has tabs along the bottom of the editing window to switch between open pages.
Bluefish is built with GTK+, and therefore will work in Gnome or XFCE distributions. It is licensed under the GPL. Bluefish can be installed through your package manager, package name "bluefish", or from their website.
Bluefish Website
Conclusion
In conclusion, I found the features of Bluefish to be much more extensive. Surprisingly, this didn't make it any more difficult to navigate and use thanks to a well designed menu and tab system. If you're designing very simple pages, just text and graphics, then either would work for you equally well. What window manager you use may be the deciding factor. If you use XFCE either will work, but if you have a KDE distribution (Knoppix, Kubuntu, Mandriva, some Debian) then you're limited, for the most part, to Quanta Plus. If you use Gnome (Ubuntu, some Debian, Red Hat) you're limited to Bluefish. I recommend trying both if you can, you just might find the next best thing to Adobe Dreamweaver.
3.17.2008
Make the Terminal speedy with Yakuake
Call me lazy, but why move the mouse to open a terminal. A purist would say a REAL operating system is entirely console based. I'm no purist, I like an OS to be usable by the majority of people. In Linux the terminal is an essential tool, great for doing any and all work. Well, with Yakuake and a bit of editing you can have a hideable terminal that you can access with a single button - Quake style.
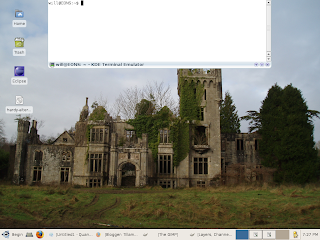
Anyone who has played the original Quake game knows it had access to a terminal within it. That was the basis for Yakuake. Yakuake is a KDE application, so it works in KDE or XFCE systems. Below is a picture of what it looks like when it's up and running.
 Simply open a terminal and type
Now you can tweak the settings of Yakuake to choose where on the screen you want it to be, what size it should be, and what key will trigger the terminal to appear. It's very easy to customize, so play with it a bit to find the best settings for you.
The default button to open Yakuake is F12. Once open the settings are stored in the directory accessed through the arrow in the lower right corner of the Yakuake.
Hope you enjoy, and now your terminal will react as fast as you think, even without a mouse.
Anyone who has played the original Quake game knows it had access to a terminal within it. That was the basis for Yakuake. Yakuake is a KDE application, so it works in KDE or XFCE systems. Below is a picture of what it looks like when it's up and running.
 Simply open a terminal and type
sudo apt-get install yakuake
sudo cp /usr/share/applications/kde/yakuake.desktop /etc/xdg/autostartNow you can tweak the settings of Yakuake to choose where on the screen you want it to be, what size it should be, and what key will trigger the terminal to appear. It's very easy to customize, so play with it a bit to find the best settings for you.
The default button to open Yakuake is F12. Once open the settings are stored in the directory accessed through the arrow in the lower right corner of the Yakuake.
Hope you enjoy, and now your terminal will react as fast as you think, even without a mouse.
3.07.2008
The 3,000 Mark
Well, we broke 3,000 visitors sometime yesterday. We would like to thank you all, and hope you're finding plenty of help. I thought we might have 1,000 hits the first year. Keep on asking good questions, and we'll keep trying to find solutions to your Linux and tech woes!
Subscribe to:
Posts (Atom)

 Posts
Posts


