
This procedure was developed using Puppy Linux 3.01 Seamonkey which is available at www.puppylinux.org . It will probably work with other versions or Puplets of Puppy, but that's the one I used, so it's the only one I can guarantee. If you have luck using other versions of Puppy please let us know in the comments. As always, I must warn you to be careful when following this procedure, or any procedure form any site as a mistake can be fatal to your system. Please see our disclaimer for the full details.
For this example, I have a single file called FreeNX_Client_1_5.pup that I'll copy from a USB drive to the my-documents directory. The procedure will be the same if you are copying the file from a CD or other type of drive too.
Mount The Drive
In Figure 1 you see the Puppy Linux desktop. Your desktop may vary slightly, but you get the idea.
Start off by opening the directory that you want to copy the file to (if you are copying the file). You'll see why I have you open it later on. I wanted to copy the file to the my-documents folder, so I clicked on the home icon (Figure 1) on the desktop and then clicked on the my-documents folder icon in the window that came up.

Figure 1
Now click on the drives icon on the desktop to open the Puppy drive mounter tool Pmount. You'll notice in Figure 2 that I have 4 drives listed. There's the floppy drive, the CD-ROM drive, the main hard drive, and my USB flash drive that is labeled as USB DISK 20X. Your listing will vary depending on what drives you have in your computer.
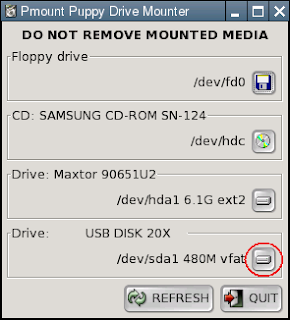 Figure 2
 Figure 2
I know that the file that I want is on my USB flash drive, so I click on the mount button (that I've flagged out with the red oval) in Figure 2 to mount the drive. It works the same way for other types of drives too. Once Pmount is done mounting the drive, you will see a new button that has a folder image on it (Figure 3). Clicking on that button will open a window containing the contents of the drive.
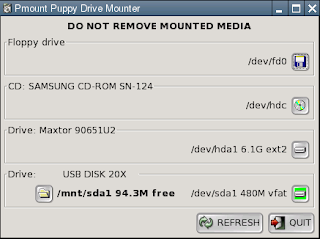 Figure 3
 Figure 3
Make sure that you don't remove the drive or disk from the computer until you have clicked on the mount button shown in Figure 2 again. Removing a flash drive while it's still mounted can result in data loss.
Work With The Files
Once you have the drive mounted and the folder is open, you can start to work with the files and folders it contains. You can see in Figure 4 that the FreeNX_Client_1_5.pup file that I want to copy is in the root directory of the drive. There's a little bit of a trick here with Puppy. The folder list on a mounted drive is not always updated consistently. Sometimes when you remount a drive that you've had mounted in Puppy before, old files that aren't there anymore will show up. To fix this, click the Rescan directory contents button that I have flagged out with the red oval in Figure 4. After clicking the rescan button I was all set.


Now that you have copied the file over, you can do whatever you need to it. In my case, I wanted to install the FreeNX client application, so I just clicked on the file I just copied, which opened the DotPup window in Figure 7.

 Figure 8
I clicked the Run button to run the installer, and then clicked No on the next dialog that asked me if I wanted to delete my original DotPup file. You could choose Yes here if you want to get rid of the DotPup file that you installed from. The Puppy installer usually opens up the folder(s) that any files were installed to, so that should help you figure out where things went during the installation.
That's pretty much it. I went the route of showing you how to copy a file since it's the most involved process, but it shows you the basics of how to deal with all of the common file operations. I hope this helps. Please leave comments on this post so that we know if it's helpful or not.
Enjoy!
Work With The Files
Once you have the drive mounted and the folder is open, you can start to work with the files and folders it contains. You can see in Figure 4 that the FreeNX_Client_1_5.pup file that I want to copy is in the root directory of the drive. There's a little bit of a trick here with Puppy. The folder list on a mounted drive is not always updated consistently. Sometimes when you remount a drive that you've had mounted in Puppy before, old files that aren't there anymore will show up. To fix this, click the Rescan directory contents button that I have flagged out with the red oval in Figure 4. After clicking the rescan button I was all set.

Figure 4
I right clicked on the file which gave me the menu in Figure 5.
Figure 5
I wanted to copy the file to my hard drive, so I clicked on the Copy... menu item. You can also click on any of the other options including Rename... and Delete. Clicking Copy... brought up the Copy dialog box in Figure 6. You'll notice that I've drawn a red oval around the file icon (in my file's case it's a bone) in Figure 6.
Figure 6
You can drag this icon (bone) to any folder that you want to copy the file to. This is where the my-documents directory window that I had you open earlier comes in. Drag the icon over to that window and Puppy will copy the file for you.Now that you have copied the file over, you can do whatever you need to it. In my case, I wanted to install the FreeNX client application, so I just clicked on the file I just copied, which opened the DotPup window in Figure 7.

Figure 7
I clicked the Unzip button which decompressed the installer application and then gave me the dialog in Figure 8. Figure 8
That's pretty much it. I went the route of showing you how to copy a file since it's the most involved process, but it shows you the basics of how to deal with all of the common file operations. I hope this helps. Please leave comments on this post so that we know if it's helpful or not.
Enjoy!


5 comments:
Well done, thanks
Linux flash drive can provide a communication channel that is safe from a possibly compromised computer. linux flash drive
yeah, but how do you find and mount a dive connected to your network (via usb to the router or via wifi, like another computer). Puppy's weak file manager seems to ignore networking completely.
Hi there and thank you very much! That is exactly what I was looking for!
Hi there and thank you very much! That is exactly what I was looking for!
Post a Comment