Backing up your files is one of the most important things any computer user can do. Why risk losing years of hard work? I have backups of everything I've done back to my "Windows 3.1 on a 486" days (1988 for the record, yeah I feel like an old man). Now backing up can be done in 3 ways; to a CD or DVD, to a fileserver, or to another hard drive. I'll explain the latter two here as most people, I'll assume, can burn a CD or DVD backup. In the next few days I will add the directions for automatically backing up.
I did this using Xubuntu 7.04 (Feisty) as the OS and a Xubuntu 7.04 Live CD for the portion using a live CD. I also like to use SimplePup (http://www.puppylinux.org/user/viewpage.php?page_id=1) for a small live boot, but I wanted the consistency here. I'll warn you again when the time comes, but messing up any commands in this can be a death knoll for all the data on your hard drive. Double, or even triple, check all your command line inputs and make sure you change what's written here to what your particular case is. I don't want to be held accountable for sloppy typing in the terminal, so please be careful.
Method 1: File Server Backup
The first way to back up is to a file server, a Samba server in this case. If you don't know what one is, you most likely don't have one and so you should either burn a CD or DVD backup or go to Method 2, setting up a Samba server is a discussion for another day. If you have a different type of file server than Samba, sorry but I don't have directions for that yet.
First, make sure you have enough hard drive space on the server for the amount of data you want to store on it. If not, you'll need to add another hard drive or get less data. I suggest the first option. Now, boot to your live CD, in this case Xubuntu 7.04. Once in the XFCE environment (AKA: the desktop) you'll need to install pyNeighborhood by going to Applications > System > Add/Remove... and searching for pyNeighborhood with the All Available Applications selection in the drop down menu in the upper right hand. Once completed you will have all the tools needed for dealing with Samba which are, quite unfortunately, not included with Ubuntu and its derivatives.
Now, open a terminal window and type sudo mkdir /mnt/samba to create a directory to which you can link directly to the Samba server. Now mount your samba directory you want to save to into this /mnt/samba directory, for example sudo smbmount //192.168.1.100/home/user/backup /mnt/samba at which point you will most likely be asked for the password to the Samba server. To break this down into English that says "As root (sudo) mount the Samba file system (smbmount) on the server (//192.168.1.100) in the backup directory (/home/user/backup) to be given the local folder samba so I don't have to type as much (/mnt/samba)." Now you can use the dd command.
The dd command is extremely powerful and can act as a way to destroy data or make backups similar to Norton Ghost. BE EXTREMELY CAREFUL WHEN USING DD, A TYPO CAN ERASE YOUR DRIVE!!!!! With that said, let's play with dd. It stands for "data definition", but some people lovingly call it "destroys data." For our backup we will define 2 options of dd, if and of. if stands for input file and of stands for output file. In this example we want to back up our entire drive to the server in an .img file, similar to an .iso image in principle. To do this type sudo dd if=/dev/hda of=/mnt/samba/mybackup.img. At this point make sure /dev/hda is the drive you want to back up, and change this to whatever drive you want to back up, and that mybackup.img is whatever name you want to give your image. Now check again, making sure that everything is typed correctly with spaces in all the right places. Hit ENTER and let it sit and do its thing. Backing up my 60GB drive takes 20ish minutes, so sit back and relax. There shouldn't be any visible signs if it's working correctly. If it finishes without error you'll get back to the prompt (#) and you're home free. To restore this backup do the same procedure, switching the if and of values. It's a beautiful thing, isn't it?
Method 2: Backing up to another drive or partition
Using this procedure you can backup an entire drive or partition to another drive or partition. First, make sure you have enough hard drive space on the destination drive or partition (the one you're copying to) for the amount of data you want to store on it. If not, you'll need to use a different hard drive. Now, boot to your live CD, in this case Xubuntu 7.04. This method is much easier than the previous in term of length of steps, but again BE EXTREMELY CAREFUL WHEN USING DD, A TYPO CAN ERASE YOUR DRIVE!!!!!
With that said, let's play with dd. It stands for "data definition", but some people lovingly call it "destroys data." For our backup we will define 2 options of dd, if and of. if stands for input file and of stands for output file. In this example we want to back up our drive or partition to another drive or partition. In the terminal type sudo dd if=/dev/hda of=/dev/hdb to copy one drive to another. To copy one partition to another it would be the same except with partition numbers, such as sudo dd if=/dev/hda1 of=/dev/hdb1 or if you want to do a backup on the same drive, a poor choice for safety reasons, it would be sudo dd if=/dev/hda1 of=/dev/hda2. At this point make sure /dev/hda is the drive you want to back up, and change this to whatever drive you want to back up, and that /dev/hdb is the drive you want to back up to. Now check again, making sure that everything is typed correctly with spaces in all the right places. Remember: whatever drive or partition is after of= will be completely overwritten. Hit ENTER and let it sit and do its thing. There shouldn't be any visible signs if it's working correctly. If it finishes without error you'll get back to the prompt (#) and you're home free. To restore this backup do the same procedure, switching the if and of values.
Sometimes you'll need to reinstall the Grub boot loader when restoring from an image. If this happens you'll be told by Grub during startup when it fails to load your OS. Just insert the Live CD and use the restore option. In Xubuntu, at least, there's an option labeled Reinstall Grub boot loader. Run this and you'll be fine. Otherwise from the terminal type grub-install /dev/hda or whatever your hard drive is.
Now you have all the different ways to back up. There are others to back up single files, but that's a simple copy and paste from one drive to another. To copy and paste single files to a Samba server follow the initial backup directions for making the link in /mnt/samba and then just copy and paste into that folder.
Happy backing up!
For the record Norton is a registered trademark of Symantec Corporation, please don't sue me if I didn't credit this properly.
Search Tillamook Rage


9.19.2007


9.18.2007
Customize the XFCE desktop and icons
Ever want to change single icons, or how the desktop is displayed? Here's an easy approach to it, without changing whole icon themes.
This procedure was developed using the Xubuntu 7.04 (Feisty Fawn) Alternate Install CD running XFCE. As always, be careful when editing your system configuration files, or following any procedures from any site, as you can do harm to your system if a mistake is made. Always make backups of the configuration files that you change, or you might just find yourself with a broken system that's a pain to fix.
The first step is to decide how you want your desktop to look. I wanted to make it as close to a Windows desktop as possible. Once you know the basics of how it works you can do anything you want with it, that's the power of Linux based systems.
First, go to the Applications > Settings > Desktop Settings menu, see below.
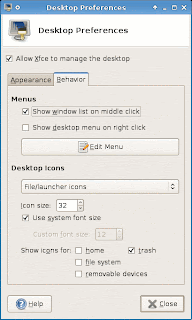 Under the behavior tab, select File/launcher icons on the dropdown menu. Under Show icons for select only the trash checkbox. Now close the dialog box. This alone isn't enough though. From the terminal type mousepad ~/.config/xfce4/desktop/xfdesktoprc (where ~ is a shorthand to the /home/USERNAME directory, it saves some keystrokes and is fancier) to edit the xfdesktoprc file, which controls which XFCE icons are shown on the desktop. This is edited by simply setting true or false for show-filesystem, show-home, show-removable, and show-trash. If any of these variables aren't there you can add them. In this example only show-trash is set to true as I am editing the other icons manually.
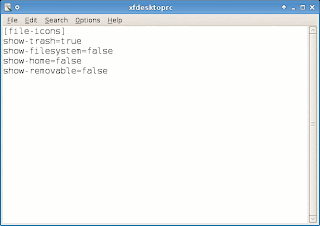 None of these changes will take effect until a restart or log out and back in. Now to make the Computer and Home Files links for the desktop. Right click on the desktop and choose Create Launcher... from the menu. The Name and Icon selections are somewhat self explanatory, give any name you want for the link and choose any icon you want. For the Command you can either choose one through the browse menu to the right of the box or type in any command you want that you would type into a terminal window.
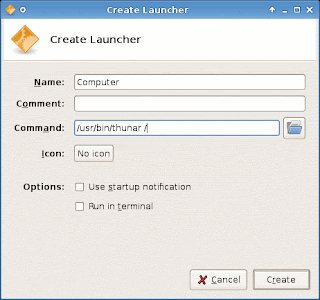 In this example I wanted my launcher to point to the root directory, similar to My Computer in a Windows system. So I used the browse menu to select thunar, the file manager in Xubuntu, and had it look to root (/). This could also be accomplished by just typing thunar /. You can create launchers that automatically look to a certain directory by making it the parameter of the command, like the home folder for the user, ie thunar /home/tillamook where tillamook would be replaced with your user name.
After a restart or logging out you should have the finished product similar to this:
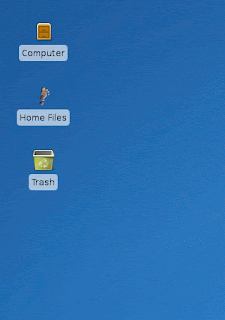 Now go forth an customize Tillimookians!
For the record, Windows is a registered trademark of Microsoft.
This procedure was developed using the Xubuntu 7.04 (Feisty Fawn) Alternate Install CD running XFCE. As always, be careful when editing your system configuration files, or following any procedures from any site, as you can do harm to your system if a mistake is made. Always make backups of the configuration files that you change, or you might just find yourself with a broken system that's a pain to fix.
The first step is to decide how you want your desktop to look. I wanted to make it as close to a Windows desktop as possible. Once you know the basics of how it works you can do anything you want with it, that's the power of Linux based systems.
First, go to the Applications > Settings > Desktop Settings menu, see below.
 Under the behavior tab, select File/launcher icons on the dropdown menu. Under Show icons for select only the trash checkbox. Now close the dialog box. This alone isn't enough though. From the terminal type mousepad ~/.config/xfce4/desktop/xfdesktoprc (where ~ is a shorthand to the /home/USERNAME directory, it saves some keystrokes and is fancier) to edit the xfdesktoprc file, which controls which XFCE icons are shown on the desktop. This is edited by simply setting true or false for show-filesystem, show-home, show-removable, and show-trash. If any of these variables aren't there you can add them. In this example only show-trash is set to true as I am editing the other icons manually.
 None of these changes will take effect until a restart or log out and back in. Now to make the Computer and Home Files links for the desktop. Right click on the desktop and choose Create Launcher... from the menu. The Name and Icon selections are somewhat self explanatory, give any name you want for the link and choose any icon you want. For the Command you can either choose one through the browse menu to the right of the box or type in any command you want that you would type into a terminal window.
 In this example I wanted my launcher to point to the root directory, similar to My Computer in a Windows system. So I used the browse menu to select thunar, the file manager in Xubuntu, and had it look to root (/). This could also be accomplished by just typing thunar /. You can create launchers that automatically look to a certain directory by making it the parameter of the command, like the home folder for the user, ie thunar /home/tillamook where tillamook would be replaced with your user name.
After a restart or logging out you should have the finished product similar to this:
 Now go forth an customize Tillimookians!
For the record, Windows is a registered trademark of Microsoft.
9.17.2007
The first week
My fellow Tillamookians...
After 1 week of posting our tips and fixes I would call it a success. We hoped to help a few people, but neither of us would have guessed 109 viewers in 8 countries on 3 continents already. Thank you all. We're getting closer every day to unveiling the ultimate goal of the team, EONS. Teasers and such to come as we get closer to release date.
EONS Project Team
After 1 week of posting our tips and fixes I would call it a success. We hoped to help a few people, but neither of us would have guessed 109 viewers in 8 countries on 3 continents already. Thank you all. We're getting closer every day to unveiling the ultimate goal of the team, EONS. Teasers and such to come as we get closer to release date.
EONS Project Team
9.16.2007
LTSP Server Setup - The (Relatively) Easy Way
You might be interested in this post if you want to set up an LTSP server. We've gone through the pain of finding the best way to set one up so you don't have to. No need to thank us, the smiles on your faces are thanks enough.
This procedure was developed using the Xubuntu 7.04 (Feisty Fawn) Alternate Install CD running XFCE. As always, be careful when editing your system configuration files, or following any procedures from any site, as you can do harm to your system if a mistake is made. Always make backups of the configuration files that you change, or you might just find yourself with a broken system that's a pain to fix.
This walk through should leave you with a complete LTSP server that clients with their "network boot" setting enabled can boot from. While it's true that the Xubuntu Alternate Install CD has an option to install an LTSP server automatically for you that works well, there are usually a few gotchas that you have to watch out for. This post is intended to guide you through the gotchas with a minimum of hardship. The hard drive of the computer that you're using during this procedure will be completely overwritten, so make sure you don't have anything on it that you don't want to lose. Also, this walk through will reference a couple of other posts on this blog to cut down on duplicate instructions. I apologize ahead of time for the low quality of a few of the screen shots. Lets get started.
The Installation Process
Boot the computer that will become your server from the Xubuntu Alternate Install CD and, if you're running a version prior to 8.04, select the Install an LTSP server option when the menu comes up. If you're using Xubuntu 8.04 or later, you'll need to follow the instructions in our LTSP update post to start the LTSP server installation. Make sure that the computer is hooked up to the network so that it can download the packages for the LTSP client build (Build chroot) step later on. Follow the directions for the Choose language screens, the Configure the keyboard setup screens, and the Configure the network screen (enter whatever host name you want the server to have). On Xubuntu 8.04 and newer, you may also be asked to select your timezone. Once you get through all of those, you will be at the first Partition disks screen (Figure 1).
 Figure 1
You want to choose the Guided - use entire disk option unless you have a good reason to do otherwise. This will use the entire hard drive (remember that you're supposed to get everything important off of it), giving the server the most possible storage for your users. The more users you have, the more hard drive space you will probably require. Also, while I'm at it I will mention that using Serial ATA (with NCQ) or SCSI instead of Parallel ATA hard drives will significantly improve the performance of your server. This is because SATA and SCSI drives handle simultaneous requests from multiple users more efficiently. Now, back to the installation. Once you have selected Guided - use entire disk, hit Enter and you will be brought to the second Partition disks screen which asks you which hard drive to partition. Select the drive (be aware that multiple disk RAID configurations may show up as only one drive) that you want to partition for the server to use and hit Enter. The next and final Partition disks screen is a confirmation screen confirming the partition configuration that you just set up. You will see more than one partition (there should be a swap partition in there somewhere), and that's normal. Hit the Left Arrow to go over to Yes and hit the Enter key. You will probably hear the hard drive(s) start crunching at this point while the partitions are created and formatted. Once that step is complete, Xubuntu versions earlier than 8.04 will have you go through a Configure time zone screen, and a Configure the clock screen asking about UTC time. After these screens, you will come to the Set up users and passwords set of screens (4 of them). Enter whatever user name and password information you want here, just make sure you remember it for later. Beginning with Xubuntu 8.10, home directory encryption became an option, so if you're running 8.10 or newer, you will see an encryption screen next. Whether or not you choose to encrypt your home directory is up to you. I personally would not for this server, since encryption is designed to protect your data in the event a computer itself is stolen. This is more of a concern with laptops. Once you're done with that you will see the Configuring APT screen, which may ask you if you use a proxy server (on newer versions). If you don't have a proxy server just hit Enter. The system will configure apt, and then the Select and install software screen will come up. All of this part of the setup is automated, so get yourself a cup of coffee, its gonna take awhile. The Building LTSP chroot... (Building Thin Client System... on newer Xubuntu versions) step may error out at 50% done, and if it does you'll see the RSOD (Red Screen of Death) in Figure 2.
 Figure 2
If you see this screen, don't worry. Just hit Enter to Continue, and then hit Enter with Build LTSP chroot selected on the Ubuntu installer main menu screen. Once you are done installing and the server has rebooted, check out our post Build chroot Fails During LTSP Server Install which will walk you through the process of redoing this step. Next you'll see the Installing GRUB boot loader screen, and the the Finishing the installation screen just before the CD ejects and a screen asking you to Continue to complete the installation comes up. Take the CD out and hit Enter to restart the computer.
Set Up the Server Environment
The first thing you want to do is ensure that your X Terminal works (Application -> Accessories -> Terminal in the default XFCE setup). There is a problem with XFCE that some people (including us) have experienced where trying to launch and X term will cause XFCE to exit out to the login screen. If you try to launch the XFCE Terminal (or any other terminal for that matter) in XFCE and it crashes, check out our post entitled "XFCE Terminal Crash Fix" to remedy the problem. Once you have a working X Term, we can move on.
Assuming that you are at the Xubuntu logon prompt, type in the user name and password combo that you set up during the installation and log in. The first thing that I would recommend doing is shutting down the DHCP server daemon that should now be running on your LTSP server. This is just a precaution to make sure that no DHCP clients accidentally get an IP address from your server instead of your network's primary DHCP server. If all of the computers on your network have static IP addresses, you should be able to skip this step. To shut down the DHCP server, open an X Term and type sudo /etc/init.d/dhcp3-server stop and hit Enter. You should see the message in Figure 3.
 Figure 3
Once this is done, you have two different paths you can take. If the LTSP installation went fine without the Red Screen of Death telling you the Build chroot step failed, just continue straight on to the end of this. If the installation failed on the Build chroot step, just follow the directions in the post entitled Build chroot Step Fails During LTSP Server Install and then come back to this post and continue from this point.
The next thing you want to do is set your server up to on it's own physical network. Once you have that done, you can start adding the LTSP client computers as well. You could also just leave it on a network that already has a DHCP server (like the one you're probably already on), but the issues surrounding that type of setup will have to be covered in another post. Once you have the server isolated on its own network, its time to set a static IP for it. Open the network settings dialog (Applications -> System -> Network) double click on your main network connection (Wired connection for me). On newer versions of Xubuntu, you may have to right click on the network manager icon in the system tray and then click Edit Connections... .Take a look at Figure 4 to see what I'm talking about.
 Figure 4
Once the settings dialog comes up for that interface, change the Configuration: drop down box to Static IP address, and enter your static IP address information. Just for your information, I used 192.168.0.1 for the IP address, 255.255.255.0 for the Subnet mask, and 192.168.0.1 for the Gateway address. Have a look at Figure 5 to see what I mean.
 Figure 5
Notice that the Gateway address is the same as the IP address in this case. I did this because this is a simple (and hopefully well generalized) procedure, so I didn't worry about getting the LTSP server on the Internet. If you need it to be on the Internet, just add the actual address of the gateway on the network, or leave it as the LTSP server if you're making it the gateway too. Once you have set the static network configuration, hit OK and then click Close on the Network Settings dialog box. Open an X Term and type sudo /etc/init.d/dhcp3-server start to start the DCHP server back up again.
Now, set up a client on the same physical network (by physical network I mean the same network switch or router by the way), set it to boot from the network, and try to boot it. At this point the client should boot off of the LTSP server you have set up and will eventually bring you to an X desktop (assuming you don't have any video issues). If things don't work out for you and the client won't boot, see the section below called So Its Broke and You Want to Fix It for help. You will see the Ubuntu load and logon screens when the client boots up but don't worry, this is normal. Once you log on it will be just like the Xubuntu environment that you set up on the server. Go ahead and log on to your new LTSP client-server setup using the user name and password you set up for the client and reap the fruits of your labor.
Something to note here is that the easy way to make changes to the client user interface (XFCE or otherwise) that the LTSP clients will see, is to log on to the server with the client's user name and password and make the changes. The next time you boot your client, it should reflect the changes that you have made on the server. You can use some of the other tips, tricks, and fixes on this blog (i.e. "LTSP Client Shuts Down Server - The Fix") to help you set up a workable, stable environment for your users. Also, since we all know that these types of procedures are almost never a "one size fits all" type of thing, see the "So Its Broke and You Want to Fix It" section below if you need it. Otherwise, enjoy.
So Its Broke and You Want to Fix It
If you've done everything in this post so far, but you're still having problems, you've come to the right place. I'm going to go through a few things that have given us fits in the past.
First, open an X Term and type sudo ifdown eth0 (where eth0 is the name of your main network card) and then type sudo ifup eth0. This will shut down and then bring back up your network interface, updating it with the changes you have made. Restarting the computer will have the same effect if you don't know the name of your network interface.
Second, please check your physical network setup and connections. I can't tell you the number of times that we (meaning me) have thought I had a broken LTSP server when it was just a network connection that I either forgot to hook up, or a switch that I forgot to plug in.
Third, if your client will not do a network boot correctly from the server, check to make sure that you have the BIOS set up to do a network boot. This can be a pain on some computers like the Dell Optiplex GX100 (who says you can't reuse an old computer huh?) that I'm using as my test bed to write this blog. In order to even get the option to use the network interface as a boot device, you have to enable an network interface option that says On w/ MBA in the BIOS. Thanks for that extra step Dell, my life wouldn't have been complete without it. Also, make sure that your network interface supports the protocols being used to boot off of the LTSP server (i.e. PXE). If it doesn't , get yourself another network card or computer that will work. Once you're sure of all this, check the next step.
Fourth, Xubuntu uses the H. Peter Anvin version of tftp (tftp-hpa, and thank you Mr. Anvin). This version of tftp responds to a switch (-s) that prepends a path onto the beginning of the path that the client uses for its download. If this isn't set right, you will get a file not found TFTP error on your client during the net boot. Check your /etc/ltsp/dhcpd.conf file along with the tftpd entry in your /etc/inetd.conf file to make sure that the path after the -s switch, plus the path to either of the image files (pxelinux.0 or nbi.img) in the dhcpd.conf file adds up to a valid path to your network boot image files. For instance, on the LTSP system that I set up while writing this, the complete path from adding the tftpd and dhcpd.conf entries was /var/lib/tftpboot/ltsp/i386/pxelinux.0. It could also be /opt/ltsp/i386/boot/pxelinux.0 too and it wouldn't hurt anything. They are the same file. Verify that this path points to a valid image on your system. If it does not, I would suggest searching the root (/) directory for the pxelinux.0 file (or the nbi.img file if you're not using a PXE enabled client). While you are in the dhcpd.conf file, take a look at the bottom and you'll notice the entry option root-path "/opt/ltsp/i386"; or something similar. This is that chroot(ed) directory that we set up earlier that will act as the root directory for your LTSP clients.
If this post was helpful to you and you liked it, let us know in the comments. If you didn't like this post, Boot wrote it and posted it under my name.
This procedure was developed using the Xubuntu 7.04 (Feisty Fawn) Alternate Install CD running XFCE. As always, be careful when editing your system configuration files, or following any procedures from any site, as you can do harm to your system if a mistake is made. Always make backups of the configuration files that you change, or you might just find yourself with a broken system that's a pain to fix.
This walk through should leave you with a complete LTSP server that clients with their "network boot" setting enabled can boot from. While it's true that the Xubuntu Alternate Install CD has an option to install an LTSP server automatically for you that works well, there are usually a few gotchas that you have to watch out for. This post is intended to guide you through the gotchas with a minimum of hardship. The hard drive of the computer that you're using during this procedure will be completely overwritten, so make sure you don't have anything on it that you don't want to lose. Also, this walk through will reference a couple of other posts on this blog to cut down on duplicate instructions. I apologize ahead of time for the low quality of a few of the screen shots. Lets get started.
The Installation Process
Boot the computer that will become your server from the Xubuntu Alternate Install CD and, if you're running a version prior to 8.04, select the Install an LTSP server option when the menu comes up. If you're using Xubuntu 8.04 or later, you'll need to follow the instructions in our LTSP update post to start the LTSP server installation. Make sure that the computer is hooked up to the network so that it can download the packages for the LTSP client build (Build chroot) step later on. Follow the directions for the Choose language screens, the Configure the keyboard setup screens, and the Configure the network screen (enter whatever host name you want the server to have). On Xubuntu 8.04 and newer, you may also be asked to select your timezone. Once you get through all of those, you will be at the first Partition disks screen (Figure 1).
 Figure 1
 Figure 2
Set Up the Server Environment
The first thing you want to do is ensure that your X Terminal works (Application -> Accessories -> Terminal in the default XFCE setup). There is a problem with XFCE that some people (including us) have experienced where trying to launch and X term will cause XFCE to exit out to the login screen. If you try to launch the XFCE Terminal (or any other terminal for that matter) in XFCE and it crashes, check out our post entitled "XFCE Terminal Crash Fix" to remedy the problem. Once you have a working X Term, we can move on.
Assuming that you are at the Xubuntu logon prompt, type in the user name and password combo that you set up during the installation and log in. The first thing that I would recommend doing is shutting down the DHCP server daemon that should now be running on your LTSP server. This is just a precaution to make sure that no DHCP clients accidentally get an IP address from your server instead of your network's primary DHCP server. If all of the computers on your network have static IP addresses, you should be able to skip this step. To shut down the DHCP server, open an X Term and type sudo /etc/init.d/dhcp3-server stop and hit Enter. You should see the message in Figure 3.
 Figure 3
The next thing you want to do is set your server up to on it's own physical network. Once you have that done, you can start adding the LTSP client computers as well. You could also just leave it on a network that already has a DHCP server (like the one you're probably already on), but the issues surrounding that type of setup will have to be covered in another post. Once you have the server isolated on its own network, its time to set a static IP for it. Open the network settings dialog (Applications -> System -> Network) double click on your main network connection (Wired connection for me). On newer versions of Xubuntu, you may have to right click on the network manager icon in the system tray and then click Edit Connections... .Take a look at Figure 4 to see what I'm talking about.
 Figure 4
 Figure 5
Now, set up a client on the same physical network (by physical network I mean the same network switch or router by the way), set it to boot from the network, and try to boot it. At this point the client should boot off of the LTSP server you have set up and will eventually bring you to an X desktop (assuming you don't have any video issues). If things don't work out for you and the client won't boot, see the section below called So Its Broke and You Want to Fix It for help. You will see the Ubuntu load and logon screens when the client boots up but don't worry, this is normal. Once you log on it will be just like the Xubuntu environment that you set up on the server. Go ahead and log on to your new LTSP client-server setup using the user name and password you set up for the client and reap the fruits of your labor.
Something to note here is that the easy way to make changes to the client user interface (XFCE or otherwise) that the LTSP clients will see, is to log on to the server with the client's user name and password and make the changes. The next time you boot your client, it should reflect the changes that you have made on the server. You can use some of the other tips, tricks, and fixes on this blog (i.e. "LTSP Client Shuts Down Server - The Fix") to help you set up a workable, stable environment for your users. Also, since we all know that these types of procedures are almost never a "one size fits all" type of thing, see the "So Its Broke and You Want to Fix It" section below if you need it. Otherwise, enjoy.
So Its Broke and You Want to Fix It
If you've done everything in this post so far, but you're still having problems, you've come to the right place. I'm going to go through a few things that have given us fits in the past.
First, open an X Term and type sudo ifdown eth0 (where eth0 is the name of your main network card) and then type sudo ifup eth0. This will shut down and then bring back up your network interface, updating it with the changes you have made. Restarting the computer will have the same effect if you don't know the name of your network interface.
Second, please check your physical network setup and connections. I can't tell you the number of times that we (meaning me) have thought I had a broken LTSP server when it was just a network connection that I either forgot to hook up, or a switch that I forgot to plug in.
Third, if your client will not do a network boot correctly from the server, check to make sure that you have the BIOS set up to do a network boot. This can be a pain on some computers like the Dell Optiplex GX100 (who says you can't reuse an old computer huh?) that I'm using as my test bed to write this blog. In order to even get the option to use the network interface as a boot device, you have to enable an network interface option that says On w/ MBA in the BIOS. Thanks for that extra step Dell, my life wouldn't have been complete without it. Also, make sure that your network interface supports the protocols being used to boot off of the LTSP server (i.e. PXE). If it doesn't , get yourself another network card or computer that will work. Once you're sure of all this, check the next step.
Fourth, Xubuntu uses the H. Peter Anvin version of tftp (tftp-hpa, and thank you Mr. Anvin). This version of tftp responds to a switch (-s) that prepends a path onto the beginning of the path that the client uses for its download. If this isn't set right, you will get a file not found TFTP error on your client during the net boot. Check your /etc/ltsp/dhcpd.conf file along with the tftpd entry in your /etc/inetd.conf file to make sure that the path after the -s switch, plus the path to either of the image files (pxelinux.0 or nbi.img) in the dhcpd.conf file adds up to a valid path to your network boot image files. For instance, on the LTSP system that I set up while writing this, the complete path from adding the tftpd and dhcpd.conf entries was /var/lib/tftpboot/ltsp/i386/pxelinux.0. It could also be /opt/ltsp/i386/boot/pxelinux.0 too and it wouldn't hurt anything. They are the same file. Verify that this path points to a valid image on your system. If it does not, I would suggest searching the root (/) directory for the pxelinux.0 file (or the nbi.img file if you're not using a PXE enabled client). While you are in the dhcpd.conf file, take a look at the bottom and you'll notice the entry option root-path "/opt/ltsp/i386"; or something similar. This is that chroot(ed) directory that we set up earlier that will act as the root directory for your LTSP clients.
If this post was helpful to you and you liked it, let us know in the comments. If you didn't like this post, Boot wrote it and posted it under my name.
Build chroot Fails During LTSP Server Install
You might be interested in this post if you got a Red Screen of Death (RSOD) during the Xubuntu LTSP server installation telling you that the Build chroot step failed. This has happened to me every time that I've done an LTSP server install (and I think I've done about 50 of them so far), and I'm sure that it either has happened or will happen to a lot of you Joe and Jane Tillamooks out there. Once you've followed this procedure, you should be ready to complete the instructions that I've given you in the "LTSP Server Setup - The (Relatively) Easy Way", starting with the section on setting the LTSP server up on its own physical network.
This procedure was developed using Xubuntu 7.04 (Feisty Fawn) running XFCE, but the problem still exists in Xubuntu 9.10 (Karmic Koala). As always, be careful when editing your system configuration files, or following any procedures from any site, as you can do harm to your system if a mistake is made. Always make backups of the configuration files that you change, or you might just find yourself with a broken system that's a pain to fix.
Make sure that your computer has a connection to the Internet while you are following these instructions. The command I'm going to give you grabs the packages that it needs from the Ubuntu repository to build the chroot. If you're running on a slow Internet connection (like dialup), take a look at the section below entitled "Rebuilding chroot Over Dialup".
The first thing you have to do is remove the old chroot(ed) directory structure that wasn't completely built during the installation. Open an X Term (see our post XFCE Terminal Crash Fix if you can't get an X Terminal to work), and type sudo rm -R /opt/ltsp/ and hit Enter (after checking the syntax). Be careful with this step as one missed key stroke could wipe out your root directory structure -consider yourself warned my fellow Tillamookite. If you would prefer to delete the directory from a graphical interface, type sudo thunar in the X term. This will launch the Xubuntu file manager and you will be able to navigate to the /opt/ltsp/ directory and delete it. Once again, if you're on a dialup Internet connection, you should probably check out the section at the bottom of this post before executing the next command. Once the rm command is done removing the /opt/ltsp/ directory and its contents, type sudo ltsp-build-client and hit Enter. This step rebuilds the /opt/ltsp/ directory structure that will become the directories that your LTSP clients use. This step takes quite awhile, so it might be a good time to catch up on your Tillamookism voting and comments for Tillamook Rage. Also, while we're waiting, I might as well give you a quick explanation of what chroot does. If you already know, just talk amongst yourselves. What chroot does in this case is set aside an area on the server's hard disk to act as a sort of sandbox (if I might borrow some software security terminology) that your clients can play in. It looks to your clients like they have their own hard drive complete with all the normal Linux folders like etc and var. So they can play all they want without hurting your server installation (in theory). Just make sure that you restrict the privileges of the LTSP client logon account(s), or some little prodigy might just end up using your LTSP server for certain undisclosed nefarious deeds. Anyway, once the ltsp-build-client command has finished, you're all set. If you stopped working on the "LTSP Server Setup - The (Relatively) Easy Way" post, to come and do this, go on back and meet me over there so we can continue.
Rebuilding chroot Over Dialup
If you're using dialup, you may want to replace the sudo ltsp-build-client line above with the following...
Keep in mind that if your CDROM drive is not mounted to the cdrom directory, you will have to change the line to use the location that it is mounted to. For instance, if your CDROM drive was mounted to cdrom1, you would type
In most cases though, you won't have to worry about this.
What this does is to minimize the amount of downloading that takes place by grabbing the files from the CDROM drive. Some security patches will still be downloaded, but the amount of things that you have to suffer through will be minimized. Just make sure that your connection to the Internet is active and that you have inserted the Xubuntu Alternate Install CD in the CDROM drive before executing the line.
You can now skip back up to the sentence you were reading before I interrupted you.
Created:09-16-07
Revised:01-13-10
This procedure was developed using Xubuntu 7.04 (Feisty Fawn) running XFCE, but the problem still exists in Xubuntu 9.10 (Karmic Koala). As always, be careful when editing your system configuration files, or following any procedures from any site, as you can do harm to your system if a mistake is made. Always make backups of the configuration files that you change, or you might just find yourself with a broken system that's a pain to fix.
Make sure that your computer has a connection to the Internet while you are following these instructions. The command I'm going to give you grabs the packages that it needs from the Ubuntu repository to build the chroot. If you're running on a slow Internet connection (like dialup), take a look at the section below entitled "Rebuilding chroot Over Dialup".
The first thing you have to do is remove the old chroot(ed) directory structure that wasn't completely built during the installation. Open an X Term (see our post XFCE Terminal Crash Fix if you can't get an X Terminal to work), and type sudo rm -R /opt/ltsp/ and hit Enter (after checking the syntax). Be careful with this step as one missed key stroke could wipe out your root directory structure -consider yourself warned my fellow Tillamookite. If you would prefer to delete the directory from a graphical interface, type sudo thunar in the X term. This will launch the Xubuntu file manager and you will be able to navigate to the /opt/ltsp/ directory and delete it. Once again, if you're on a dialup Internet connection, you should probably check out the section at the bottom of this post before executing the next command. Once the rm command is done removing the /opt/ltsp/ directory and its contents, type sudo ltsp-build-client and hit Enter. This step rebuilds the /opt/ltsp/ directory structure that will become the directories that your LTSP clients use. This step takes quite awhile, so it might be a good time to catch up on your Tillamookism voting and comments for Tillamook Rage. Also, while we're waiting, I might as well give you a quick explanation of what chroot does. If you already know, just talk amongst yourselves. What chroot does in this case is set aside an area on the server's hard disk to act as a sort of sandbox (if I might borrow some software security terminology) that your clients can play in. It looks to your clients like they have their own hard drive complete with all the normal Linux folders like etc and var. So they can play all they want without hurting your server installation (in theory). Just make sure that you restrict the privileges of the LTSP client logon account(s), or some little prodigy might just end up using your LTSP server for certain undisclosed nefarious deeds. Anyway, once the ltsp-build-client command has finished, you're all set. If you stopped working on the "LTSP Server Setup - The (Relatively) Easy Way" post, to come and do this, go on back and meet me over there so we can continue.
Rebuilding chroot Over Dialup
If you're using dialup, you may want to replace the sudo ltsp-build-client line above with the following...
sudo ltsp-build-client --mirror file:///cdromKeep in mind that if your CDROM drive is not mounted to the cdrom directory, you will have to change the line to use the location that it is mounted to. For instance, if your CDROM drive was mounted to cdrom1, you would type
sudo ltsp-build-client --mirror file:///cdrom1In most cases though, you won't have to worry about this.
What this does is to minimize the amount of downloading that takes place by grabbing the files from the CDROM drive. Some security patches will still be downloaded, but the amount of things that you have to suffer through will be minimized. Just make sure that your connection to the Internet is active and that you have inserted the Xubuntu Alternate Install CD in the CDROM drive before executing the line.
You can now skip back up to the sentence you were reading before I interrupted you.
Created:09-16-07
Revised:01-13-10
9.14.2007
New Feature
Over the next few months the EONS Team will try out a new feature. We'll have polls on the right-hand side of the screen to let you, the reader, vote on your favorite "Tillamookism" and eventually take submissions for Tillamookism of the week. This raises a few questions:
- What is a Tillamook?
- What is a Tillamookism?
- Did you eat paint chips as a kid?
We can easily answer those questions.
- Tillamook (Till-uh-mouck) n - was the name of a short-lived processor made by Intel. After finding one in a laptop and wondering what it was, the team laughed themselves silly over the name, try saying it, it really is fun. After which the Tillamookism was born.
- A phrase, usually from TV or movie, in which a word is replaced by Tillamook.
- No comment.
So go and vote, exercise you rights as a human*! And if that doesn't convince you, sudo go and vote.
*Sorry, but any animals or plants capable of voting are excluded from this poll. If you feel the need, call you congressperson and ask for Universal Eukaryotic Suffrage.
Autoupdate feature
Would you like your Debian or Debian derivative (Ubuntu and such) system to automatically update? I would, so that's enough of an answer for me.
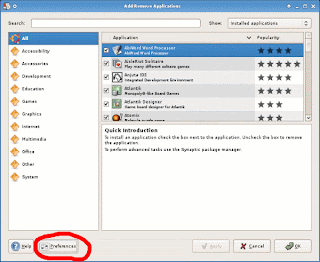
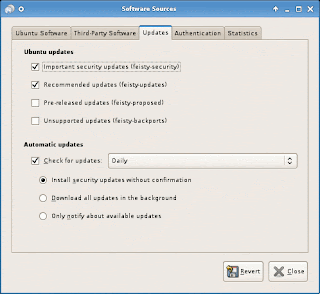
I did this in Xubuntu 7.04 (Feisty) but it should be the same or very similar in other versions, I'll post them as I try them.
Go to Applications > System > Add/Remove... This opens the Adept Package Manager. Click on Preferences in the lower left corner, which opens a new menu. Several things can be done here and I recommend learning about all the features, but I won't go into that here.
Select the Updates tab and check the box marked Check for updates under the heading Automatic Updates. Select the frequency in the drop-down menu next to the checkbox. Select the radio button below that corresponding to the feature you want, I recommend automatic installation. You can also check the Recommended Updates as well from the top section of the Updates tab, but it's not crucial.
Now your system will automatically update itself, congrats!
Subscribe to:
Posts (Atom)

 Posts
Posts


