
You might be interested in this post if you want to create word processor documents, brouchures, flyers, spreadsheets, presentations, and the like with your Linux machine. I developed this post while running Xubuntu 7.10, but you should be able to adapt it to your Debian or Ubuntu version/derivative. If you have questions about the differences, be sure to ask in the comments section of this post. Please note that I'm using the term "publishing" in a generalized way in this post and not just to mean print shop applications.
As always, be careful when following advice and/or procedures from this, or any other site, as your system or installation (or both) could be damaged if a mistake is made. See our disclaimer for details.
Introduction
There's just no getting away from desktop publishing. Many of us have to deal with some form of document creation during a normal day. Those of us in the Linux world also have to deal with the added challenge of working with proprietary formats from programs like Microsoft Word and Excel. Fear not though, as I'm going to walk you through some of the common applications to use for desktop publishing in Linux, and a few tips that you can use to make life a little easier. Keep in mind as you read this though that I'm not a publishing guru. I use OpenOffice.org quite a bit, but some of the other programs that I'm going to talk about are apps that I haven't used very much, if at all (Inkscape is new to me). As is my habit, my hope here is not to give you an exhaustive treatise on desktop publishing, but a good starting point for your own exploration.
Fonts
Unfortunately, Linux typically doesn't come with a great pack of fonts (at least not for publishing), and the fonts that it does have are not overly compatible if you're transferring files to and from Windows. I'm going to tell you how to install the Microsoft Core Fonts package on your Ubuntu/Xubuntu system, but keep in mind that they have a copyright on them, so you'll have to decide whether or not you really want/need them.
You can install the Microsoft Core Fonts package through the Add/Remove Applications dialog (Applications > System > Add/Remove...) by entering the term msttcorefonts in the Search: field. Once the entry comes up for Microsoft Core Fonts, just checkmark it and click the Apply Changes button, and then click the Apply button in the confirmation dialog that comes up. You'll then be presented with a configuration window telling you that you're about to set up DEbian FOnt MAnager (defoma). Just click the Forward button and the dialog will close. When the installation is complete, you can click the Close button on the Software has been installed successfully dialog. The Microsoft core fonts will now be available when you are using OpenOffice or any other publishing application.
An alternative to the GUI route I just outlined is to open a terminal (Applications > Accessories > Terminal) and type
There is another font package I really like that you might find interesting too. It's a set of fonts that were created by Brian Kent and packaged for Ubuntu by CrunchBang.org. These fonts are not truly open, but they are free and very very nice. Thank you Brian and CrunchBang for making these fonts available to the rest of us Ubuntu/Xubuntu users.
To install the Brian Kent/CruchBang font package, you'll need to add the repository holding the fonts through the Applications > System > Software Sources dialog. Once that dialog has opened, click the Third-Party Software tab, click the Add... button, and then enter the following line in the text box beside APT line:
and click the Add Source button. Unfortunately, this fonts package hasn't been carried into the newer repositories, so you'll have to leave the gutsy part of the line intact, even if you have a newer Ubuntu/Xubuntu version. After you've clicked the Add Source button, click the Close button on the Software Sources dialog and then click the Reload button on the dialog that pops up saying that your software information is out of date. Once the reload is complete, the Software Sources dialog should close.
Now, open the Synaptic Package Manager (Applications > System > Synaptic Package Manager) and search (Edit > Search...) for ttf-aefonts. Once the entry for ttf-aefonts comes up in the right pane, left click on its checkbox and select the Mark for Installation option. You'll get a warning that the download can't be authenticated, but you should be fine. I haven't had any problems with this package at all. Just click the Mark button. Next, click the Apply button which will bring up another dialog letting you confirm your changes. Click the Apply button here too. Lastly, you'll get the Changes applied dialog and you can just click the Close button and then close the Synaptic Package Manager.
You can also install the font package (once you've added the launchpad repository above) by opening a terminal (Applications > Accessories > Terminal) and typing
and then hitting Enter.
You should now have the fonts available when you use OpenOffice or any other programs that allow you to select the font style.
Clipart
If you want some extra open source clipart to use in your documents, you might want to install the Open ClipArt package that's in the standard Ubuntu repository. All you have to do is open the Add/Remove Applications dialog (Applications > System > Add/Remove...) and type openclipart in the Search: text box. You should see the Open ClipArt entry at the top of the list. Just select the checkbox and then click the Apply Changes button. You'll see a couple of other dialogs asking you to confirm your change (click the Apply button) and to close the dialog (click the Close button).
You can also install the Open ClipArt package from the terminal (Applications > Accessories > Terminal) by typing
and then hitting Enter.
Once the Add/Remove Applications dialog is closed (or the Open ClipArt package is done installing in the terminal), you can open a program like OpenOffice, Inkscape, or Scribus and insert the new clipart. For example, to insert an Open ClipArt file in OpenOffice Writer, you click the insert picture menu item (Insert > Picture > From File...) and browse to the /usr/share/openclipart directory. There you'll be able to choose either png or svg file types (you'll probably want to make sure that you use svg for Inkscape and Scribus) and which category you want. There's a bunch, so be ready to take quite a bit of time browsing through them.
OpenOffice
Almost all of us have need of a word processor or spreadsheet program at times, so I always install OpenOffice.org on my computers (don't ask how many computers I have). OpenOffice is a Microsoft Office replacement that creates and edits word processing documents, spreadsheets, presentations, simple drawings, databases, and much more. It can even open and save Microsoft Office formats.
There are basically two alternatives when installing OpenOffice on Xubuntu. The first alternative is the more involved of the two, but gives you the latest version. If you want to go this route, you can download the latest version here. Once you download it, extract it and then run the installer by double clicking on the setup script in the OpenOffice setup folder. When the installer window comes up, just follow the instructions. Make sure that you have Java 5 (1.5) or newer installed though, or OpenOffice won't run.
The easier alternative is to install OpenOffice from the Add/Remove Applications dialog. This will install what usually ends up being a slightly older version of OpenOffice, but if you don't need the latest and greatest, it's quicker and easier to do it this way. To launch the Add/Remove Applications dialog, go to Applications > System > Add/Remove... and left click. Once the dialog opens, type openoffice in the Search: field and your options for the OpenOffice installation will be displayed (Figure 1). Note that it doesn't matter whether you have All available applications selected in the Show: box or not.
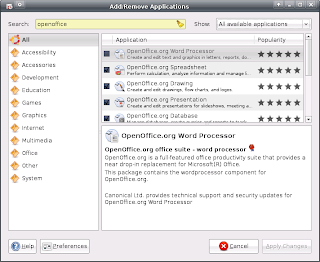 Figure 1
One of the most common tasks that I have to use OpenOffice for (besides creating documents from scratch) is opening and editing Microsoft Office files. To open a Microsoft Office file from within OpenOffice, do the normal File > Open routine and then pull the File type: menu down and select the Microsoft Program's 97/2000/XP option. Figure 2 shows me selecting the Microsoft Word format in Openoffice.org Writer (word processor).

Once you have selected the file type, you can browse to a location where you have a Microsoft file and open it by selecting it and hitting the Open button. Saving to a Microsoft format goes the same way. You take the File > Save As... route and select the Microsoft format that you need.
Another handy input/output feature is the ability to export your documents to PDF files. To do this, you select File > Export as PDF... which will give you the PDF export dialog. I leave the settings alone unless I need something special done, like only exporting a range of pages instead of all of them. You can just click the Export button once you've got all the settings the way you want them.
If you find that you're always working with a certain type of file that's not the default OpenOffice format, you might want to check out the Options dialog (Tools > Options) and look at the Load/Save category. If you use the Always save as pull-down menu and select the Microsoft format you need, OpenOffice will always try to save your documents in the Microsoft Office format. I usually don't do this though because I try to use OpenOffice's open formats for all my documents. It's up to you though. Take a look around in the Options dialog a little on your own, there are a lot of things that you might find useful. There are default formatting options, settings for applications like email clients to use with OpenOffice, Accessibility and Security options, and much more.
OpenOffice has a tremendous amount of features and options, but if you're a convert from Microsoft Office, it should be a pretty easy transition. If you're just starting out with an office suite like OpenOffice, you should probably check out the Help menu. The Help > Get Help Online... option might be a real benefit to you because you can ask the OpenOffice community questions and get answers directly.
Scribus
Scribus (Figure 3) is basically a replacement for Microsoft Publisher. The "drawback" is that it doesn't support opening or saving the Publisher file format, and the development team apparently has no plans to add that support in the future. If you're desperate to transfer files into Scribus from Publisher, you can copy the pages from Publisher into a new Microsoft Word document, save that file, then open it in OpenOffice.org Writer and export that to the OpenOffice Draw format which Scribus can open. Obviously it's not a pretty solution, so I wouldn't expect your document to come through correctly. If you're switching over to Scribus from Publisher, the lack of importing for your old Publisher files is something to keep in mind. You might need to keep Publisher around for legacy support purposes - at least for awhile. Check out the Additional Reading section of this post for a short tutorial that I found through the Scribus site that has a few tips for those switching from Publisher to Scribus.

and then hit Enter.
Once that's finished installing, you can find a Scribus entry under the Applications > Graphics menu. Unfortunately, you'll have to search for help online with the current version of Scribus since there is no integrated manual in the help system. Have a look at the Scribus documentation page to get an idea of what to do. While this does make sure that people get the latest version of the documentation, it could pose a problem for somebody who doesn't have ready access to an Internet connection (think computer labs in developing nations). In the version that comes with Xubuntu 7.10 (1.3.3.9), there is a placeholder for an integrated manual though, so I'm guessing that this omission is only temporary.
There are many great features in Scribus, but a few of the most interesting to me were PDF output (File > Export > Save As PDF...), scripting support (in the Script menu), and good anti-aliasing support. I'm no publishing expert though, so I may be missing some really big issues. If you create publications like flyers, brochures, newsletters and such, I suggest you try Scribus out to see what you think.
Inkscape
According to their website, Inkscape (Figure 4) is an "Open Source vector graphics editor, with capabilities similar to Illustrator, CorelDraw, or Xara X". This is not a program that I use for my own projects, but you can do so much with it and it's used so much in open source publishing, I felt it needed to be included here. To get a good feel for what the program is capable of, you can do what I did and go through a few of the tutorials on their website. While trying these tutorials out, I found Inkscape to be pretty intuitive and powerful, and version 0.46 was very polished and ran well. I didn't have any problems with it during the time that I tried it out. I know that quite a few groups that do publishing use Inkscape and you can get an idea of who uses it, and for what, if you take a look at the gallery on the Inkscape site. In their tutorials section you'll see several of the uses for Inkscape including (but of course not limited to) logos, text effects, comic strips, and even RPG game elements such as buildings.

GIMP
I talked about GIMP (Figure 5) briefly in our digital imaging post, and I want to give it just a little more coverage here.

There's a GIMP add-on that Boot put me wise to that I like to install called gimp-data-extras. According to its description, this package includes an "extra set of brushes, palettes, and gradients for The GIMP". If you find that you need those things and you want to install the data extras package, just open a terminal (Applications > Accessories > Terminal) and type
Viewing/Editing PDF Documents
Just like Adobe (Macromedia) Flash, the Adobe Acrobat PDF format is all over the place, and there will probably be times when you will need to open, edit, or create one of these documents yourself. I've already talked a little bit above about how you can export to PDF from OpenOffice and Scribus, but there are a few other tools for working with Acrobat Reader files in Linux. Just a quick note - I'm going to include the installer package names in parentheses as I go through this section. You can use these names when doing sudo apt-get install, or you can search for them in the Add/Remove Applications dialog.
If you just want a simple PDF viewer when using Xubuntu/Ubuntu, there are several to choose from. Xubuntu comes preinstalled with Document Viewer (Figure 7) whose non-generic name is Evince, and with which I've been very happy. It has all the standard features of a PDF viewer that I usually need and a couple more.


If you don't like Document Viewer or Adobe's Acrobat Reader for some reason though, you have alternatives. KPDF (kpdf), xpdf (xpdf), and ePDFViewer (epdfview) are all very capable viewers that vary by a few features here and there, and are available in the Ubuntu/Xubuntu repository. Some differences also lie in what libraries they rely on (for example Qt versus GTK+) but part of the beauty of running XFCE is that both Qt and GTK+ apps almost always run without any problem. KPDF is nice looking with a feature set that is almost identical to Document Viewer, but KPDF has button toolbars that make accessing its commands a little quicker. xpdf is the least visually appealing, has the fewest features, and doesn't include the typical menu at the top of the window. If you want to see a menu, right click in an open area of the window. xpdf is fine if you just need a very simple viewer, but I prefer others. ePDFViewer is (in my opinion) an average viewer, a lot better than xpdf, but not as good or as feature rich as KPDF or Document Viewer.
If you want to edit PDFs, try PDF Editor (pdfeditor). As long as as the PDF is not locked, PDF Editor should open and change it. Be careful though as I have had it open copywritten material (that wasn't locked) so that I could edit it before. Always check to make sure you're not breaking any laws when you edit someone else's PDFs. One thing to note here is that if the PDF was scanned from a hard copy document instead of being created in software like OpenOffice or Scribus, you won't be able to edit the text unless the document was scanned using OCR (Optical Character Recognition).
PDF Editor has a lot of features like being able to strike through or highlight text, being able to draw on the page, the ability to edit, move, or delete text, etc. The help menu is a little bit sparse, but most of the buttons have fairly descriptive tool tips, so if you know what you want to do, you'll probably be able to figure it out. Another feature of PDF Editor is that it can keep track of revisions for you. That's always nice when you make a mistake and have to roll back to an earlier version. Make sure you usethe File > Save new revision menu option instead of the normal Save if you want to have this roll back functionality though.
Digital Imaging
Image acquisition and editing is also a big part of creating documents, so I usually go ahead and install the applications outlined in my post on digital imaging. That way you'll be able to get images from your digital camera(s) and scanner(s) so that you can include them in your documents.
Printers
I talked a little bit about printers from the standpoint of scanning in my digital imaging post (also mentioned above), but here I would like to talk a little more about Linux printing support. When it's time to print the beautiful document that you've created, Linux gives you the control over the printing process that you would expect from a user friendly desktop operating system. You can add/remove/change your printer(s) by going to Applications > Settings > Printing, which will open the Printer configuration dialog for the localhost (your computer).
If Xubuntu hasn't automagically recognized your printer, the Printer configuration dialog is where you would go to add it manually. Just click the New Printer button, select the printer from the list that comes up (some of the names can be cryptic), and click Forward. Follow the instructions all the way through to add your printer. If you get stuck with this, post a question to the comments section of this post or email us and we'll try to help you.
If your printer isn't being recognized in Xubuntu, and you've made sure that it's plugged into the computer and turned on, you might want to check the Linux compatibility list for your printer manufacturer. Some people would argue that you should do this first, but many times (in my experience) a printer that has the claim of not being supported works under a generic driver. I've had very good luck with Xubuntu recognizing printers, especially Hewlett Packard models.
Once you add your printer (or it is automatically added by Xubuntu), it should show up in your Local Printers list. You can click on the entry for your printer to get the options that are available in the right hand pane. Have a look at Figure 9 to see what I'm talking about.

If you go to the Printer Options page, you'll find a setting that I get a lot of good out of. There's a Print Mode: pulldown menu (Figure 10) that allows you to reduce the quality of your printouts.

Under the Job Options tab there is a plethora (a bunch) of other settings that influence how your printer operates. Another one of the most useful for me is the Scale to fit option that allows you to force the document to fit onto one page. There are also options that allow you to set your document to print with more than one page per sheet, or to print on both sides of the paper (your printer might not support this though). This can be a great paper saver if you're printing out draft or archive documents. My printer doesn't support printing on both sides though, so I do it manually. If you pay attention to how your printer pulls the sheets through, you can usually reinsert the sheet so that the next page will be printed on the back side. This method requires some experimentation, and it also requires printing one page at a time and then re-inserting it into the printer (which can be a little tedious), but it cuts the amount of paper you use in half. Please be aware though that some printers don't like having paper run through them more than once. Be careful when you're trying this method out as you could end up with a nasty paper jam.
Don't forget to look around some more in the pages of the Printer configuration dialog box. You never know what useful things you'll find. Also, if you get a chance to upgrade to the Hardy (8.04) version of Ubuntu/Xubuntu I think you'll be pleasantly surprised with the printer support. 8.04 does a really nice job of autodetecting, autoinstalling, and autoconfiguring printers. Not that earlier versions don't do a good job, but 8.04 is even better.
Conclusion
We'll that's a quick rundown on a very broad topic. I hope that I've given you a good place to start your own exploration into the world of desktop publishing in Xubuntu. Let us know in the comments section what you find and what you think. Your feedback is always important to us.
Enjoy!
Further Reading
1. Scribus
2. Inkscape
3. Gimp
4. Linux Journal Magazine - Oct 2007 - Pages 16,17 - "A Ticket out of Poverty"
5. Linux Pro Magazine - September 2007 - Pages 92,93 - "Hai Ti! Comics"
6. Five Minutes To Midnight
7. Open Lab
8. Our Digital Imaging Post
9. Switching From Publisher To Scribus
10. Brian Kent's AEnigma Font Site
11. CrunchBang
12. Open ClipArt
Created:06-03-08
Revised:06-07-08
As always, be careful when following advice and/or procedures from this, or any other site, as your system or installation (or both) could be damaged if a mistake is made. See our disclaimer for details.
Introduction
There's just no getting away from desktop publishing. Many of us have to deal with some form of document creation during a normal day. Those of us in the Linux world also have to deal with the added challenge of working with proprietary formats from programs like Microsoft Word and Excel. Fear not though, as I'm going to walk you through some of the common applications to use for desktop publishing in Linux, and a few tips that you can use to make life a little easier. Keep in mind as you read this though that I'm not a publishing guru. I use OpenOffice.org quite a bit, but some of the other programs that I'm going to talk about are apps that I haven't used very much, if at all (Inkscape is new to me). As is my habit, my hope here is not to give you an exhaustive treatise on desktop publishing, but a good starting point for your own exploration.
Fonts
Unfortunately, Linux typically doesn't come with a great pack of fonts (at least not for publishing), and the fonts that it does have are not overly compatible if you're transferring files to and from Windows. I'm going to tell you how to install the Microsoft Core Fonts package on your Ubuntu/Xubuntu system, but keep in mind that they have a copyright on them, so you'll have to decide whether or not you really want/need them.
You can install the Microsoft Core Fonts package through the Add/Remove Applications dialog (Applications > System > Add/Remove...) by entering the term msttcorefonts in the Search: field. Once the entry comes up for Microsoft Core Fonts, just checkmark it and click the Apply Changes button, and then click the Apply button in the confirmation dialog that comes up. You'll then be presented with a configuration window telling you that you're about to set up DEbian FOnt MAnager (defoma). Just click the Forward button and the dialog will close. When the installation is complete, you can click the Close button on the Software has been installed successfully dialog. The Microsoft core fonts will now be available when you are using OpenOffice or any other publishing application.
An alternative to the GUI route I just outlined is to open a terminal (Applications > Accessories > Terminal) and type
sudo apt-get install msttcorefontsThere is another font package I really like that you might find interesting too. It's a set of fonts that were created by Brian Kent and packaged for Ubuntu by CrunchBang.org. These fonts are not truly open, but they are free and very very nice. Thank you Brian and CrunchBang for making these fonts available to the rest of us Ubuntu/Xubuntu users.
To install the Brian Kent/CruchBang font package, you'll need to add the repository holding the fonts through the Applications > System > Software Sources dialog. Once that dialog has opened, click the Third-Party Software tab, click the Add... button, and then enter the following line in the text box beside APT line:
deb http://ppa.launchpad.net/corenominal/ubuntu gutsy main
and click the Add Source button. Unfortunately, this fonts package hasn't been carried into the newer repositories, so you'll have to leave the gutsy part of the line intact, even if you have a newer Ubuntu/Xubuntu version. After you've clicked the Add Source button, click the Close button on the Software Sources dialog and then click the Reload button on the dialog that pops up saying that your software information is out of date. Once the reload is complete, the Software Sources dialog should close.
Now, open the Synaptic Package Manager (Applications > System > Synaptic Package Manager) and search (Edit > Search...) for ttf-aefonts. Once the entry for ttf-aefonts comes up in the right pane, left click on its checkbox and select the Mark for Installation option. You'll get a warning that the download can't be authenticated, but you should be fine. I haven't had any problems with this package at all. Just click the Mark button. Next, click the Apply button which will bring up another dialog letting you confirm your changes. Click the Apply button here too. Lastly, you'll get the Changes applied dialog and you can just click the Close button and then close the Synaptic Package Manager.
You can also install the font package (once you've added the launchpad repository above) by opening a terminal (Applications > Accessories > Terminal) and typing
sudo apt-get install ttf-aefontsand then hitting Enter.
You should now have the fonts available when you use OpenOffice or any other programs that allow you to select the font style.
Clipart
If you want some extra open source clipart to use in your documents, you might want to install the Open ClipArt package that's in the standard Ubuntu repository. All you have to do is open the Add/Remove Applications dialog (Applications > System > Add/Remove...) and type openclipart in the Search: text box. You should see the Open ClipArt entry at the top of the list. Just select the checkbox and then click the Apply Changes button. You'll see a couple of other dialogs asking you to confirm your change (click the Apply button) and to close the dialog (click the Close button).
You can also install the Open ClipArt package from the terminal (Applications > Accessories > Terminal) by typing
sudo apt-get install openclipartand then hitting Enter.
Once the Add/Remove Applications dialog is closed (or the Open ClipArt package is done installing in the terminal), you can open a program like OpenOffice, Inkscape, or Scribus and insert the new clipart. For example, to insert an Open ClipArt file in OpenOffice Writer, you click the insert picture menu item (Insert > Picture > From File...) and browse to the /usr/share/openclipart directory. There you'll be able to choose either png or svg file types (you'll probably want to make sure that you use svg for Inkscape and Scribus) and which category you want. There's a bunch, so be ready to take quite a bit of time browsing through them.
OpenOffice
Almost all of us have need of a word processor or spreadsheet program at times, so I always install OpenOffice.org on my computers (don't ask how many computers I have). OpenOffice is a Microsoft Office replacement that creates and edits word processing documents, spreadsheets, presentations, simple drawings, databases, and much more. It can even open and save Microsoft Office formats.
There are basically two alternatives when installing OpenOffice on Xubuntu. The first alternative is the more involved of the two, but gives you the latest version. If you want to go this route, you can download the latest version here. Once you download it, extract it and then run the installer by double clicking on the setup script in the OpenOffice setup folder. When the installer window comes up, just follow the instructions. Make sure that you have Java 5 (1.5) or newer installed though, or OpenOffice won't run.
The easier alternative is to install OpenOffice from the Add/Remove Applications dialog. This will install what usually ends up being a slightly older version of OpenOffice, but if you don't need the latest and greatest, it's quicker and easier to do it this way. To launch the Add/Remove Applications dialog, go to Applications > System > Add/Remove... and left click. Once the dialog opens, type openoffice in the Search: field and your options for the OpenOffice installation will be displayed (Figure 1). Note that it doesn't matter whether you have All available applications selected in the Show: box or not.
 Figure 1
As you can see, there are several different programs that make up OpenOffice in the same way that there are several different programs (Word, Excel, etc) that make up Microsoft Office. Just put a checkmark beside the ones that you want (I usually at least do the Word Processor and Spreadsheet), and then click the Apply Changes button. OpenOffice is installed under the Applications > Office menu so you can start whichever app you need easily.
One of the most common tasks that I have to use OpenOffice for (besides creating documents from scratch) is opening and editing Microsoft Office files. To open a Microsoft Office file from within OpenOffice, do the normal File > Open routine and then pull the File type: menu down and select the Microsoft Program's 97/2000/XP option. Figure 2 shows me selecting the Microsoft Word format in Openoffice.org Writer (word processor).

Figure 2
Once you have selected the file type, you can browse to a location where you have a Microsoft file and open it by selecting it and hitting the Open button. Saving to a Microsoft format goes the same way. You take the File > Save As... route and select the Microsoft format that you need.
Another handy input/output feature is the ability to export your documents to PDF files. To do this, you select File > Export as PDF... which will give you the PDF export dialog. I leave the settings alone unless I need something special done, like only exporting a range of pages instead of all of them. You can just click the Export button once you've got all the settings the way you want them.
If you find that you're always working with a certain type of file that's not the default OpenOffice format, you might want to check out the Options dialog (Tools > Options) and look at the Load/Save category. If you use the Always save as pull-down menu and select the Microsoft format you need, OpenOffice will always try to save your documents in the Microsoft Office format. I usually don't do this though because I try to use OpenOffice's open formats for all my documents. It's up to you though. Take a look around in the Options dialog a little on your own, there are a lot of things that you might find useful. There are default formatting options, settings for applications like email clients to use with OpenOffice, Accessibility and Security options, and much more.
OpenOffice has a tremendous amount of features and options, but if you're a convert from Microsoft Office, it should be a pretty easy transition. If you're just starting out with an office suite like OpenOffice, you should probably check out the Help menu. The Help > Get Help Online... option might be a real benefit to you because you can ask the OpenOffice community questions and get answers directly.
Scribus
Scribus (Figure 3) is basically a replacement for Microsoft Publisher. The "drawback" is that it doesn't support opening or saving the Publisher file format, and the development team apparently has no plans to add that support in the future. If you're desperate to transfer files into Scribus from Publisher, you can copy the pages from Publisher into a new Microsoft Word document, save that file, then open it in OpenOffice.org Writer and export that to the OpenOffice Draw format which Scribus can open. Obviously it's not a pretty solution, so I wouldn't expect your document to come through correctly. If you're switching over to Scribus from Publisher, the lack of importing for your old Publisher files is something to keep in mind. You might need to keep Publisher around for legacy support purposes - at least for awhile. Check out the Additional Reading section of this post for a short tutorial that I found through the Scribus site that has a few tips for those switching from Publisher to Scribus.

Figure 3
Scribus can be installed by opening the Add/Remove Software dialog (Applications > System > Add/Remove...) and typing scribus in the search field. Once the search is done scroll down, check the Scribus entry, and then click the Apply Changes button. There may be two entries for Scribus in the list that comes up. If there are, use the first one. An alternative way to install Scribus is to open a terminal window (Applications > Accessories > Terminal) and typesudo apt-get install scribusand then hit Enter.
Once that's finished installing, you can find a Scribus entry under the Applications > Graphics menu. Unfortunately, you'll have to search for help online with the current version of Scribus since there is no integrated manual in the help system. Have a look at the Scribus documentation page to get an idea of what to do. While this does make sure that people get the latest version of the documentation, it could pose a problem for somebody who doesn't have ready access to an Internet connection (think computer labs in developing nations). In the version that comes with Xubuntu 7.10 (1.3.3.9), there is a placeholder for an integrated manual though, so I'm guessing that this omission is only temporary.
There are many great features in Scribus, but a few of the most interesting to me were PDF output (File > Export > Save As PDF...), scripting support (in the Script menu), and good anti-aliasing support. I'm no publishing expert though, so I may be missing some really big issues. If you create publications like flyers, brochures, newsletters and such, I suggest you try Scribus out to see what you think.
Inkscape
According to their website, Inkscape (Figure 4) is an "Open Source vector graphics editor, with capabilities similar to Illustrator, CorelDraw, or Xara X". This is not a program that I use for my own projects, but you can do so much with it and it's used so much in open source publishing, I felt it needed to be included here. To get a good feel for what the program is capable of, you can do what I did and go through a few of the tutorials on their website. While trying these tutorials out, I found Inkscape to be pretty intuitive and powerful, and version 0.46 was very polished and ran well. I didn't have any problems with it during the time that I tried it out. I know that quite a few groups that do publishing use Inkscape and you can get an idea of who uses it, and for what, if you take a look at the gallery on the Inkscape site. In their tutorials section you'll see several of the uses for Inkscape including (but of course not limited to) logos, text effects, comic strips, and even RPG game elements such as buildings.

Figure 4
Inkscape is very easy to install if you're running an Ubuntu derivative like Xubuntu since it's in the repository. In order to install it, just open a terminal (Applications > Accessories > Terminal) and typesudo apt-get install inkscapeand hit Enter. If you prefer to install applications via the GUI route, you can open the Add/Remove Applications dialog (Applications > System > Add/Remove...) and search for inkscape. The entry for Inkscape should be the only one that comes up, so you can check it and click the Apply Changes button.
If I get a chance to work some more with Inkscape I'll update this post with new information, but for now I hope that gets you started.
If I get a chance to work some more with Inkscape I'll update this post with new information, but for now I hope that gets you started.
GIMP
I talked about GIMP (Figure 5) briefly in our digital imaging post, and I want to give it just a little more coverage here.

Figure 5
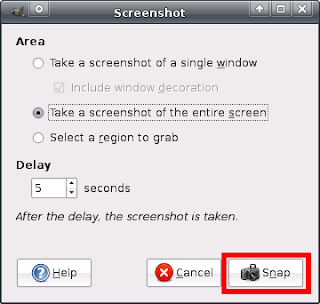
Most, if not all of you, that have used Linux for any amount of time have probably used GIMP. It allows you to work with and create images for use in a variety of situations. For instance, I use GIMP to acquire and clean up the screenshots for the blog posts here on Tillamook Rage. Taking a screenshot with GIMP is really easy. With the GIMP window open, you just launch the Screenshot dialog (File > Acquire > Screenshot...) and tell GIMP whether you want to take a picture of the whole screen or just one window, whether you want the window decoration (title bar, border, etc) included, and how long it should wait to take the screen shot. After you click the Snap button (Figure 6) the Screenshot dialog will close and the screenshot will be taken. If you asked GIMP to take a screenshot of a single window, you'll be given a chance to click on the window that you want captured.
Figure 6
Once you've acquired the screenshot, you can crop it and mark it up so that people who view it later can see exactly what you're talking about. One thing I would suggest here is to save the image in GIMP's native XCF format until you're ready to distribute it. That way all of your edits will be preserved and you'll be able to change them later if you need to. Just "save as" the file in your preferred format (I mostly use PNG for this blog) when you've finished all your edits. Even though I use GIMP mostly for screenshots and editing digital images, I've seen it used to create some pretty impressive graphics (logos, text effects, etc) too. Search gimp artwork in Google and take a scroll to see what people (who are much more talented than I am) can do with GIMP.There's a GIMP add-on that Boot put me wise to that I like to install called gimp-data-extras. According to its description, this package includes an "extra set of brushes, palettes, and gradients for The GIMP". If you find that you need those things and you want to install the data extras package, just open a terminal (Applications > Accessories > Terminal) and type
sudo apt-get install gimp-data-extrasand hit Enter. The GUI alternative is to open the Synaptic Package Manager (Applications > System > Synaptic Package Manager) and search (Edit > Search...) for gimp-data-extras. Once the search results come up, just mark the entry for installation and click the Apply button. I would also recommend searching the word gimp this way too. Just scroll down after the search is complete until you start seeing the entries that start with gimp. You can find some really interesting packages and plugins for GIMP that you never knew existed. Just look around and experiment. In my experience any time spent learning GIMP pays you back and then some.
Viewing/Editing PDF Documents
Just like Adobe (Macromedia) Flash, the Adobe Acrobat PDF format is all over the place, and there will probably be times when you will need to open, edit, or create one of these documents yourself. I've already talked a little bit above about how you can export to PDF from OpenOffice and Scribus, but there are a few other tools for working with Acrobat Reader files in Linux. Just a quick note - I'm going to include the installer package names in parentheses as I go through this section. You can use these names when doing sudo apt-get install, or you can search for them in the Add/Remove Applications dialog.
If you just want a simple PDF viewer when using Xubuntu/Ubuntu, there are several to choose from. Xubuntu comes preinstalled with Document Viewer (Figure 7) whose non-generic name is Evince, and with which I've been very happy. It has all the standard features of a PDF viewer that I usually need and a couple more.

Figure 7
Although Document Viewer does work pretty well for me, it's pretty hard to beat the overall integration with other applications (like Firefox) that Adobe's Linux version of Acrobat Reader gives (Figure 8). It's nice to click on a PDF hyperlink in Firefox and have it open inside that tab. It's not a big inconvenience to do the Open With or Save As... routine and use Document Viewer, but the integration is nice when I'm zipping around the Internet and want to get a quick idea of whether I need to read a document or not.
Figure 8
If you want to download and install the Adobe Acrobat Reader for Linux, start by going to Adobe's website. When downloading, Adobe's site (as of the time of this writing) seems to want to detect Xubuntu as a Red Hat based distribution. You have to click the Different language or operating system? link if you want to be able to select the option of downloading a tar.gz or a .deb installer. I downloaded the deb file and then double clicked it to start the installation. It installed fine and started right up on my Xubuntu 7.10 system. Adobe Reader really doesn't have that many more features (that I use in a normal day) than the other PDF reading apps, but something that may seal the deal for you is the whole integration issue.If you don't like Document Viewer or Adobe's Acrobat Reader for some reason though, you have alternatives. KPDF (kpdf), xpdf (xpdf), and ePDFViewer (epdfview) are all very capable viewers that vary by a few features here and there, and are available in the Ubuntu/Xubuntu repository. Some differences also lie in what libraries they rely on (for example Qt versus GTK+) but part of the beauty of running XFCE is that both Qt and GTK+ apps almost always run without any problem. KPDF is nice looking with a feature set that is almost identical to Document Viewer, but KPDF has button toolbars that make accessing its commands a little quicker. xpdf is the least visually appealing, has the fewest features, and doesn't include the typical menu at the top of the window. If you want to see a menu, right click in an open area of the window. xpdf is fine if you just need a very simple viewer, but I prefer others. ePDFViewer is (in my opinion) an average viewer, a lot better than xpdf, but not as good or as feature rich as KPDF or Document Viewer.
If you want to edit PDFs, try PDF Editor (pdfeditor). As long as as the PDF is not locked, PDF Editor should open and change it. Be careful though as I have had it open copywritten material (that wasn't locked) so that I could edit it before. Always check to make sure you're not breaking any laws when you edit someone else's PDFs. One thing to note here is that if the PDF was scanned from a hard copy document instead of being created in software like OpenOffice or Scribus, you won't be able to edit the text unless the document was scanned using OCR (Optical Character Recognition).
PDF Editor has a lot of features like being able to strike through or highlight text, being able to draw on the page, the ability to edit, move, or delete text, etc. The help menu is a little bit sparse, but most of the buttons have fairly descriptive tool tips, so if you know what you want to do, you'll probably be able to figure it out. Another feature of PDF Editor is that it can keep track of revisions for you. That's always nice when you make a mistake and have to roll back to an earlier version. Make sure you usethe File > Save new revision menu option instead of the normal Save if you want to have this roll back functionality though.
Digital Imaging
Image acquisition and editing is also a big part of creating documents, so I usually go ahead and install the applications outlined in my post on digital imaging. That way you'll be able to get images from your digital camera(s) and scanner(s) so that you can include them in your documents.
Printers
I talked a little bit about printers from the standpoint of scanning in my digital imaging post (also mentioned above), but here I would like to talk a little more about Linux printing support. When it's time to print the beautiful document that you've created, Linux gives you the control over the printing process that you would expect from a user friendly desktop operating system. You can add/remove/change your printer(s) by going to Applications > Settings > Printing, which will open the Printer configuration dialog for the localhost (your computer).
If Xubuntu hasn't automagically recognized your printer, the Printer configuration dialog is where you would go to add it manually. Just click the New Printer button, select the printer from the list that comes up (some of the names can be cryptic), and click Forward. Follow the instructions all the way through to add your printer. If you get stuck with this, post a question to the comments section of this post or email us and we'll try to help you.
If your printer isn't being recognized in Xubuntu, and you've made sure that it's plugged into the computer and turned on, you might want to check the Linux compatibility list for your printer manufacturer. Some people would argue that you should do this first, but many times (in my experience) a printer that has the claim of not being supported works under a generic driver. I've had very good luck with Xubuntu recognizing printers, especially Hewlett Packard models.
Once you add your printer (or it is automatically added by Xubuntu), it should show up in your Local Printers list. You can click on the entry for your printer to get the options that are available in the right hand pane. Have a look at Figure 9 to see what I'm talking about.

Figure 9
There are some things in the options pages that you normally shouldn't mess with (like the Device URI), but there are some really handy options too. The first thing you might want to do when you install a printer that you're going to be using a lot is make it the default printer. You can do this on the Settings tab by clicking the Make Default button. Now, every time that you click the print button in an application, the document will go to this printer. This is also the location where you print test pages and tell the printer to clean its print heads with the Print Test Page and Clean Print Heads buttons respectively. You may not get the Clean Print Heads option if your printer doesn't support that functionality though.If you go to the Printer Options page, you'll find a setting that I get a lot of good out of. There's a Print Mode: pulldown menu (Figure 10) that allows you to reduce the quality of your printouts.

Figure 10
If I'm not needing to print nice looking documents to give to someone else, I always use this setting (especially if I'm printing drafts to edit them). It cuts down on the amount of ink that your printer uses (take that over-priced ink cartridge companies!) and makes for less wear and tear on your printer. I usually set this to Draft Grayscale (Black cartridge) or Draft (Color cartridge) so that they will be the default selection because I always forget to set it at print time. If you want to print a nice version of a document, you can always go to the printing properties section of the program you're using and change the setting to the higher print quality. For example, in OpenOffice Writer, you would go the normal File > Print route and then click the Properties button. If you look around a little bit, you'll find a Printout Mode option under the Device tab. That will allow you to change the print quality setting back to a higher level. Other programs will be similar, you'll just have to look around a little bit for the setting.Under the Job Options tab there is a plethora (a bunch) of other settings that influence how your printer operates. Another one of the most useful for me is the Scale to fit option that allows you to force the document to fit onto one page. There are also options that allow you to set your document to print with more than one page per sheet, or to print on both sides of the paper (your printer might not support this though). This can be a great paper saver if you're printing out draft or archive documents. My printer doesn't support printing on both sides though, so I do it manually. If you pay attention to how your printer pulls the sheets through, you can usually reinsert the sheet so that the next page will be printed on the back side. This method requires some experimentation, and it also requires printing one page at a time and then re-inserting it into the printer (which can be a little tedious), but it cuts the amount of paper you use in half. Please be aware though that some printers don't like having paper run through them more than once. Be careful when you're trying this method out as you could end up with a nasty paper jam.
Don't forget to look around some more in the pages of the Printer configuration dialog box. You never know what useful things you'll find. Also, if you get a chance to upgrade to the Hardy (8.04) version of Ubuntu/Xubuntu I think you'll be pleasantly surprised with the printer support. 8.04 does a really nice job of autodetecting, autoinstalling, and autoconfiguring printers. Not that earlier versions don't do a good job, but 8.04 is even better.
Conclusion
We'll that's a quick rundown on a very broad topic. I hope that I've given you a good place to start your own exploration into the world of desktop publishing in Xubuntu. Let us know in the comments section what you find and what you think. Your feedback is always important to us.
Enjoy!
Further Reading
1. Scribus
2. Inkscape
3. Gimp
4. Linux Journal Magazine - Oct 2007 - Pages 16,17 - "A Ticket out of Poverty"
5. Linux Pro Magazine - September 2007 - Pages 92,93 - "Hai Ti! Comics"
6. Five Minutes To Midnight
7. Open Lab
8. Our Digital Imaging Post
9. Switching From Publisher To Scribus
10. Brian Kent's AEnigma Font Site
11. CrunchBang
12. Open ClipArt
Created:06-03-08
Revised:06-07-08


7 comments:
Wow..I always wonder how to view/edit PDF in Linux, which made me stuck with Windows. Thanks for the info, very informative.
For fonts, why not use SVG fonts?
More on SVG via svg.startpagina.nl
Thanks belasungkawa, I'm really glad that you got some good out of the post.
Several programs (other than OpenOffice, Scribus, and Inkscape) have options for printing to PDF. They usually reside under the "File > Save As..." menu, or under some sort of "File > Export" menu, so I would look around for that option whenever you try out a new program.
For the other programs that don't export to PDF though, there are options. The easiest one when using Xubuntu is to add another printer through the print settings panel (Applications > Settings > Printing) by clicking the "New Printer" button. The "New Printer" dialog will come up and one of the options under the "Devices" list on the left hand side should be "Print into PDF File". Click that entry, click the "Forward" button, and then click the "Forward" button again on the next screen to select the "Generic" PPD. If you have trouble, you can try a different driver, but the generic should be fine. The next screen should have "PDF file generator" selected in the left hand pane, and if it is, just hit the "Forward" button. The last screen allows you to give the PDF printer a name (I used the default) and a description. Fill these in however you want (the "Location" field should probably be the host name of your computer to avoid confusion), and click the "Apply" button. You should now see the PDF printer that you created in the list of printers in the left hand pane of the "Printer configuration" dialog. You can close the dialog, open a program like OpenOffice Writer (even though it will already export PDFs we'll just test it), type in some text, and use "File > Print" to print the document to your new PDF printer. I usually save the document once (to get a name attached to it) and then print it. The document should end up in a PDF folder inside your home folder (~/PDF). This is not a sure-fire method since there are a few programs like Mousepad that have trouble printing to PDF (although Boot and I suspect that it's actually Xfprint4 that's the problem), but it might be a real help to you if you ever need it.
This next one is unrelated to PDFs, but it's a neat trick anyway. If you're using OpenOffice Impress (presentation software), you can export your presentation to a Flash movie (.swf) by going to "File > Export..." and selecting the swf format in the "File format:" pull-down. You can do a lot of things with the Flash format, so it's really handy that OpenOffice Impress includes that feature.
If you have trouble with what I've described above, please let us know. We'll be happy to help.
Hi stelt,
Was there a specific SVG fonts package for Linux that you had in mind, or were you talking about Linux SVG fonts in general?
Very complete and interesting post. Could you add something under "Printing" for people like me who have installed Xubuntu on a machine in a home network, and would like to print to a printer shared by a Windows box. I have been trying for days to find out how to make this work. I installed Xubuntu 8.04 (I think) with default packages, and later added "samba" which I thought was why I couldn't see my windows shares, but still can't see them. FWIW, my Windows machines are in a workgroup called MONTREAL. Maybe you could alternately reference a good article on networking with Windows machines in your "Printing" section? Thanks muchly.
Hi Jaques,
Are you not seeing any shares, including file shares, or do you just not see printer shares? What model printer are you trying to print to?
There are several good articles on Samba configuration. There's a good general one at https://help.ubuntu.com/community/SettingUpSamba which mentions 2 GUI configuration tools - Swat and kdenetwork-filesharing. You might take a look at those utilities to see if they have the settings you need. There's also some information at http://ubuntuforums.org/showthread.php?t=347730 about printing to Windows printers without messing with the Linux drivers for them. I'm not sure if either of those will help you, but it might give you a start.
I haven't been able to test the procedures from either of those links yet, so proceed with caution. I wanted to try to get you something to hopefully keep you moving. I'll work on an update to this post on how to print to a Windows shared printer in the meantime. Hopefully I'll have it up soon.
Let me know if those links bring up any other questions.
JeremyW
Apparently Ubu pulled a Microsoft and make a number of UI changes (in 9,04). Great information and, with a little hunting through the 9.04 drop downs, most everything is located. Absolutely worth a bookmark! BTW, pont of interest, only the font NAMES are copyrighted; the fonts are not. (I'm an old hot type printer and early DTPer.)
Post a Comment